Joined: May 14, 2013 Posts: 201 Location: Between Crosslake and Emily, Minnesota
Posted: Mon Apr 04, 2016 9:54 am Post subject: M38A1 Spark Plug cable nuts
I have a couple plug cables that have buggered-up threads nuts on one end. Can I pull the wires out of the cables and touch up the nuts with a tap? Or, are wires not supposed to be pulled out?
Thanks _________________ Steve Stark - 1955 M38A1 MD #85388
Member - MVPA #35153
Member - Red Bull Historic Military Vehicle Association
Ok I know it has taken me a little bit to get back to this thread but here is the rebuild I did.
Warning this is not a true set, it will look like it but no fully waterproof.
Ok so as those of you have read I do not have an original set of waterproof plug wires, but what I do have is a shorter set of waterproof plug wires.
Step 1
Image
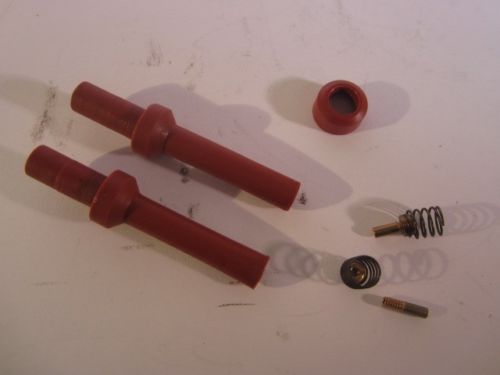
Above you see the normal threaded end and spring to lead connection. Start by unscrewing the contact spring, normal lefty loosey applies here. this can be difficult so try pushing the orange insulator back some and using needle nose pliers to hold the lead or just cut the lead off since we will use new wire.
Image
Step 2
Next slide the insulator off and inspect for damage. If no damage is visible and not dried out this can be reused if needed.
Image
Step 3
Remove the old wire. It is not required to unscrew both contact springs to remove the wire.
Image
Step 4 (This is only if you do not have a correct length set to use)
Next you need to unsolder the ends so that they can be reused on new shielding. This will need to be done by a large solder gun or with a little propane torch.
Image
Step 5
Cut wire to proper length. This can be done by matching it to the length of the old wires if you have an original set or by laying it out and measuring from the distributor to each spark plug.
Step 6
Now it is true that the original wire is 5mm but I was only able to find 7mm for sale so if you use 7mm you will need to strip the outside insulation has shown here.
Image
This will allow the original orange insulator to slip back over.
Step 7
From aircraft spruce I was able to get my plug wire and also tinned copper braid and ignition shielding braid, all as 10 ft continuous lengths for under 15 bucks. I had extra contact springs and leads laying around to use but these should also be able to find at an aircraft supplier.
Once you have stripped the black insulation back, if using 7mm wire, strip back the white inner insulation and crimp on a new lead.
Step 8
Now for those who still want a waterproof set you need to order some Duraflex Type C-3 conduit the remaining steps are the same but you will substitute the Duraflex conduit instead of the tinned copper braid.
You will need to feed the ignition shielding braid through the tinned copper braid, Take your time as this can be tricky.
Image
Step 9
For those who order the Duraflex conduit this step is easy for the ones without it is more difficult.
Now we need to cut our shielding braid and tinned braid to length. To do this you need to slide the wire inside the braids, this will expand the braids and thus make them slightly shorter in length, next mark where the end of each length of wire is and cut. Next slide the end we soldered off earlier over the wire and slide on the insulators to be able to trim the braid as needed.
Image
Once you have trimmed it down you need to solder the ends back on.
WARNING you must remove the wire before doing this so you do not melt it.
If you are not using the conduit you will need to have something hold the braids in place inside the ends. I made 3/4 inch long spacers from some brass round stock i had scrap of to fit over my wire and for the braids to slide over and fit snug inside the ends (Not pictured). As with the unsoldering you will need to use a large solder gun or a little propane torch.
Step 10
Now that the ends have been solder, you can now slide the wire back through and slide the insulators on. Once that is done screw on the contact springs and you are done.
Image
Image
If you have any questions just ask and I will do my best to answer them.
Joined: May 14, 2013 Posts: 201 Location: Between Crosslake and Emily, Minnesota
Posted: Tue Apr 05, 2016 8:04 am Post subject:
Thanks Wes for all the help. I am going to be looking closely at the cables this weekend. The jeep runs fine without screwing down the two buggered-up cable nuts (distributor end) but I would feel better if they were screwed down. Don't want the engine to start missing in a parade or other run.
FWIW, the cables on my A1 do not have the elbow on both ends. Other than that, I assume they are the same as the ones in your photos.
BTW, what are you doing up at 1:43AM? _________________ Steve Stark - 1955 M38A1 MD #85388
Member - MVPA #35153
Member - Red Bull Historic Military Vehicle Association
You cannot post new topics in this forum You cannot reply to topics in this forum You cannot edit your posts in this forum You cannot delete your posts in this forum You cannot vote in polls in this forum