Joined: May 30, 2014 Posts: 3444 Location: Texas Hill Country
Posted: Fri Jul 11, 2014 7:36 pm Post subject:
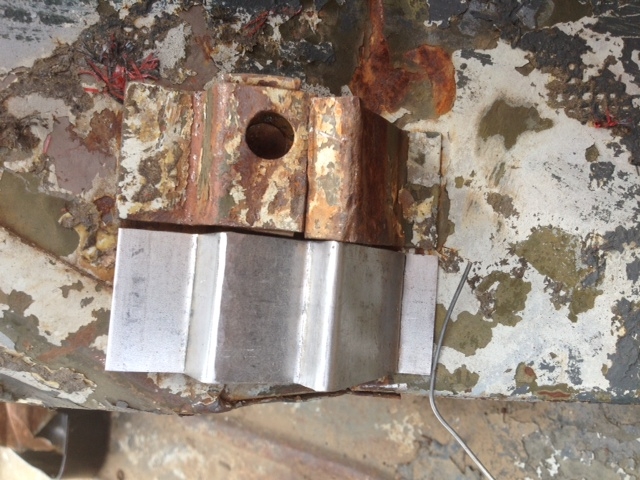
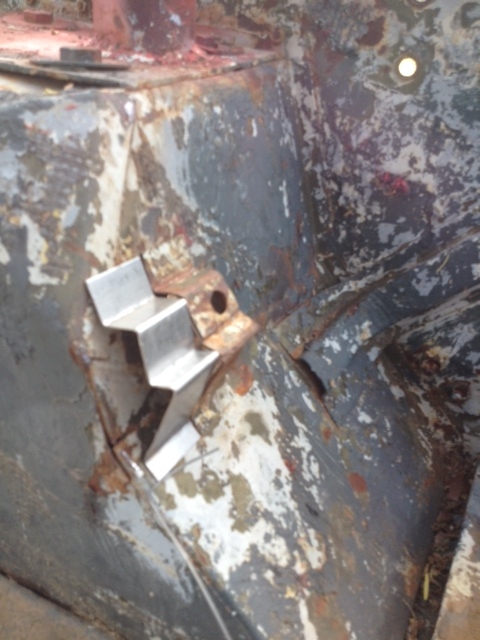
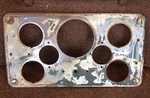
Took time today to transfer my dimensions for the tub seat brackets to some 1/16" sheet. Cut them out with the bandsaw and pounded and bent with hammer and vice. One day a brake would be nice.
Joined: May 30, 2014 Posts: 3444 Location: Texas Hill Country
Posted: Sun Aug 10, 2014 11:35 am Post subject:
As I mentioned in my first post, my 1950 M38 was poorly treated and converted to 12 volts. My priorities are to get it running, safely and reliably, work on cosmetics, and then we'll see.
A running vehicle goes along way to keep the enthusiasm up, as well as foster goodwill and buy in from the rest of the family.
The motor has had a new belt, new oil filter, fresh oil, plugs pulled and cleaned, and it runs smoothly. The brakes are out and the steering is fried, so any kind of test drive is out of the question.
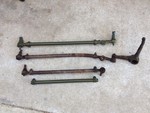
Next up the steering and brakes. Ordered tie rods and ends and a bell crank rebuild kit from Midwest Military. I managed to get the left rod off Friday, and spent most of the morning yesterday trying to remove the right rod and bell crank. Finally got them off still attached to one another. In the meantime I cleaned, primed and painted the replacement rods and ends.
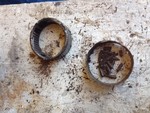
This morning I used a 4-1/2" angle grinder with cut off and cut through the bearing end on the tie rod that I could not get off. Once it was off I managed to pop out the end using a couple of pieces of steel and my vise. Then tap out the baring races, and clean up.
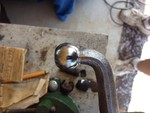
The ball was not in bad shape but did have a little uneven wear. I dressed it with a file, emery cloth, 150 grit paper, a couple of those foam paint sanding pads with different grits, and finished off with a fine wire wheel.
Joined: May 30, 2014 Posts: 3444 Location: Texas Hill Country
Posted: Mon Aug 11, 2014 4:10 pm Post subject:
Pulled the drag link today. Stripped, cleaned, primed and painted the rod.
Called John and ordered a parts kit. The stuff doesn't look too bad, but since I'm here....
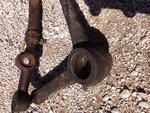
Once I had the drag link off I grabbed the ball end of the steering box shaft. Pitman arm? About 1/2" of play at the ball end. At the very least the bearings or sleeves are shot. If I'm lucky.
joy.
Eyed the brake lines while I was down there. Everything is rusty, the boot is tattered and hanging off the master cylinder and what I can see that is exposed is rusty. Thinking I may as well order a new or rebuilt. Cleaning and or stripping that thing may be a total waste of time.
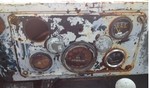
Mentioned on another thread I was working the steering wheel over. An original Sheller, in poor shape. The plastic is cracked in several places, some over 1/4" deep, finish is dry, cracked and peeling where it is there.
I started with a wire brush knocking the loose stuff off, then some rough sandpaper, and cleaned the cracks as best as possible. Filling the cracks with JB Weld in steps due to the depth.
More JB Weld, sanding in between coats. You and still see a couple of pretty substantial cracks, but the overall wheel center is coming back. Also have done some light filling and sanding on the arms and outer wheel.
Took a photo of how these come apart so they go back together correctly.
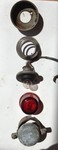
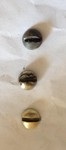
And this is one of those armchair projects that along with everything else needs to be done, but can be done inside with NCIS on the tv, when it is 100 degrees. I cleaned the light screws, which are brass by the way, filed the heads where the slots were damaged, and then finish sanded with a foam sanding pad.
The middle one looked pretty bad initially, but it cleaned up okay. There is not a lot riding on these screws, and if there is enough slot to turn the screw to get it tight, which there was, it should work fine.
Joined: May 30, 2014 Posts: 3444 Location: Texas Hill Country
Posted: Mon Dec 15, 2014 7:16 pm Post subject:
Began the brake project by getting a replacement used tire for the spare. Tried to remove the right rear but had one lug nut that was really stuck. Hit it with Liquid Wrench and will try again tomorrow.
Tried the left rear with again, one really stuck lug nut.
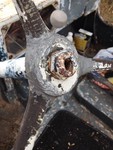
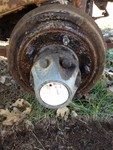
Switched to the right front. Lugs and wheel came right off. Oh, boy, not supposed to be grease here....
Surprisingly (well maybe not depending on what comes later) the three drum screws came right out. Rotated the cams and the drum still did not want to come off. Worked it off a little at a time with a screwdriver between the drum and hub, being careful not to apply much pressure.
Looks like I'll be pulling everything labeled brake and tying this mess back up, do the same on the left side and plugging off the front brake steel line port on the master and seeing what the rears look like. And I was right about replacing everything. The steel S-line was welded to the flexible hose fitting. I'll have to cut the steel line to the tee to get everything off.
Again, just trying to be able to stop it when I get it up the driveway to the shop.
In the meantime, I'll be reading and rereading Moses' treatise on rebuilding knuckle joints. With all of the grease in the brakes I am pretty sure the knuckle is dry. I bet I pulled at least a pint of grease out of that area. Certainly the seal is nonexistent.
As the saying goes, sometimes chicken, and sometimes feathers.
Joined: May 30, 2014 Posts: 3444 Location: Texas Hill Country
Posted: Tue Dec 16, 2014 3:22 pm Post subject:
Purchased a new wrench for the wheel nuts. They were so worn the oversized one that came with the jeep would no longer turn them. Had to file a couple flat again because of the "swarf?" that the wrong size wrench had produced. Got the right rear loose and off. Tried that stuck nut on the left rear and so far no go. Another spray of Liquid Wrench and I'll try again.
Managed to get the right rear drum off. One of the three screws was a real pain, but they all came out. the rears appear to be more dry and no grease, but there is some surface rust instead. The lower adjusters really tried my patience but all brake parts on the right rear are now off and headed for cleaner.
Drum has a little ridge but the shoe area is pretty clean and bright, except for one spot that looks like it sat 90 degrees straight down for a while and water accumulated. The cylinder seals were completely shot, and again the line was dry when disconnected. Shoes were in decent shape except one had come loose at the top.
Bottom line is I have now managed to pull all brake parts off both right front and rear. The front still needs to be degreased and cleaned up, then they'll be ready for reattachment and assembly.
Joined: May 30, 2014 Posts: 3444 Location: Texas Hill Country
Posted: Wed Jan 07, 2015 9:30 am Post subject: brakes
Thought I'd copy and edit some of the post on brake lube here on the project page.
As I mentioned on the other page, when I was removing the parts I bagged and tagged each lot of parts, i.e., left rear, right rear, etc. Then when I had then off on another day not good enough to work in the weather I cleaned and/or soaked in mineral spirits if necessary, wire brushed, re-threaded, hand-filed, sanded and buffed the parts I was going to reuse. This along with cleaning up the backing plates, etc., really helped in reassembly as the parts and where they were going were clean and everything went together easily.
Here is the post from the TK page:
"I bought a ceramic lube in press tubes at NAPA. Kind of
pricey, but for what you are using it for, and how often you 'll
be back for re-application probably a bargain.
I had taken the time to clean up all parts including the drums
and backing plates, wire brushing the pins and cam bolts and
running dies over them. Also filed any burrs and high spots
and non-flat spots on the cam bolts. I skimmed the cams but found
later that I needed to lightly sand the interior and clean up the
pins. Those brass buddies need to slide on real easy or they will
make trouble for you when assembling the pads and brackets.
If they are tight the assembly won't flange up because they won't
slip over the pin.
I am grateful for all of the information provided by manuals
as well as the help from the board. That and cleaning up and preparing
all of the reused parts enabled me to put everything back together
on both rear wheels in less than an hour.
I still need to adjust the shoes, install new lines, master cylinder
bleed and adjust linkage. Figure one more decent day.
Then I should have working brakes on the rear."
Filing: In filing, one doesn't want to remove any base material. You are looking for burrs and little pieces of metal pushed off a square surface into somewhere that will interfere with fit. An easy example is lug nuts rounded off by Bubba using whatever tool he had at hand. The lug nuts in many cases look pretty bad, but a little judicious use of a file lightly cleaning up the flat surfaces will make it useable. Again, one doesn't want to take any of the flats off but remove the metal shoved onto the flats off the edges.
Anyway, expecting some really cold and nasty weather the next few days so work in the outdoor shop has come to and end for the time being.
Joined: May 30, 2014 Posts: 3444 Location: Texas Hill Country
Posted: Fri Jan 09, 2015 10:46 am Post subject:
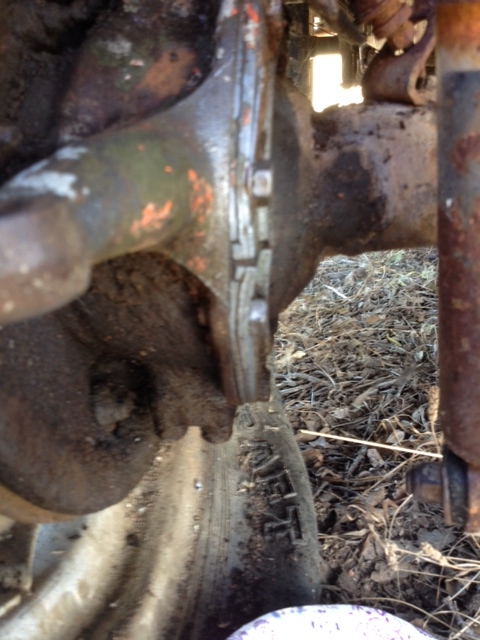
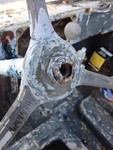
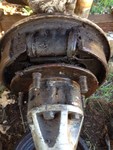
In crawling around under the vehicle working on the emergency and service brakes I was looking at the rear differential. It looks like there are casting defects or voids on either side of the "pumpkin?". At first I thought they were bad weld repairs or something, as they look a bit like bad plug welds.
Joined: May 30, 2014 Posts: 3444 Location: Texas Hill Country
Posted: Sun Jan 18, 2015 2:30 pm Post subject: Brakes, axles, and springs, oh My!
I've been working on the brakes. I now have everything from the dash handle to the actuating arm on the drum replaced for the E-brake. The cable is a tad long, but I still need to pull the drum and am not ready to drain the tranny and transfer case yet.
In any case, the thing will stall the vehicle.
Moving to the service brakes. I have a new master cylinder, banjo fitting, steel and flexible lines, wheel cylinders, and shoes installed to the rear. I put a brass pipe plug in the front master hole. I bench bled the master. I can see where that would really help. Also installed a new Civvy brake switch to plug the hole. I adjusted the pedal, pumped up the brakes, then with the help of SWMBO, bled them and topped the master.
Did a test run because in the process of moving it to a spot in the yard I could jack it up, she wanted a ride. The brakes will stall the vehicle, but of course the shoes need to be adjusted. Put it into the spot and jacked it up. While removing the right rear wheel I found I could turn it with the left on the ground. Huh. Limited slip diff?
Removed the right rear and adjusted the shoes to .003/.008+/-. I could not get the front bottom snugged up completely but I'll test drive it and move everything around, and go back and readjust. Got the left rear adjusted and put everything back together.
That's when I took a closer look at that rear end. No tags visible anywhere. No valves on the axle ends, just teensy weep holes for the excess grease. I found two casting numbers, both on the right rear of the differential casting. Top is 18429, and the bottom is what looks like a diamond with a C in it, and 41 next to it. Below is the number 2.
I know little about M38's (I am trying). I know nothing about MB's and GPW's. I don't think Willys made any Civvy jeeps until after the war, so it seems I have a WWII rear axle under this thing.
Is there anything specific that I need to know if that is the case? Do I need to check the front? Are the gear ratios compatible?
Oh, yeah, springs. After rebuilding all of my steering stuff back to the Pittman arm (it and the box are next), I find that the right tie rod is hitting the top of the front spring clip. I did not notice if the takeoff did it, but it was in such poor shape who could tell. Maybe the springs are so weak they allowing that much deflection?
The WWII MB & GPW rear axles are full floaters Dana 23-2 and 4.88:1.
The black M38 in your album has a postwar semi-floater Dana 41 which is correct for both the civvy cj's and your M38 and they were normally 5.38:1.
The ratio is on the pumpkin housing. A posi won't allow one wheel to turn when the other is on the ground. _________________ Wes K
45 MB, 51 M38, 54 M37, 66 M101A1, 60 CJ5, 76 DJ5D, 47Bantam T3-C & 5? M100
You cannot post new topics in this forum You cannot reply to topics in this forum You cannot edit your posts in this forum You cannot delete your posts in this forum You cannot vote in polls in this forum