| View previous topic :: View next topic |
| Author |
Message |
32sbct
Member

Joined: May 09, 2011
Posts: 166
|
 Posted: Tue Sep 06, 2016 8:25 pm Post subject: Need some help - new body tub issues Posted: Tue Sep 06, 2016 8:25 pm Post subject: Need some help - new body tub issues |
 |
|
My Jeep came with no tub but I did have the original hood, fenders, grill, and windshield. When I talked to the different vendors none could say for sure whether a new tub would mate up well with original parts. Based on that, I bought a full body kit so that all the parts would work well together. Plus, my original parts had plenty of extra holes, dents and dings typical of a well used jeep. I have decent mechanical skills but I can't do metal fabrication or weld.
I put the tub on this past weekend and it fit really well based on the location of the steering column and all the body mounts. I loosely installed the four bolts that go across the rear bumper. I wanted to get the fenders and grill on before drilling the other holes. So far so good.
Yesterday and today I tried attaching the fenders and the grill. Not so good. I'm having the same problem on both sides. There is not enough room to attach the fenders without lifting up the front of the tub to get enough clearance at the very top where the body tub comes to a point (see the area in the first picture). When I do get it bolted up the tub is raised off the body mount rubber shims by a full half an inch on the passenger side. (see second picture).
The repo front grill is a really poor piece. There are all kinds of missing details. So I put the original grill on and tried the original fenders. That fixed the lifting issue on the passenger side but the tub got pushed back about a quarter inch over the rear bumper on that side for the fender to fit.
I still have about a 1/4 inch gap on the drivers side between the tub and the shims using with the original fender.
So what are my options? The fender can't move forward because the fender brace is in a fixed position. The grill bolts up with no issues. I think if I elongated the mounting holes in the rear bumper and moved the tub back a little that may gain me some space without throwing the other mounting holes off too much.
Tomorrow I'm going top be putting the front floor panels back in to see how the pedals line up. Any suggestions would be much appreciated.
Thanks Marty


 |
|
| Back to top |
|
 |
wesk
Site Administrator


Joined: Apr 04, 2005
Posts: 16257
Location: Wisconsin
|
| Posted: Tue Sep 06, 2016 10:20 pm Post subject: |
|
|
Folks never like getting a question answered with a question but I see no other way!
This is the number ONE task.
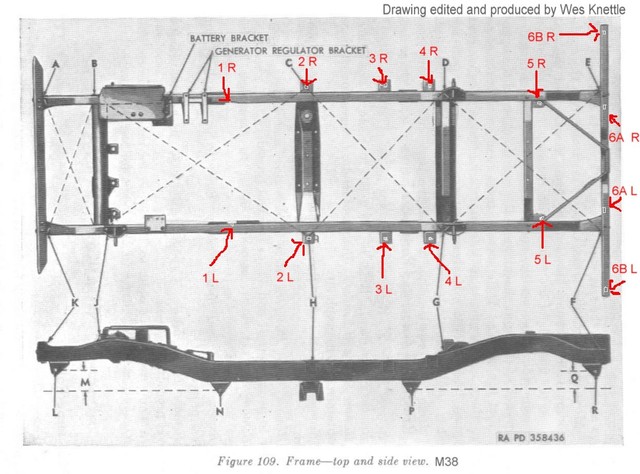
Did you check the frame for square and correct heights. The dimensions are in your TM 9-1804B Section 13 frame Section III Inspection on Page 175
Then tub must match pedal holes to pedals. Then it is from this point that you bend things and oblong things to make them fit. Try not to get bolts to tight until you have all parts generally in alignment. Before you commit you still must install the engine make sure the starter arm aligns correctly with the kick pedal.
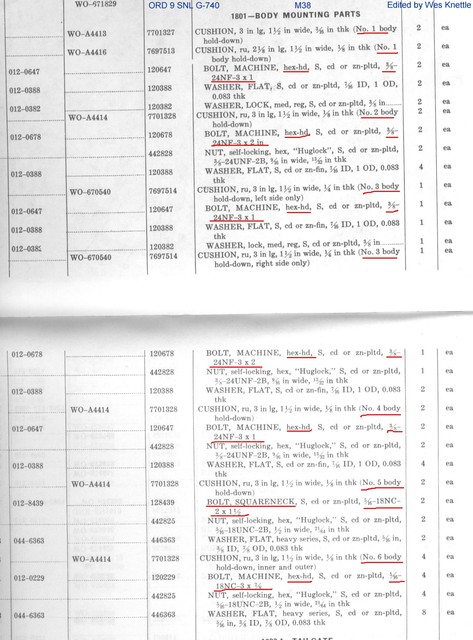
In the end the required height of your tub mount cushions will rarely match the thicknesses spelled out in the parts manual.
_________________
Wes K
45 MB, 51 M38, 54 M37, 66 M101A1, 60 CJ5, 76 DJ5D, 47Bantam T3-C & 5? M100
Mjeeps photo album: http://www.willysmjeeps.com/v2/modules.php?set_albumName=Wes-Knettle&op=modload&name=gallery&file=index&include=view_album.php |
|
| Back to top |
|
|
Hawkshadow
Member

Joined: Oct 10, 2012
Posts: 310
Location: Toronto, Ontario, Canada
|
| Posted: Tue Sep 06, 2016 11:41 pm Post subject: |
|
|
Is it an MD Juan tub?
_________________
Jordan
M38 CDN
52-30718 |
|
| Back to top |
|
|
skyjeep50
Member
Joined: Feb 20, 2007
Posts: 606
Location: Illinois
|
| Posted: Wed Sep 07, 2016 7:18 am Post subject: |
|
|
Things may not be lining up quite right now but that is a really pretty jeep at this stage - good luck with your project!
_________________
1951 M38 |
|
| Back to top |
|
|
4x4M38
Member
Joined: May 30, 2014
Posts: 3447
Location: Texas Hill Country
|
| Posted: Wed Sep 07, 2016 7:53 am Post subject: |
|
|
Be aware that several of us have found the top rear portion of the fender where it hits the cowl point you are having trouble with has a dent on both fenders. Some discussion as to potential causes but a common thread is an airdrop.
Theoretically this could deflect the frame enough to cause the dents, and if past the plasticity stage of the frame channels put a slight bend in them.
As Wes suggested check everything for square but be sure and put a long
straightedge on the frame rails and make sure they are not bent slightly.
Take care,
_________________
Brian
1950 M38
MC11481
http://www.willysmjeeps.com/v2/modules.php?set_albumName=album372&op=modload&name=gallery&file=index&include=view_album.php |
|
| Back to top |
|
|
rgmutchler
Member
Joined: Sep 28, 2008
Posts: 345
Location: Caldwell, Texas
|
| Posted: Wed Sep 07, 2016 3:17 pm Post subject: |
|
|
I see from the pictures that you have your drive chain in. How does it line up under the hood for engine clearance, radiator etc. The body mount info that Wes included for you is good because some of the mounts take more rubber spacers than others and the front side mounts have a pretty good gap that needs to be filled on top of the frame. For the spacers I went to Tractor Supply and bought some bailer rubber strap that allowed me to cut enough for several body installations. Mud flap material works good also.
From other descriptions I've seen about installing the MD Juan bodies many have had to redrill some holes for pedals etc but with a little tweaking them seem to have fit in the long term.
Good luck, it looks really good in the picture.
_________________
R G Mutchler
M274A5
M-38 MC13312
http://willysmjeeps.com/v2/modules.php?set_albumName=rgmutchler&op=modload&name=gallery&file=index&include=view_album.php |
|
| Back to top |
|
|
leecarr
Member
Joined: Jul 15, 2013
Posts: 54
Location: Rochester, Massachusetts
|
| Posted: Wed Sep 07, 2016 4:25 pm Post subject: |
|
|
| If you don't mind me asking, what vender did purchase from and are you happy with them other wise. Looking in to getting one myself. |
|
| Back to top |
|
|
32sbct
Member
Joined: May 09, 2011
Posts: 166
|
| Posted: Wed Sep 07, 2016 4:33 pm Post subject: |
|
|
To answer a few questions.
Yes this is an MD Juan body kit. It was purchased locally from D & L Bensinger to avoid shipping costs. They were easy to deal with. I think overall the kit is well made except for the radiator guard/grill. It was missing quite a bit. For example, there were no holes drilled for the screws that go around each headlight nor the welded on plates that the screws thread into. There were many other missing details. I'm sure there are other issues with the overall kit compared to an original but I don't have an original tub to compare it to. That being said, if there were no reproduction body kits I would never have been able to bring this one back from the grave.
The engine, chassis and drivetrain have been redone and are in the vehicle. So far, the hood seems to line up very nicely but I don't have it bolted on yet and the radiator is not yet installed. I also need to replace the padding that goes along the top of the radiator.
I was not able to work on the jeep today. I'll start out tomorrow measuring the frame and height per the diagram Wes provided. I'll let you know how I make out.
Marty |
|
| Back to top |
|
|
32sbct
Member
Joined: May 09, 2011
Posts: 166
|
| Posted: Thu Sep 08, 2016 4:31 pm Post subject: |
|
|
I tried measuring the frame today. It is pretty much impossible with the body on and everything else installed (motor, trans, exhaust, etc.).
I did fit the floor pieces. The top piece that was part of the kit fit well and the clutch and brake pedal line up pretty well (see first photo below). The transmission cover was a mess. The opening for the transmission was too small by about half an inch. The shift lever cover did not fit at all.
I still had the old transmission cover and shift lever cover. The transmission cover fit fine but the shift lever cover and the transmission are hitting towards the front (see second picture). I'll have to modify it to get some clearance there.
Having spent a lot of time moving the body, fenders and grill trying to get the best fit, I think I'm finally set. In reality, there is not a lot you can do. The fender brace attaches to the frame which is a fixed point that can't move. The grill pivots on the grill hinge bracket so there is a little movement left to right but it also has to match up to the fenders. For the tub itself, the main points are the steering column which has to fit where the bracket bolts and the holes for the pedals. What you come to realize is that when you fix one issue by moving it around, you usually create or worsen another problem.

 |
|
| Back to top |
|
|
4x4M38
Member
Joined: May 30, 2014
Posts: 3447
Location: Texas Hill Country
|
|
| Back to top |
|
|
Hawkshadow
Member
Joined: Oct 10, 2012
Posts: 310
Location: Toronto, Ontario, Canada
|
| Posted: Thu Sep 08, 2016 8:18 pm Post subject: |
|
|
You've pretty well stumbled upon the answer on your own. You make the best fit possible and go from there. On my new MD tub my best fit still had me adjusting peddle holes, moving one of the fender mounts to the flange rather than the centre of the mount and all kinds of other work.
That new tub will drive you absolutely crazy at times and frustrate you with hours of work. But it's like you said - without it you wouldn't be able to save that jeep. At the end of the day only you will see some of those imperfections, but I guarantee nobody will be able to see them as you're finally driving your jeep down the road.
Here are a couple examples of what you're in for:
Adjusting holes that don't line up. This will be common. Get a dremel with a carbide bit for the holes to be adjusted and a step-bit set for your drill for the new ones.
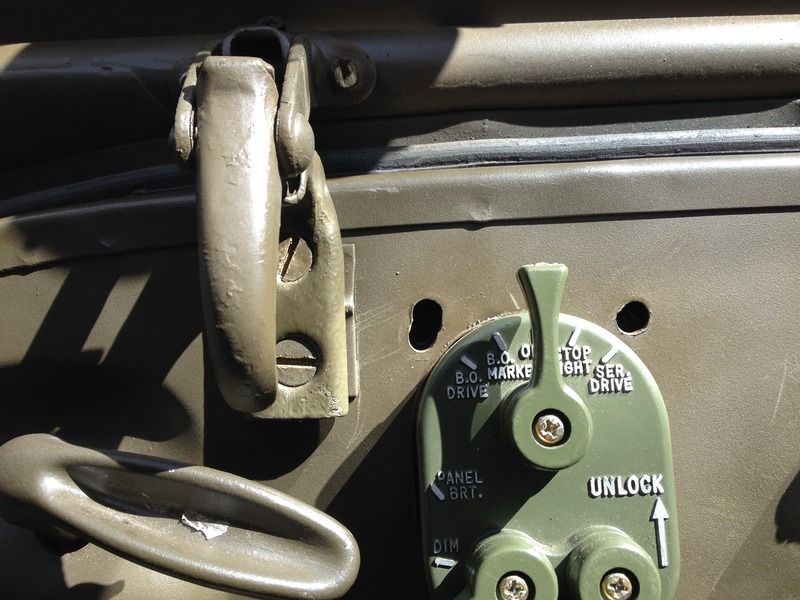
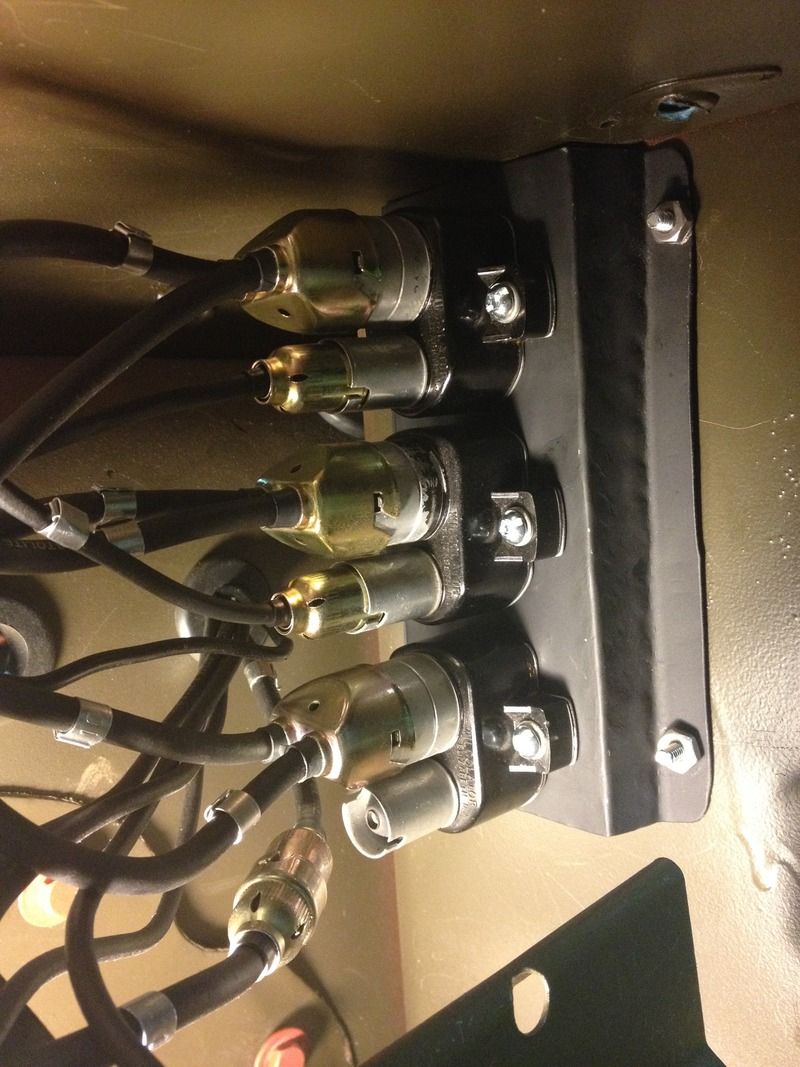
Creating items like the circuit breaker mount
Don't worry about opening up the floor pan bolt holes. It's very common and will save you a lot of time and energy!
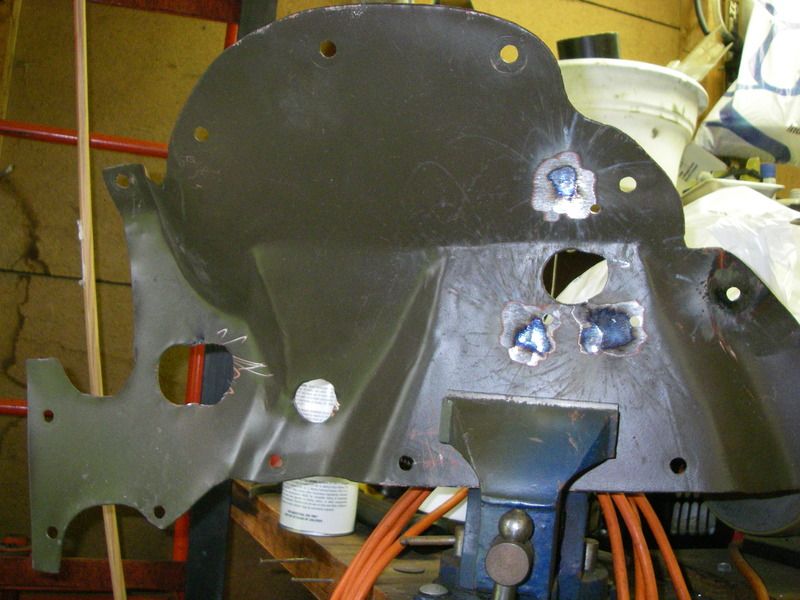
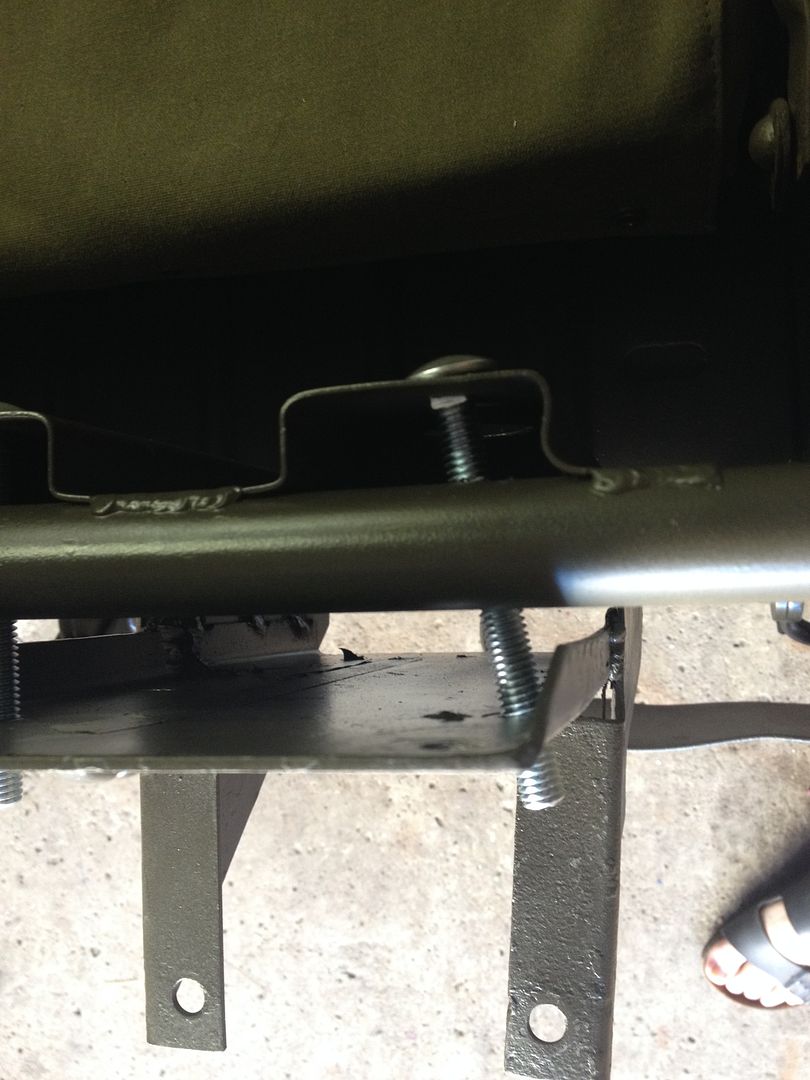
Then there's times when making the pieces line up correctly gives you something like this. Don't question it. Just accept it and move on.
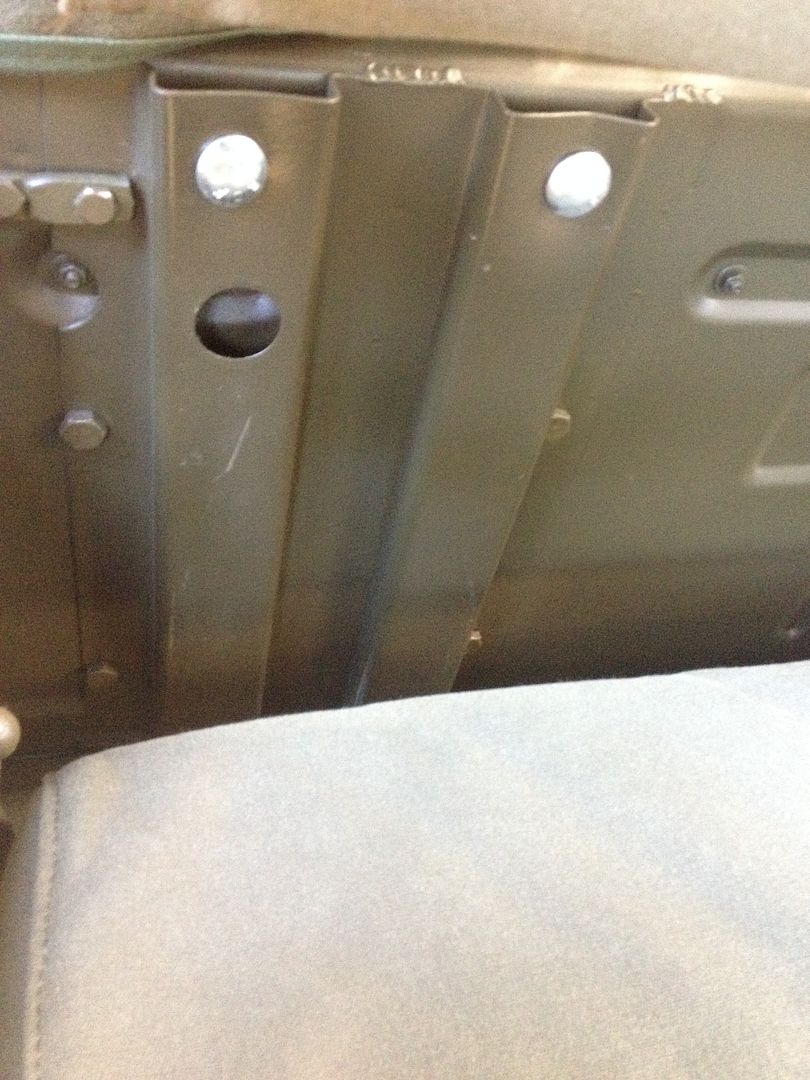
The tailgate comes undrilled on the outside. Going straight through the square hole in the reinforcement doesn't line up and leaves the bolt hitting the tire carrier if you drill through the bracket. This is the actual correct fit between my original carrier and the repro tailgate.
_________________
Jordan
M38 CDN
52-30718 |
|
| Back to top |
|
|
4x4M38
Member
Joined: May 30, 2014
Posts: 3447
Location: Texas Hill Country
|
|
| Back to top |
|
|
4x4M38
Member
Joined: May 30, 2014
Posts: 3447
Location: Texas Hill Country
|
|
| Back to top |
|
|
Hawkshadow
Member
Joined: Oct 10, 2012
Posts: 310
Location: Toronto, Ontario, Canada
|
| Posted: Fri Sep 09, 2016 7:59 am Post subject: |
|
|
The wiring for the breakers came with the news harness from Vintage Wiring of Maine. The schematic booklet that came with the kit had a page clearly illustrating the breaker daisy chain.
The tailgate came with re-enforcements already welded in to place on both sides. The top lip did not have the cut-away sections as on the original. I'll take another picture showing how the mounting lined up on the inside of the reinforcements.
_________________
Jordan
M38 CDN
52-30718 |
|
| Back to top |
|
|
Hawkshadow
Member
Joined: Oct 10, 2012
Posts: 310
Location: Toronto, Ontario, Canada
|
| Posted: Fri Sep 09, 2016 11:59 am Post subject: |
|
|
Here's a picture of the inside.
_________________
Jordan
M38 CDN
52-30718 |
|
| Back to top |
|
|
|

