I'll be referencing the TM a greater detail more on the build. I didn't find the Ross manual in the downloads section of this site. Did I miss it?
For the readers, Wes is absolutely correct. No matter what your experience or skill level, very few are the times when the manuals don't provide at least some kind of help and these sites and their membership are there to fill in the information gaps. It's a great one-two punch.
My interest in posting here is to help the folks who have one of these trucks or who are contemplating trying their hand at one. Now that we are on the topic of how-tos and can-dos there is one other thing that goes largely unspoken.
When you acquire one of these vehicles, especially one as tired as my son's truck, you are going to have to spend a few dollars here and there. For our truck to be safe, we had to invest in that in the form of labor and often, parts - and that's just the simple truth of it. Keep that in mind when you are gazing longingly at the old truck with the for sale sign and contemplating making it a part of your family.
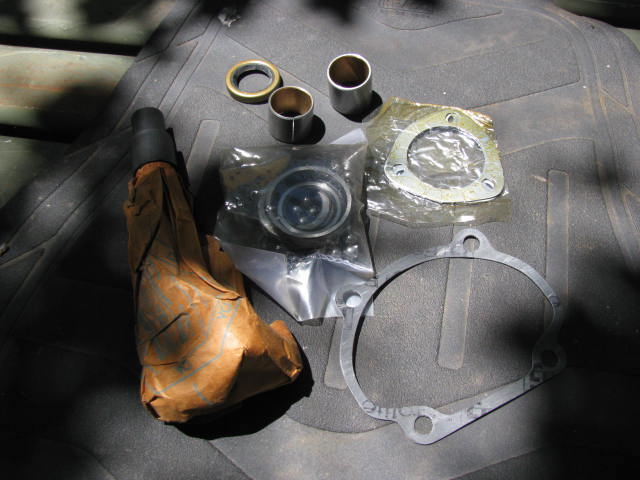
Ok, here's a little update. Some parts are in and here's the rebuild kit.
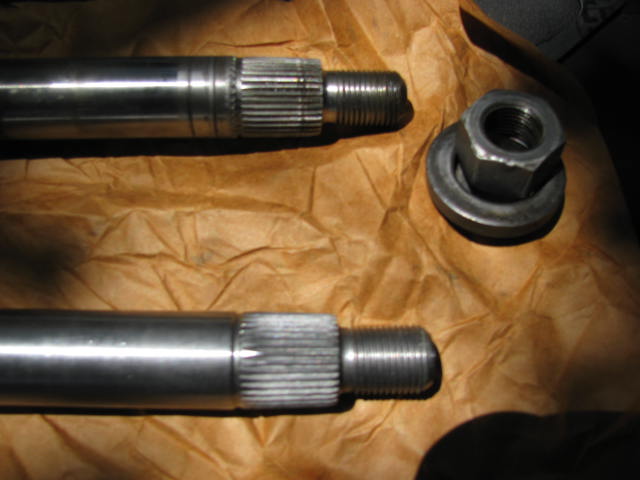
As you can see here, the splines on that new shaft are FAR healthier than the old one, whose splines are high in the middle and low on either end - part of what is causing the wobble on the pitman arm. In that condition, there is just no way to get it tight enough to seat well. This is chiefly what got me into the rebuild of this box.
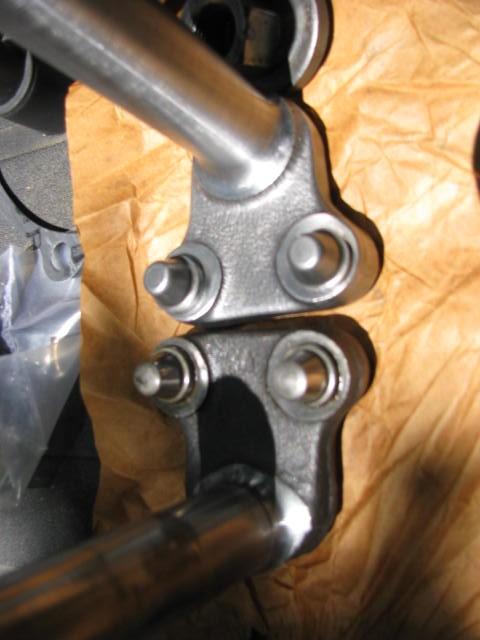
I know. I know. I just can't get good focus for the tight shots but if you look, the wear on the old studs is pretty obvious. The wear wasn't a deal-breaker but with the splines all messed up, everything goes bye-bye.
As an aside, I read where one fellow claims he had these studs pressed out, rotated 180 degrees and pressed back in again. Wow. Crazy?...or dedicated to the cause? You decide.
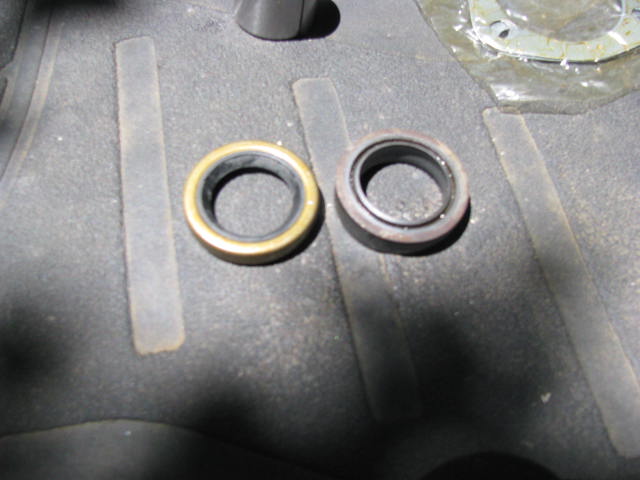
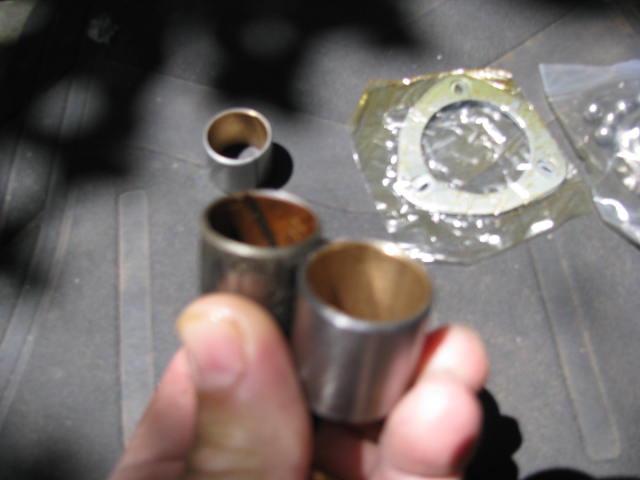
The new seal is more like what we're used to seeing, however, it has one point of contact against the shaft, whereas the older one has two. I don't know what is "right" but this is nothing like what I pulled out of the steering gear box.
Once again, my camera fails me. What I was trying to show you was the difference in the lubrication groove. In the old bearing/bushing, it has a helical cut with very acute edges and the groove doesn't go all the way across but terminates before it reaches the end, perhaps because that end is where the outer seal is. In the new one, the lubrication groove is very wide, runs the whole length of the bearing and has tapered edges. Oddly, that new groove doesn't look quite as deep to me but it could be the coloration.
And so, having my lovely new parts I went right to the business of carefully pressing the new shaft bushings in. Got those done with no dramas and then, the moment of truth. NOPE. The shaft won't go in.
Well, we knew these were going to have to be reamed but can one get away with reaming these by hand? The specs say we're looking to achieve between .0005" and .0025". Let's just say that's a pretty close fit. Now, I'm good, but I'm not THAT good and so, having a rather stellar machinist in town who takes on extra work at home when he's not machinist-ing for regular paycheck, I delivered it to him to sort that out for me. When it's all done, I'll share with you what it cost and let YOU decide whether or not it's worth it.
Now, if I were a hundred miles from the nearest machinist, I'd go for it but here's the rub. FIRST you have to know exactly how big your shaft is and only then can you procure a reamer, preferably one that's adjustable. SECOND, there is the matter of ensuring that your process reams out both bushings perfectly in line with one another. So, in my mind, this is a matter best left to the experts and machinists can only exist if they get paid once in a while.
Support your local machinist!
My guy's initial inspection revealed that the bushings were "egg-shaped" (measured in very, very tiny amounts, like, a decimal point and lots and lots of zeros) but such are the intricacies of fine machine work. What is small to us is huge to them and such matters are best left to the professionals....bless 'em all.
No, I didn't chicken out. I used good judgement, and while I am at the coast, basking in the sun and drinking those drinks with the little umbrellas in 'em, some other guy can do some work on my truck.
Last edited by m3a1 on Sun May 06, 2018 4:45 pm; edited 1 time in total
On a slightly different topic (eye protection) I finally caved in and had a piece of metal removed from my eye yesterday. I've always been rather indifferent to pain which is something that drove my parents (and my wife) kind of crazy over the years but when I knew I'd be going to the coast for a few days with its constant wind, the thought of dealing with that was just too much to bear.
So, with a visit to my optometrist and $80 later I'm good to go. That's $80 I might have put into the Jeep.
When the incident occurred, YES, I was using eye-pro but what I didn't expect was the tiniest little piece of metal getting right past my glasses, probably at the bridge of the nose.
I've been through this before and have made a point of having lots of eye-pro around - enough to have one ready at every work station - and yet apparently not the right kind. So, live and learn. I'll be doubling down and getting some full face shields instead of glasses, especially for those places where I'm grinding metal.
Cheers,
TJ
Last edited by m3a1 on Sun May 06, 2018 4:46 pm; edited 1 time in total
Ok, we're back in business. Just a quick update and a formal request for a source for the PROPER lube for the steering gearbox. I know what NOT to use and I have had to politely tell many of my overly-helpful parts counter guys that what they're pushing isn't the right stuff. I even expected to find something at Tractor Supply and that was no dice!
I got back from a nice, restful visit to the coast and picked up my gearbox with it's freshly (and beautifully) honed bushings. Cost - $30. I was prepared to pay $40, so I tipped my machinist $10. "Grease for the skids..", as they say, and the peace of mind is worth every penny.
Everything is a snug, hand-in-glove fit, yet moves freely. I do not intend to reassemble it dry so things are on hold until I find some proper lube and a reliable source for it. Worm Gear oil seems to be the closest thing I've found thus far.
So, please. If you know what is correct, please share.
Correct can be a very dangerous word. Correct per the applicable pubs? Correct based on experience in the field? Correct iaw with the gospel iaw ???
The lube chart in the TM 9-8012 calls out GO of the appropriate seasonal grade checked every 1,000 miles.
The early 50's/60's civvy manuals state:
MIL-L-2105B checked every 1,000 miles which is GL4 in single grade 80 year round. GL4 works fine.
So does the antique ford differential gear oil in 600 weight.
The main thing is trying to get the oil of your choice to stay in the gear box and not have a very high sulphur content. _________________ Wes K
45 MB, 51 M38, 54 M37, 66 M101A1, 60 CJ5, 76 DJ5D, 47Bantam T3-C & 5? M100
Yesterday, I did my homework. I read about this till blood was squirting out of my eyes. This is certainly not my area of expertise. I am not hanging my hat on what is correct based on the TM, simply because we have lubricants available to us now that simply did not exist back then.
Of course, an important thing to keep in mind when selecting the "correct" lubricant is that this is not a high-speed gearbox and I can see how some fellows erroneously conclude that chassis grease might work since this is a low speed application. Among the many reasons why chassis grease does NOT work is that a "correct" steering gearbox lubricant must be able to efficiently follow the bits and pieces as they move around in the gearbox, leaving no voids. Thus, we are looking for a lubricant that is more oil-like than grease-like....something that is a bit like honey.
As has already been discussed at great length, grease will simply push out and not return to the areas requiring lubrication.) My advice to anyone who has introduced grease into their steering gearbox is that they take the time to remove it.
Also, the "correct" lubricant would benefit from having the same qualities over a broad range of temperatures. This has been achieved with many modern lubricants. So, arguably, with the "correct" modern lube, the need for changing gearbox lubricants for seasonal purposes can be eliminated from your bi-annual maintenance list. Of course another parameter is that the "correct" lubricant also be formulated in such a way that it not have an adverse effect upon the yellow metals present in the gearbox. These things were on my mind.
I started with the following. Found it interesting but it can be a bit misleading especially if you assume viscosity is all there is to it -
This next, very scholarly piece helped a lot, particularly this simple phrase which I used as a guide "Generally speaking, a high-quality worm drive lubricant will have low friction, high oxidation resistance, good anti-wear protection and high viscosity index." I don't pretend to understand all of the article but I think I got what I needed out of it -
I also revisited the topic on the CJ2A forum where a lot of opinions were shared. -
Then I went to youtube and saw HOW the tests (applicable to the product I'm presently considering) were performed. They also show what the resulting damages are. The first two tests take place at very high speeds -
And, through the power of the internet, I finally came upon this synthetic (!!!) the qualities of which I'm presently discussing with my buddy, who is an honest to God chemist and who worked at places like Red River refurbishing military stuff. The information provided on the technical data sheet of these products is really important and if you are serious about finding out about your lubricant, you absolutely must look at that.
Technical Data Sheet. What I'd like the reader to take away from this are the PROPERTIES of the product. Point of interest, in the product I'm presently examining, ISO 460 has a slightly higher viscosity than ISO 680, yet 680 is a bit better performer in the scar test (so, surprise surprise! - viscosity really ISN'T all there is to it, right?)
In my physical searching, I learned that what we generally would require for steering gearbox lube is really not to be found on the shelves of auto parts stores in any amount, chiefly because its popular use has been lost to antiquity. This doesn't mean it's not out there. It simply means that we may be looking in the wrong place, eh?
I learned that the term "Food Grade" is not to be automatically dismissed as something that is necessarily WRONG for those of us in the automotive world. In fact, the use of additives like sulfur and phosphorous is a huge no-no when it comes to the formulation of food grade lubricants (the FDA obviously frowns upon it), SO, finding a food-grade lubricant that we can use (one that is H1-rated) is VERY good indeed!
The key point of the following link was the general discussion of the H1 rating (An H1 rating has been achieved by the synthetic lubricant I'm considering) -
One of my main parameters is that the lube do its job (beyond the obvious lubrication performance issues) - that it will not be prone to leaking, that it will not be damaging yellow metals, that it will not be degrading over time.
Another thing high on my list is that the lube be readily available, not only for myself, but also for the NEXT guy who owns this truck. Procuring some mysterious lube from someplace that is never to be found again really doesn't help that guy.
And so, in the time it took me to write this, the decision has finally been made. Super Lube 54632 Synthetic Gear Oil ISO 680, 1 quart Bottle, Translucent, is the product I selected for use in my steering gearbox. It will be several days before it arrives but when it does, I'll share some photos.
Cheers,
TJ
Last edited by m3a1 on Thu May 10, 2018 10:40 am; edited 6 times in total
Nice disortation. I have been down all those roads many times oin the last 40-50 years. As you discovered new is not always a good choice since the purveyors of the new stuff never considered it's use in our antiques.
I found this comment:
Quote:
Super Lube 54632 Synthetic Gear Oil ISO 680, 1 quart Bottle, Translucent, is the product I selected for use in my steering gearbox.
A very well chosen set of words! And appropriately you left that other word "Correct" out. Good move!
Several more observations that may help other folks:
Chassis lube makes for very interesting steering behavior at Zero degrees F.
Don't loose site of the fact that GL4/MIL-L-2105B still works fine in these old Ross gear boxes.
Always remember "Opinions are like Poop Chutes! Everyone has one!" So make your choices personal based on study & not opinions. _________________ Wes K
45 MB, 51 M38, 54 M37, 66 M101A1, 60 CJ5, 76 DJ5D, 47Bantam T3-C & 5? M100
Exactly. My chemist friend put it very succinctly. "There are many lubrications that will do the job. Some better then others." Ergo, there are lots of other options out there for us.
All any of us can do is do our level best to make an informed decision and hope we're satisfied. My goal is, as always, to do work that will satisfy not only me, but the next owner as well. I am hoping that if somebody feels he has to open this gearbox in another 70 years, he will be pleasantly surprised.
Sorry. There has been a delay in posting, owing to my son having to spend some time in the hospital.
My lubricant came in and it's really interesting stuff. Viscosity-wise this flows more like thick maple syrup than honey...and just as sticky! As I mentioned, this product meets all the specifications I was looking for in a lubricant, so I'm a happy camper.
As you know, the reaming of the bearing/bushings for the output shaft was completed and we found them to be out of round when pressed into place. Reaming not only brought them into the correct tolerance, but also took down the high spots. Knowing what I know now, I might have gone to greater lengths to procure a set of NOS parts but with what I have, I'm sufficiently satisfied to forge ahead with the business at hand.
Now, finally having a moment away from the hospital, I decided to have a good hard look at the upper and lower bearings.
I was dissatisfied with the bearing cups that came in the kit. They are machined in such a way that the bearings have only two points of contact and I felt those surfaces were simply not machined to the same smooth, quality finish as the originals. The original bearing cups actually cradle the bearing surface across one quarter of its diameter and are machined to a much smoother finish , not to mention they are proper mates to the bearing cups on the steering shaft.
So, with the intent to reuse the original cups, I got a micrometer and checked the new bearings and found them to be just a tiny bit larger than what I pulled out (in the tens of thousandths) and so, elected to pop the old bearings out of their retaining ring and pop the new ones in. The most obvious benefit is going to be that final assembly is going to be far easier than trying to herd all those ball bearings into position and keep them there while everything is going back together. I also believe the life of my new bearings is going to be extended by having their working load spread across a larger surface.
As a small sidebar comment, you may have noticed that as yet, I've made no mention of the retaining clips for the bearing cups. Such clips serve to keep the steering gear shaft with it's attendant bearings, as well as their bearing cups assembled as a unit, speeding assembly and disassembly.
My gearbox did not have them which suggests to me that someone has been in there before. My gearbox got along fine without them and at the moment, I've no plans to replace them because when the gearbox is assembled and working, the clips really serve no purpose. I only bring this up because they are mentioned in the TM and no, I did not overlook them.
The trickle down effect of changing the ball bearings out is that we can no longer assume that the shim pack that we began with is still correct (that which was used to set the preload). If you are doing this, don't simply throw everything back together and assume everything is correct. That said, the original shim pack IS a good place to start the process of re-shimming, thus saving time you and effort. The kit I purchased provides a whole set of brand new shims.
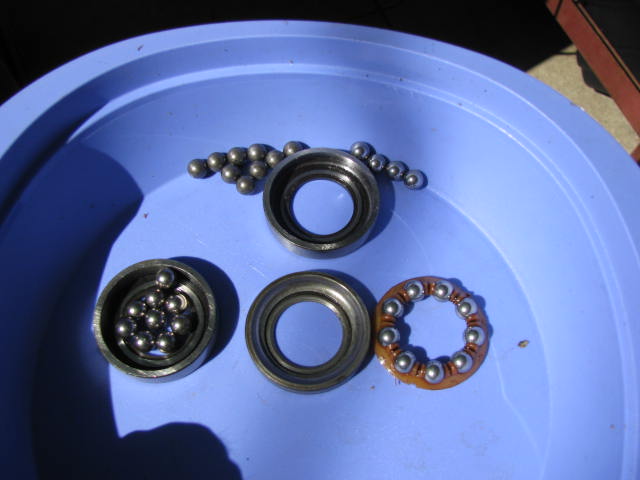
In the photo below -
Top center - original (dull) lower ball bearings to the left of the new bearing cup and new ball bearings to the right. They have most likely lost their luster due to particulates that gathered in the lower regions of the gearbox.
Center - original bearing cup
Left - original top ball bearings, still quite shiny and in good order.
Right - original bearing guide with new ball bearings in place. This mates to the bearing cup in the center.
As always, when it comes to sourcing replacement parts, generally you get what you pay for. I can't say with any authority how this rebuild kit's components compare to NOS parts, quality-wise. I admit, I was a little put off by the revelation that my bearings/bushings for the output shaft were very slightly egg-shaped but we can be thankful for it, as it DOES drive home the need for the very necessary step of reaming.
It may surprise you to know that I have a brand new fully assembled steering gearbox on the shelf but, I wanted to get into one of these and get my hands on every little piece. We learn by doing.
All times are GMT - 6 Hours Goto page Previous1, 2, 3, 4, 5, 6, 7
Page 7 of 7
You cannot post new topics in this forum You cannot reply to topics in this forum You cannot edit your posts in this forum You cannot delete your posts in this forum You cannot vote in polls in this forum