Posted: Mon Jul 08, 2019 3:43 pm Post subject: Voltage Reg to Firewall wiring harness
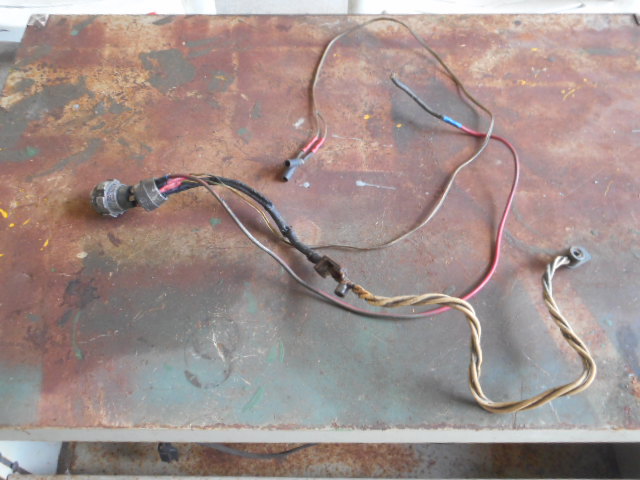
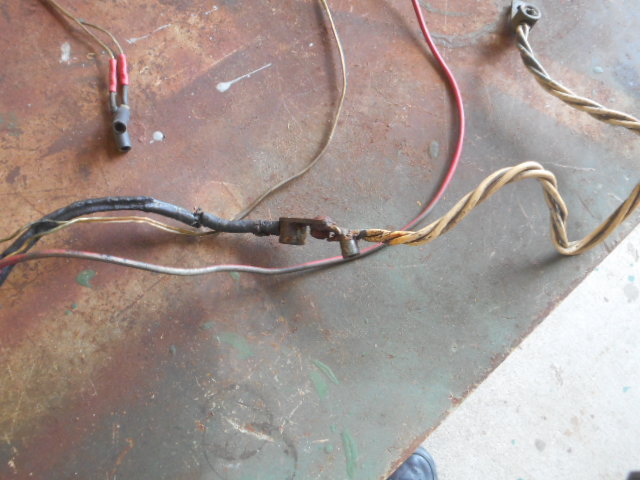
I am working on inventorying what I have and need to rewire my M38. The voltage reg to firewall wiring harness is my first problem. It has been butchered pretty badly. As you can see from the pictures the main power lead to the starter is really fouled up. At the voltage regulator connector the old wires have been connected to a hodgepodge of wiring but the circuit number tags are still on the wires up close to the connector.
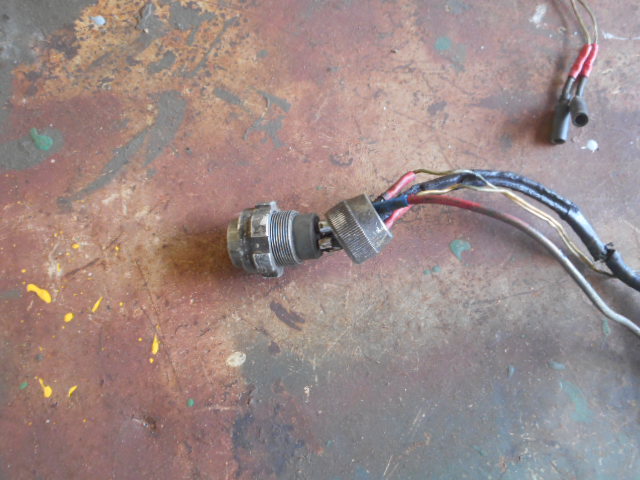
I would like to try and rebuild this part of the harness but am not sure about how to open up the reg. connector plug. I have unscrewed the connector on the back of the plug and figured that the inner 4 prong plug would then pull out but it hasn't. How to you disassemble this, if you can.
Joined: Apr 14, 2005 Posts: 285 Location: Livermore Ca.
Posted: Mon Jul 08, 2019 5:19 pm Post subject:
take a look at the downloads section right here on this site....you'll find it _________________ '51 M38 #22936,
'51 M100 Dunbar
#01164782
'53 M100 Dunbar
M416b1
2- M762
MVPA #11788
MVCC LIFER
Yikes, looks like a fire waiting to happen. Be sure to check the photo galleries, particularly the second one, belonging to WesK. Fish around in there, there is tons of info.
That brownish piece is a rubber insulator, usually you can lube it up and pry it down the wires to get to the solder cups. Yours looks like the wires are soldered to wire stubs sticking through that insulator. It should all clean off, but if it is wrecked those connectors are out there. _________________ '52 Dodge M37, '42 GPW, '48 FrankenJeep CJ2A/M38, '50 CJV-35(U), '51 M38, '42 WC-57 Command Car, '44 WC-51 Weapons , (2) M1941 Sperry 60" Anti-Aircraft Searchlights, John Deere M-gator, '44 White M3A1 Scout Car
Joined: May 30, 2014 Posts: 3447 Location: Texas Hill Country
Posted: Mon Jul 08, 2019 8:45 pm Post subject:
Yeah, that is supposed to be a rubber insulator. Its probably old, dry and hard. Its what makes the plug waterproof. As you tighten down on the fitting you have loose, it squeezes the rubber and seals the wires.
I think you will have to cut off all that junk so you can pull that insulator off, exposing the solder pins that go though the front of the plug.
Joined: Oct 02, 2014 Posts: 1910 Location: South Carolina, Dorchester County
Posted: Mon Jul 08, 2019 10:16 pm Post subject:
Hey RG,
I'm sure you'll find the manual on Bendix and Canon plug connectors. If like most, once you get the compression lock-nut off the back, the only thing holding the pins in place inside that rubber block-grommet is a ring around each pin that's buried in the center of that (molded for that ring) rubber block -- the rubber block grips each pin individually by that ring around the pin inside the molded part of the rubber block. It's a friction fit. As already mentioned, the nut on the back compresses the rubber to seal it all up.
I've seen plenty of connectors destroyed by trying to pry the rubber from around the pins. The only way to get them out is to push (with some wiggle) that ring around the pin through the rubber block-grommet. The design is made to extract pins through the rear of the connector, but in theory they can come out the front just as well (problem is the special tools aren't made to do it that way). Not recommended, forget I said it. Once you get one out (or see an illustration in the TM) you'll see what's hard to describe here in words.
As already mentioned, once the rubber block gets hard and brittle it gets tough to take apart. If the rubber disintegrates at all you might as well just look for a new connector unless you can find a replacement rubber grommet. A disintegrating rubber block-grommet is a fire waiting to happen.
I suggest soak the entire connector in some penetrating lubricant for a while, sometimes simple liquid dish soap works good. Then find a dowel (if the pins are female kind) to insert into the face of the pin and gently as possible wiggle and push the pin out the rear of the rubber block-grommet. If there's still a wire attached you can sometimes gain more leverage by pushing the pin and pulling the wire at the same time (this usually takes 3 hands). Be careful not to break the "ears" off female pins when wiggling -- just pressure them to the rear as easy as possible. If the pins are male on the mating side then you probably don't have much choice but to fashion a hollow-dowel tool to push them out the back of the connector (there is a special tool set made for various pin sizes on these connectors). Trying to push a male pin with needle-nose pliers or something of the like usually won't end well.
Once you get one pin out, the rest each get easier (more room for the rest --- the rubber block relaxes a bit). Conversely, when assembling--- the last one in is usually the hardest. I cannot emphasize lubricant enough.
Submerge the whole thing real good and gently try to wiggle the pins around inside the rubber block-grommet to work the lubricant in as much as possible and loosen things up.
Once you get the pins dis-mounted from the rubber block-grommet, if they're still serviceable, it's fairly easy to un-solder the wire from each cup on the pin, solder in new wire, and gently push each one back into the (lubricated) rubber block. Sometimes it might be easier to feed the new wire through the front of the block and pull the pin into the rubber grommet until you feel it's ring lock into the block. The rubber block should have letters that identify each pin location relative to the key on the connector.
Lastly (and I'm not familiar with this exact connector) the rubber block-grommet is usually held in place inside the metal connector shell by it's own molded "lip". Once all the pins are removed it should come out of the shell much easier (with lube and finesse). It may come out with pins still in if not totally hard-brittle (with lube and finesse).
Good luck! Just my 2 rookie cents (but repaired many a connector during my active duty avionics maintenance days) It can be done without the special tools but calls for plenty of finesse... Standing by for Wes to shoot me in the you-know-what...... _________________ Ron D.
1951 M38 Unknown Serial Number
1951 M100 Dunbar Kapple 01169903 dod 5-51
The only good sports car that America ever made was the Jeep."
--- Enzo Ferrari
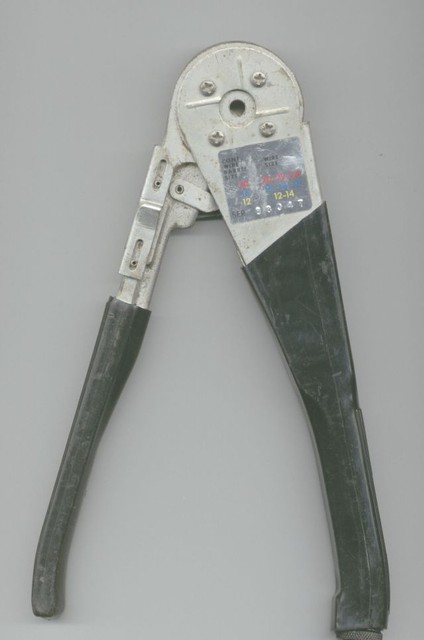
I am surprised that so many folks are only talking soldered pins. Truth is the original plug had crimped pins and the replacement pins as listed in the ORD 9 are crimp style pins.
If you wish to fabricate a new harness in your own garage then do yourself a favor and pick up the correct tools. They are not very expensive and make the job simple.
This is the manual that will walk you thru the rebuilding of the cannon plug style connectors.
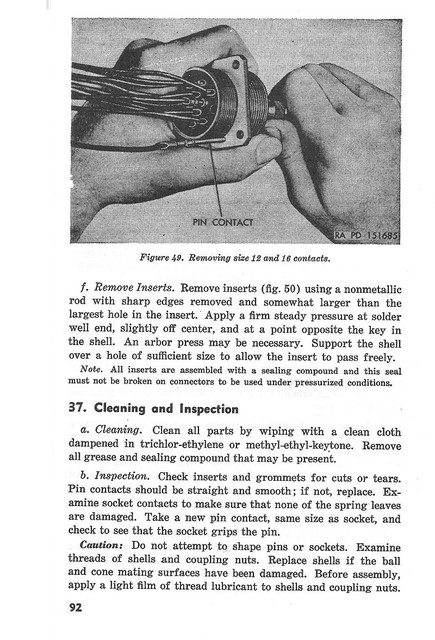
Pin removal
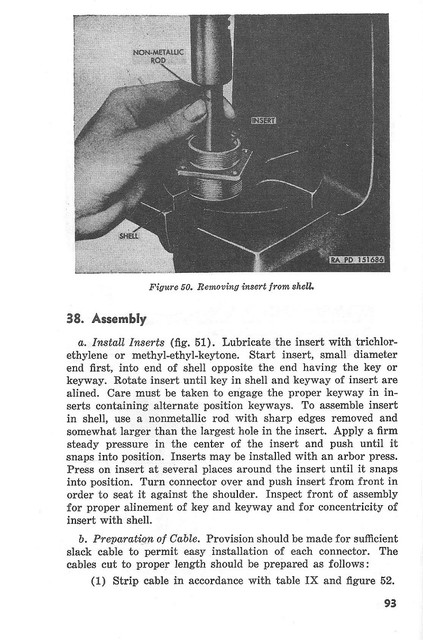
Separating the insert from the shell
The manual even shows how to use the solder type pins! _________________ Wes K
45 MB, 51 M38, 54 M37, 66 M101A1, 60 CJ5, 76 DJ5D, 47Bantam T3-C & 5? M100
Posted: Tue Jul 09, 2019 5:09 am Post subject: Harness help
Ralph,
If you need help with the V Reg harness, just holler. I have components in stock or we can use your old one and build you a new one.
John
MWM, Inc.
Joined: Jul 10, 2018 Posts: 97 Location: Western Washington
Posted: Tue Jul 09, 2019 10:06 am Post subject:
You could pick up individual portions of the wiring harness or the entire thing from Vintage Wiring. They make nice stuff. _________________ Rick Eades
1951 M38 & 1967 M715
I appreciate the folks that offered suggestions and info. I plan on taking it apart the rest of the way and seeing if I can rewire the connector so I can fix up a basic harness to get the jeep started. I don't know if I want to tackle building a complete harness. The you tube video that Ron posted is helpful if you want a clearer picture of the basic principles in the construction of these type of connectors. It also explained how to use the removal tools that Wes posted pictures of.
I did some research trying to determine where to buy the problem connector, the one that attaches to the voltage regulator. The connector is made by ITT Cannon (and others I imagine)
I think the part numbers are
ITT Cannon CA3106E22-22PY
Mouser Part #
965-CA3106E22-22PY Possible Ord. # 8724249
but it is hard for me if I can't actually see and compare the parts so don't take my research as gospel.
I was surprised that a single purchase of the connector was around $100. Wes might know of other suppliers but I couldn't find any.
Brian,
I'll probably call John Bizel or Brent if I can't fix it. Right now I am just looking for a temporary setup to get it running and then I can figure out a harness. I looked at one today that a friend had from Vintage wiring for an M37 that came with his M37 when he bought it. It is relatively new but it has packard connectors instead of douglas.
I try to remember
"patience grasshopper"
You cannot post new topics in this forum You cannot reply to topics in this forum You cannot edit your posts in this forum You cannot delete your posts in this forum You cannot vote in polls in this forum