| View previous topic :: View next topic |
| Author |
Message |
OKCM38CDN
Guest

|
 Posted: Mon Apr 27, 2009 8:48 am Post subject: Posted: Mon Apr 27, 2009 8:48 am Post subject: |
 |
|
Use rubber bands to hold the plates in and be patient...
I have done my T-90 and a T-96 this way... also make sure your plates are in the notches on the synch rings... Inner springs need to be set sot they are not open together...
Hope this helps... |
|
| Back to top |
|
 |
idiocrates
Member

Joined: Nov 02, 2007
Posts: 437
Location: Seguin, Texas
|
| Posted: Mon Apr 27, 2009 1:31 pm Post subject: |
|
|
I just finished rebuilding my T90 as well. I used almost all new parts from Novak. The two things that i reused were the synchro hub and sleeve with new brass synchro rings, springs and plates. And i thought the 88 needle bearings in the cluster gear were going to be difficult. That turned out to be so simple I did it twice just so I could use up some of my old spacer washers and eliminate some of the excess space left on the intermediate shaft. The synchro hub on the other hand was a pain. To begin with it was used and the edges were sharp like razors. Secondly, it was a little peculiar when it came to sliding on to the main shaft.....it just had to be a certain way or it wouldn't go. My suggection is to test fit everything and make marks the way it needs to go. Anyway.....I assembled my hub with the springs first.....so that each spring landed in the same clutch plate slot....but went in opposite directions around the hub......one in the front of the hub.....one in the back. And incidentally.....the longer, thinner inner hob core goes to the front of the transmission. Once I had the springs in place I lubed up my plates generously and put them into place in the three slots on the hub. Make sure that the one that goes in the slot where the springs land goes over the ends of both the front and the back spring. I then lubed the outside of the hub and the inside of the sleeve and with my hand wrapped around the hub and with it laying flat on the bench I slide the sleeve down onto the hub with the shifter fork groove on the sleeve to the rear. And yes......it took me several attempts. Patience really counts here as well as a good dose of determination. Getting the sleeve started was the hard part for me. I had to sort of let the plates kick in a small bit...a very small bit....and then once the sleeve was goinging they just naturally pressed into the slots and straightened up. Once the sleeve is in place visually check the springs to make sure they are still in against the hub core and not outside the dogs on any of the plates. And be sure to check both the front and the back of the hub. And as a final check verify once again that the two ends of the springs are captured under and inside the dogs on their plate. Once I had this all assembled I installed the second gear.....its blocking ring.....and slid the synchro on to the main shaft. Make sure the notches in the blocking ring line up with the plates or you won;t be able to get the hub on far enough to install the snap ring.
And I don't even want to talk about getting the main shaft into the main drive gear roller bearings. I got a little cocky and ahead of myself and installed the bearing adapter and the rear bearing onto the main shaft before I installed the main shaft into the case. Primarily because I had prechecked the fit of my rear bearing on the shaft and knew it was going to take some force and i didn't want to be hammering on my bearing with the shaft resting on the needle bearings. Anyway.....after undoing my oil collector and sliding my input gear as far forward as I could and sliding my synchro sleeve as far forward as possible I finally managed to get the main shaft in......with a few choice words.....but then, hey.....I giess that's why we work on these things in the garage and not the dining room table, eh?
Just stick with it.....despite outward appearances......it WILL go. Its just real sequence dependant. Good luck!
Jim |
|
| Back to top |
|
|
idiocrates
Member
Joined: Nov 02, 2007
Posts: 437
Location: Seguin, Texas
|
| Posted: Mon Apr 27, 2009 1:38 pm Post subject: |
|
|
Sorry for the double post.......but you didn't leave out your front brass blocking ring, did you? I can't tell from the pic since your sleeve is slid so far forward so I'm just checking. Thanks.
Jim |
|
| Back to top |
|
|
ocwd
Member
![]()
Joined: May 14, 2007
Posts: 721
Location: Placentia, CA
|
| Posted: Mon Apr 27, 2009 3:00 pm Post subject: |
|
|
Jim,
Both blocking plates are there. I think that your description is axactly what I needed. I had a hunch that something was out of place. I need to pull those parts out, clean them up and try again. Like you said, I expected the counter shaft to be the hard part. That was the easy part using the directions and tools needed. How hard was it to slide your sleeve over the hub? Mine seems excessively hard. I'll come back with another update later this week if I can find some time to get back out in the garage. Thank you for your help Jim (perfect).
Dave |
|
| Back to top |
|
|
idiocrates
Member
Joined: Nov 02, 2007
Posts: 437
Location: Seguin, Texas
|
| Posted: Mon Apr 27, 2009 3:47 pm Post subject: |
|
|
Well....between the rather excessive use of assembly lube and the sharp edges on the synchro hub I couldn't hardly move my sleeve either.....but I chalked it up to being too slippery to get a real hold and my delicate, arthetic fingers. It ssems to move okay between the notches in the the sleeve and once I got my shifter cover on the stick moves everything easy enough. Guess it has something to do with good stiff springs and new full size plates.
One thing I wondered...and wanted to try but never did.....was putting the springs in last. manually holding the plates in place in the hub and sliding the sleeve on......and then snapping the springs in. Seems like this would make sliding the sleeve on much easier....and I can't see why you couldn;t put the end of the spring under a plate and work it around the inside of the hub and under the other two dogs and then turn the hub around and do the same thing just making sure you go the other way starting with the same plate. There must be some reason though cause I have never seen the assembly written up this way......more just curious than anything else.
Did you have any problems from your oil collector? I had to file on mine pretty extensively.....and I pity the next guy who has to go back in there. When I opened my T90 up the first time this is all that was left of my oil collector

I think the rest got eaten. Anyway...I bought a new one and there was no way in the world it was going in when it was supposed to....I couldn;t turn it.....not without bending the bejeeezers out of it.....so I had to file it down to where it was a lot thinner then it was originally.....and it still was darn difficult to get into place. Its there now and it clears everything....I just hope its still thick enough to do some good cause my main gear and intermediate shaft were wasted when I got my jeep.
I guess the main things to check when assembling the synchro hub are:
1. Longer, thinner hub goes to the front of the transmission
2. one spring goes on either side of the hub
3. as viewed from each side, each spring starts in the same plate notch and goes on in a clockwise direction....or counterclockwise just so long as they both go the same way as viewed. Understand this is in opposite directions when you consider that the two springs are on opposite sides of the hub.
4. make sure both of the spring ends are captured by one of the plates and that both springs are inside the downward dogs on the other two plates
5. The three plate locations in the hub must match up to the notches in the brass blocking rings front and rear and this mating must be maintained throughout the rest of the transmission assembly
6. The shifter fork ring on the sleeve goes to the rear of the synchro assembly.
Good luck....it is #@$%@ satisfying once it all comes together.
Jim |
|
| Back to top |
|
|
ocwd
Member
![]()
Joined: May 14, 2007
Posts: 721
Location: Placentia, CA
|
| Posted: Mon Apr 27, 2009 5:42 pm Post subject: T90 |
|
|
| The original oil collector was still in place and usable. It was a bit bent up so I tweeked it a bit but it still fits nicely. I wish I could work on my T90 tonight but it will probably have to wait until the week end. Oh well. |
|
| Back to top |
|
|
New2Jeep
Member
![]()
Joined: Apr 14, 2009
Posts: 6
Location: Ventura, CA
|
| Posted: Wed Apr 29, 2009 4:38 pm Post subject: |
|
|
| I wish I could help in some way but looking at your pictures makes me realize that I will actually be able to get my jeep project going soon. I am in the very very begining stages of a restoration and already feel like I'm in over my head.....reading through this thread has already helped out. Good luck, and keep up the work. |
|
| Back to top |
|
|
ocwd
Member
![]()
Joined: May 14, 2007
Posts: 721
Location: Placentia, CA
|
| Posted: Fri May 01, 2009 12:35 pm Post subject: Jeep |
|
|
I am glad that this post will help motivate you. The hardest part is just getting started. The Jeep will come apart really easy. Make sure you bag and tag everything. You won't remember where all the bolts go. I have been lucky to have help from a couple of friends who are very mechanically inclined. The painting is the easiest part. This web site and G503 are great resources.
Also, you should change your profile so we know where you are located. If you are located down the road from me, I'd be happy to swing by your house with tools in hand to help you out. |
|
| Back to top |
|
|
New2Jeep
Member
![]()
Joined: Apr 14, 2009
Posts: 6
Location: Ventura, CA
|
| Posted: Fri May 01, 2009 12:55 pm Post subject: |
|
|
| Thanks I am hoping some friends will be able to help me out as well. I thought I changed it so my location showed up but I'll try again. I am located in Ventura but moving to Santa Paula in about a month. Thanks for the offer! |
|
| Back to top |
|
|
ocwd
Member
![]()
Joined: May 14, 2007
Posts: 721
Location: Placentia, CA
|
| Posted: Mon Jul 20, 2009 8:35 am Post subject: T90 |
|
|
Well, I finally got back to my Transmission yesterday. I still struggled with that #@$%@ clutch sleeve and synchronizer plates. It's still not done  |
|
| Back to top |
|
|
idiocrates
Member
Joined: Nov 02, 2007
Posts: 437
Location: Seguin, Texas
|
| Posted: Mon Jul 20, 2009 9:34 am Post subject: |
|
|
I don't know what your rebuild budget looks like but you can get the synchronizer fully assembled with plates, springs, blocking rings, and shift collar all in-place for around $70.00 USD from some of the suppliers. All you'd have to do is keep it together as you slide it on the main shaft and make sure your blocking ring notches and plates stay aligned.
Reaching around the hub was my biggest problem......given my short stubby fingers. Fortunately I was blessed with a third hand in the form of a well-endowed table muscle (aka...beer belly....aka....gut) that I could use to help partially hold the third plate in place while I slid on the shift collar. Of course, there's always the possibility that my sychro going together was more of an accident then an actually mechanical function....but like my dad used to say....even a blind hog will find an acorn every now and then. In any event.....it eventually slid together....and was I ever glad when it did! Hang in there.......relax......and have fun with it.
What really impresses me is that can still find all the parts after all this time!! Between me and too many lead paint chips I'd have already forgotten what I was working on. Good luck!!
Jim |
|
| Back to top |
|
|
OKCM38CDN
Guest
|
| Posted: Mon Jul 20, 2009 10:42 am Post subject: |
|
|
When working with the syncro gears and plates; use rubber bands to hold them in place... little tip I picked up from the rebuild guide...
Gives you that third hand...
Hope this helps... |
|
| Back to top |
|
|
wizard
Member
Joined: Jul 01, 2009
Posts: 12
|
| Posted: Tue Jul 21, 2009 5:20 pm Post subject: that looks great |
|
|
I know you cannot wait to put her back together and get her on the road. Please continue to show your progress. Some of us are taking notes.
thanks, |
|
| Back to top |
|
|
ocwd
Member
![]()
Joined: May 14, 2007
Posts: 721
Location: Placentia, CA
|
| Posted: Wed Jul 22, 2009 8:03 am Post subject: T-90 |
|
|
| Will do Wizard. At this point, I am stuck on my T-90 so there are no new pictures or updates. This Friday I am dropping my transfer case off at a local Jeep shop for an overhaul. I've been spinning my wheels on the T-90 so I will punt on the transfer case. There is still much to do and a lot of money to be spent. |
|
| Back to top |
|
|
ocwd
Member
![]()
Joined: May 14, 2007
Posts: 721
Location: Placentia, CA
|
| Posted: Sun Aug 02, 2009 8:37 am Post subject: T90 & Tcase |
|
|
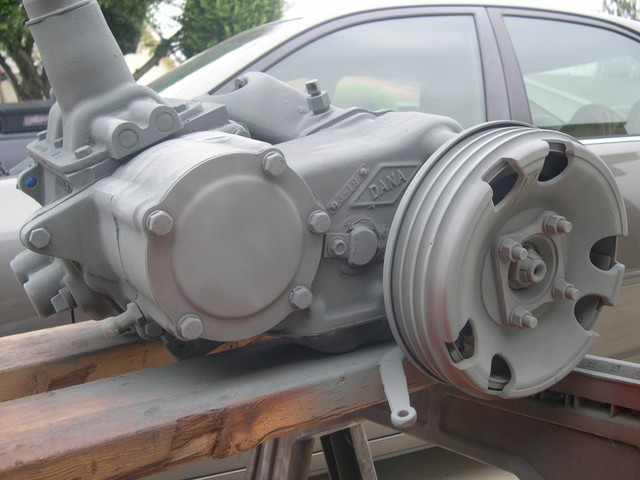
Back at it. Here is my trans and t case cleaned and primed. They need another coat of primer and a couple coats of paint.
 |
|
| Back to top |
|
|
|

