| View previous topic :: View next topic |
| Author |
Message |
ocwd
Member
![]()
Joined: May 14, 2007
Posts: 721
Location: Placentia, CA
|
 Posted: Mon Jun 07, 2010 2:45 pm Post subject: Center Exhaust Pipe Posted: Mon Jun 07, 2010 2:45 pm Post subject: Center Exhaust Pipe |
 |
|
| I'll send John an email and see what he says. I know there is a difference in M38 and M38A1 center exhaust. Is there a difference in header pipes or are they the same? I really did expect these to fit right pretty close and was surprised when they didn't. |
|
| Back to top |
|
 |
Cacti_Ken
Member

Joined: Apr 20, 2005
Posts: 1021
Location: Silsbee, Texas
|
| Posted: Mon Jun 07, 2010 2:55 pm Post subject: |
|
|
My muffler and exhaust pipe needed some tweeking too. It is probably the same manufacturer as yours.
In order for you to get the muffler raised up and on the right angle. You might have to grind the weld on the tringle flange on the exhaust pipe so that you will be able to rotate it. Position the muffler where it should be and snug up the hanger bolt. Now match the exhaust flange with the muffler flange, snug it up with some bolts. and weld the flange back on the exhaust pipe. The muffler inlet pipe should be a little larger in diameter than the exhaust. If while fitting the two together you find the exhaust pipe to extend longer than should be, either trim it off or let in slide into the muffler inlet then weld the flange back on it.
This is what I had to do.
I realize this sucks and is a pain, but in order to salvage what you have, it will work out.
_________________
Tropical Veteran
35th Inf. Reg. "CACTI" 4th I.D. VN
Amateur Radio K5XOM |
|
| Back to top |
|
|
ocwd
Member
![]()
Joined: May 14, 2007
Posts: 721
Location: Placentia, CA
|
| Posted: Mon Jun 07, 2010 3:00 pm Post subject: Center Exhaust Pipe |
|
|
| I just spoke to John at MWM. I guess I got one from the old batch of pipes. John said to heat it up red hot just behind the rear flange and pull it into place. Apparently this was an issue on his older pipes and it worked out well just heating it up. I'll give it a shot after I get some oxygen for my tourch. |
|
| Back to top |
|
|
53a1
Member

Joined: Jun 25, 2008
Posts: 583
Location: Kern Co.
|
| Posted: Mon Jun 07, 2010 8:35 pm Post subject: |
|
|
Dave,
Are you talking about heating and bending the center pipe or the muffler? I think the center pipe looks good. It's the muffler that looks messed up. I would do what me and the other member suggested and cut, rotate and weld just the end of the muffler. You may also have to do the other side of the muffler as well to get it to bend up.
If you start messing with the center pipe you may no clear your frame. |
|
| Back to top |
|
|
ocwd
Member
![]()
Joined: May 14, 2007
Posts: 721
Location: Placentia, CA
|
| Posted: Mon Jun 07, 2010 8:50 pm Post subject: Center Exhaust & Muffler |
|
|
| You are probably right about that. I have some time to think about it as I won't be working on my Jeep for a while. The muffler was $35 so I don't mind tinkering with it. |
|
| Back to top |
|
|
ocwd
Member
![]()
Joined: May 14, 2007
Posts: 721
Location: Placentia, CA
|
| Posted: Fri Jun 11, 2010 8:48 am Post subject: Center Exhaust & Muffler |
|
|
I will be working on my muffler in the next few weeks. Is there anyone here that can provide me with some pictures showing the correct and final location of the muffler? I want it to end up in the correct location just in case I ever install a fording pipe. Pictures from a few different angles would be very helpful.
Thanks in advance,
Dave |
|
| Back to top |
|
|
wesk
Site Administrator


Joined: Apr 04, 2005
Posts: 16249
Location: Wisconsin
|
| Posted: Fri Jun 11, 2010 10:23 am Post subject: |
|
|
Pictures won't save you alignment issues with your fording kit. 9 out of 10 fording kit installs will require tweaking of the tail pipe position to allow proper positioning of the fording pipe mount brackets.
The manual photos of the rear of the jeep will give you the best shots of original installations. Sample shots of existing installations today are usually way off for the reasons you are seeing with shape and fit of repop parts and many folks deliberately bend the tailpipe downward to get rid of the exhaust's tendency to resonate off the inside of the bumperette.

Large view of this photo: http://img.mypicgallery.com/m38fordingkit/mv-mag-oct-01-pg-57.jpg
Look at the photo on page 36 of TM 9-8012 and Page 6 of TM 9-1804B.
_________________
Wes K
45 MB, 51 M38, 54 M37, 66 M101A1, 60 CJ5, 76 DJ5D, 47Bantam T3-C & 5? M100
Mjeeps photo album: http://www.willysmjeeps.com/v2/modules.php?set_albumName=Wes-Knettle&op=modload&name=gallery&file=index&include=view_album.php |
|
| Back to top |
|
|
DJ
Member

Joined: Apr 15, 2005
Posts: 289
Location: Wis.
|
| Posted: Fri Jun 11, 2010 8:47 pm Post subject: |
|
|
I too got one of the pipes from the old batch from John. I heated it per John's advice. It fits quite well ,looks real close to picture in the manual. I have the fording kit (not installed) and by holding the pipe in place it is real close to fitting properly, with a small amont of tweaking.
DJ |
|
| Back to top |
|
|
ocwd
Member
![]()
Joined: May 14, 2007
Posts: 721
Location: Placentia, CA
|
| Posted: Sat Jun 12, 2010 12:07 pm Post subject: Center Exhaust & Muffler |
|
|
| Thanks Wes and DJ. I still need to get some oxygen. |
|
| Back to top |
|
|
ocwd
Member
![]()
Joined: May 14, 2007
Posts: 721
Location: Placentia, CA
|
| Posted: Sat Jun 19, 2010 7:22 am Post subject: Front Engine Plate |
|
|
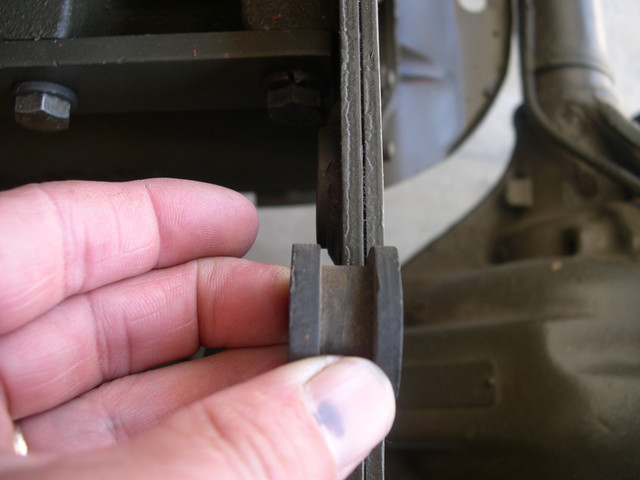
OK, so I guess I have the wrong front engine plate. Mounting tabs face opposite directions but has a short generator mounting hole. I am told that I can stack washers to fix the problem but what size washers and how many. I have a smaller grommet to use. I did not realize there were different Willys engine plates with opposite facing mounting tabs. What vehicle is this engine plate correct for?

 |
|
| Back to top |
|
|
wesk
Site Administrator
Joined: Apr 04, 2005
Posts: 16249
Location: Wisconsin
|
|
| Back to top |
|
|
53a1
Member
Joined: Jun 25, 2008
Posts: 583
Location: Kern Co.
|
| Posted: Sat Jun 19, 2010 9:49 am Post subject: |
|
|
Dave,
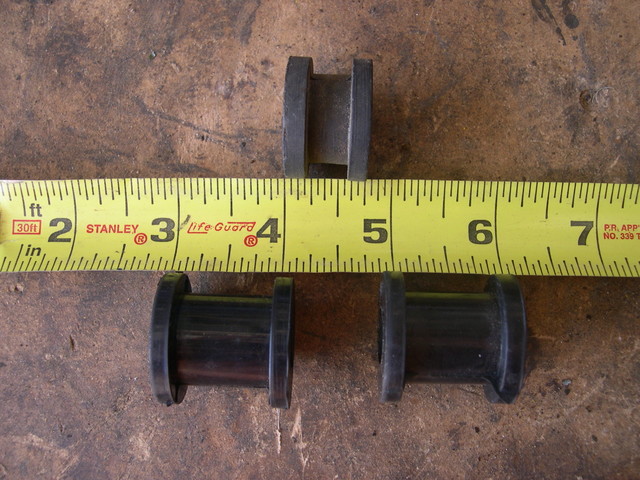
I would use the short rubber bushing. Take the bolt that holds the generator and buy some flat washers to fill the gap between the mount plate and the generator. If you need to drill out the ID of the washer that is no big deal.
I would start with the difference in length of the bushings and use that as the number of washers you will need. Close is good enough.
_________________
'53 M38A1 X2 |
|
| Back to top |
|
|
ocwd
Member
![]()
Joined: May 14, 2007
Posts: 721
Location: Placentia, CA
|
| Posted: Sat Jun 19, 2010 1:50 pm Post subject: Front Engine Plate |
|
|
Wes,
What TM is that picture from? I can never find these things in the TMs. Also, looking at that TM figure, my engine plate looks correct. Is it?
Dave |
|
| Back to top |
|
|
wesk
Site Administrator
Joined: Apr 04, 2005
Posts: 16249
Location: Wisconsin
|
| Posted: Sat Jun 19, 2010 8:12 pm Post subject: |
|
|
Dave,
Yes I believe your plate is correct. The bushings are correct also and I see nothing wrong with the fit. The front always has play at the bushing. This allows for slight variations in plate and generator tab thickness and plate alignment. When you get her installed and tighten the two bolts most of that extra space you now see will be gone.
The photo is from the M38 operator's & service manual TM 9-8012 page 195 Figure 66 which is in the Chapter 152 Generator assembly removal & installation. There's a very similar photo in the M38A1 TM 9-8014 but not as clear.
_________________
Wes K
45 MB, 51 M38, 54 M37, 66 M101A1, 60 CJ5, 76 DJ5D, 47Bantam T3-C & 5? M100
Mjeeps photo album: http://www.willysmjeeps.com/v2/modules.php?set_albumName=Wes-Knettle&op=modload&name=gallery&file=index&include=view_album.php |
|
| Back to top |
|
|
ocwd
Member
![]()
Joined: May 14, 2007
Posts: 721
Location: Placentia, CA
|
| Posted: Sat Jun 26, 2010 5:52 pm Post subject: Center Exhaust & Muffler |
|
|
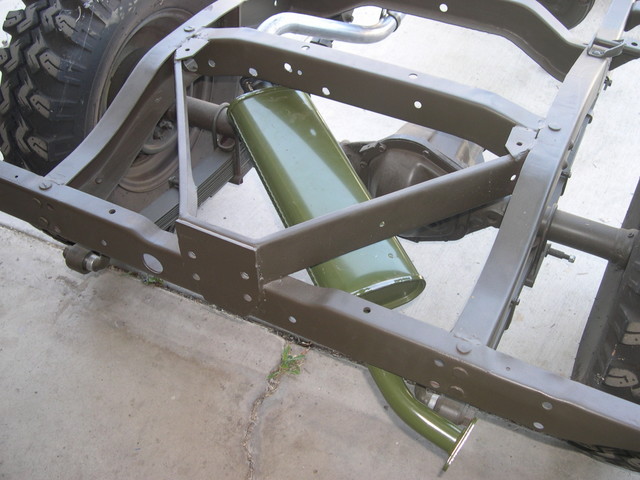
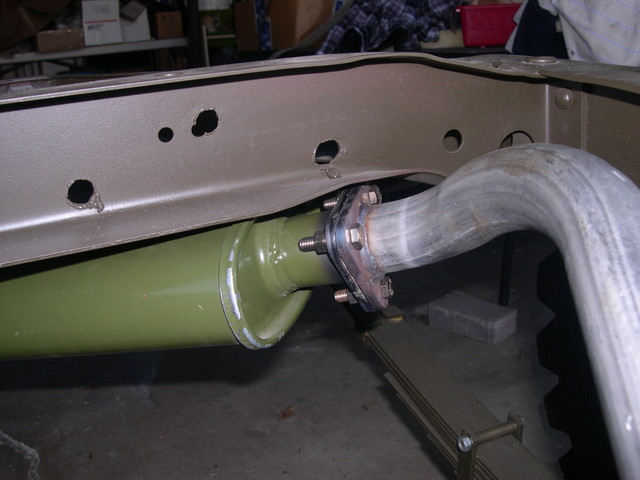
I got the muffler bent up into place. Not too thrilled with the fit. I can tell that the flange is going to rattle on the cross member. I'll do some more heating and tweaking when I can get a better torch. The map gas torch does not get hot enough.

 |
|
| Back to top |
|
|
|


