| View previous topic :: View next topic |
| Author |
Message |
53a1
Member

Joined: Jun 25, 2008
Posts: 583
Location: Kern Co.
|
 Posted: Sat Oct 24, 2009 4:05 pm Post subject: 53 M38A1 Project - a.k.a Lil' Bastard Posted: Sat Oct 24, 2009 4:05 pm Post subject: 53 M38A1 Project - a.k.a Lil' Bastard |
 |
|
I'm moving my build over to this site from the G. No action over there for A1s and I'm looking to get more help and feedback. This is my first build and this site has been great source of information.
As an intro, Little Bastard is actually one of two A1's I picked up. LB was a '53 converted to a yellow hunting Jeep with all the bubba mods you've come to know and love. In its glory years it was a USMC Jeep. I determined this by the underlying paint and undercoating.
The other Jeep was a '53 USMC radio Jeep with the engine missing, bent frame but otherwise an easy restoration. The intent was to build one good Jeep out of two but as parts started popping up I decided I would build two.
I'm building the radio Jeep from the ground up while LB is getting the body work done first. The tub from LB may spend some time on the radio Jeep frame up but at this point I don't have a definite plan.
Here are the links
http://www.g503.com/forums/viewtopic.php?f=11&t=121643
http://www.g503.com/forums/viewtopic.php?f=11&t=131981
http://www.willysmjeeps.com/v2/modules.php?name=Forums&file=viewtopic&t=2938&highlight=
Last edited by 53a1 on Wed Feb 17, 2010 10:44 am; edited 7 times in total |
|
| Back to top |
|
 |
53a1
Member
Joined: Jun 25, 2008
Posts: 583
Location: Kern Co.
|
| Posted: Sat Oct 24, 2009 4:10 pm Post subject: |
|
|
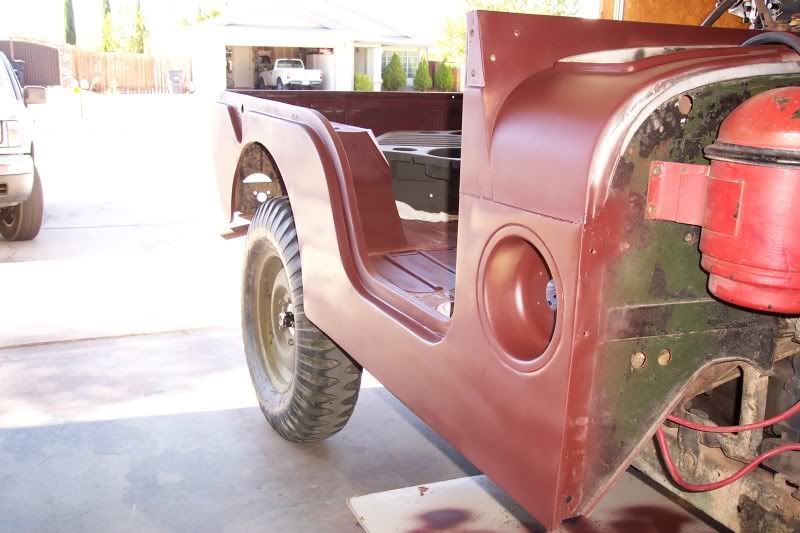
Got my frame back from the sand blaster. Primed it up. Shot the rims and tub while I was at it.
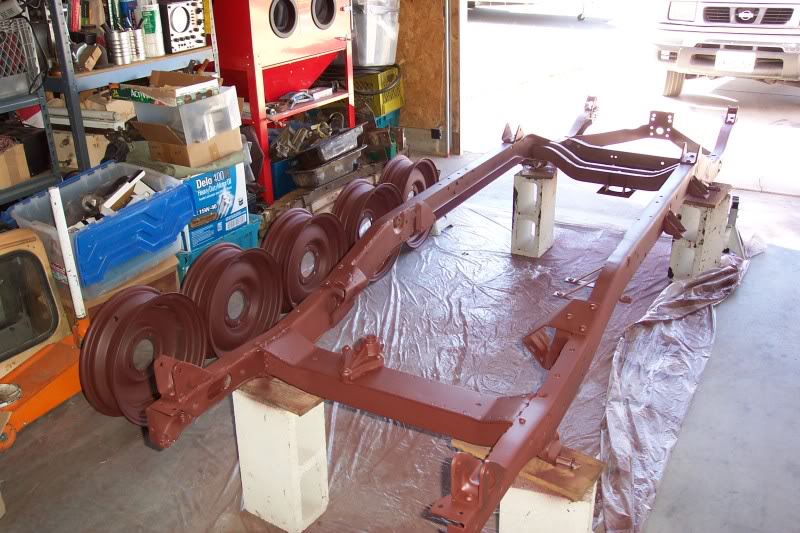
I'm fixing the tub while attached to another roller. When done it will go on the painted frame. I need to be able to move the tub so I'm leaving it on the other frame and I'm going to flip it over and do the bottom before it goes on.
Paint gun on sale at Harbor Freight for 14.00. With a 20% coupon that's 11 bucks. Works real good.
 |
|
| Back to top |
|
|
MODIFIED
Member

Joined: Mar 28, 2008
Posts: 353
Location: BrOoKlYn
|
| Posted: Sat Oct 24, 2009 4:41 pm Post subject: |
|
|
looking good there Dave. Have you progressed in finding a decent Block to work with?  |
|
| Back to top |
|
|
53a1
Member
Joined: Jun 25, 2008
Posts: 583
Location: Kern Co.
|
| Posted: Sat Oct 24, 2009 6:23 pm Post subject: |
|
|
| Nothing as of now. Just the pitted up one 'our buddy' sold me. |
|
| Back to top |
|
|
53a1
Member
Joined: Jun 25, 2008
Posts: 583
Location: Kern Co.
|
| Posted: Sat Oct 24, 2009 6:52 pm Post subject: |
|
|
Anyone know if I can wait a week until I apply to top coat? The instructions say to wait a few hours but I was wondering If it's possible to wait too long. I don't want to sand the primer on the frame before top coating.
Thanks. |
|
| Back to top |
|
|
MODIFIED
Member
Joined: Mar 28, 2008
Posts: 353
Location: BrOoKlYn
|
| Posted: Sat Oct 24, 2009 7:00 pm Post subject: |
|
|
| whats brand primer and topcoat your using? I'd wet sand if you have suspicion of tackiness to the primer. alkyd or enamel based primers for which you thin with Xylene can be sanded and top coated after an couple hours. Though, you have to take in consideration ambient temperature and humidity. Most primers offer a long "dwell" window prior to top coating, some up to a year! |
|
| Back to top |
|
|
ocwd
Member
![]()
Joined: May 14, 2007
Posts: 721
Location: Placentia, CA
|
| Posted: Sun Oct 25, 2009 6:39 am Post subject: Paint |
|
|
you can put multiple layers of primer on in one day. I would skip the wet sanding and just go over the entire frame with 000 steel wool between coats of paint and primer. After using the 000 steel wool, use a clean wet rag to get most of the dust off then a tack cloth. I waited several days between coats of paint.
Your project is looking good. Keep it up and post more pictures.  |
|
| Back to top |
|
|
53a1
Member
Joined: Jun 25, 2008
Posts: 583
Location: Kern Co.
|
| Posted: Sun Oct 25, 2009 7:50 am Post subject: |
|
|
| I'm using Gilespie primer and top coat. It's lusterless top coat. I'll hit it with some steel wool this morning. I decided to top coat it today. Thanks for the quick responses. |
|
| Back to top |
|
|
ocwd
Member
![]()
Joined: May 14, 2007
Posts: 721
Location: Placentia, CA
|
| Posted: Sun Oct 25, 2009 9:03 am Post subject: Paint |
|
|
| Take your time and make sure the surface is clean before applying the next coat. |
|
| Back to top |
|
|
MODIFIED
Member
Joined: Mar 28, 2008
Posts: 353
Location: BrOoKlYn
|
| Posted: Sun Oct 25, 2009 11:04 am Post subject: |
|
|
| YUP, I CONCUR, STEEL WOOL. just make sure you blow it clean or even better, vacuum the surface before top coating. and don't use a tack cloth if you had that on the agenda!!! |
|
| Back to top |
|
|
53a1
Member
Joined: Jun 25, 2008
Posts: 583
Location: Kern Co.
|
| Posted: Mon Oct 26, 2009 10:04 am Post subject: |
|
|
Had some brass wool handy so I hit it a little with that. Paint looks great to me.
Got lazy and shot the rims directly over prime with no steel wool prep so we will see how that goes. I suspect it will be good enough. I don't have the eye of a perfectionist or the patients and at time I cut corners to keep the project moving. 
The Gilespie paint is almost dry and feels real hard like a shell so I'm happy. Heads up, the Gilespie paint needed no thinning. Glad I ordered four gallons and rattle cans.
Now onto the rear cross member. I know I should have done it before paint but I had to get the bare metal covered. I chose lusterless paint so I can touch up areas as I go.
Thanks for your help guys. |
|
| Back to top |
|
|
ocwd
Member
![]()
Joined: May 14, 2007
Posts: 721
Location: Placentia, CA
|
| Posted: Mon Oct 26, 2009 10:20 am Post subject: Paint |
|
|
| The steel wool roughs up the surface and gives subsequent coats of primer and paint a good surface to grab on to. I suspect that your paint will be ok but it may start to chip in places in the years to come. If you really want to get the first coat of primer to stick to bare metal. Hit it with metal prep first. The metal prep will etch the bare metal and the primer will stick nicely. You could also use an etching primer for your first coat. Etching primer is expensive. I usually use metal prep on most bare metal. |
|
| Back to top |
|
|
oilleaker1
Member
Joined: May 14, 2009
Posts: 971
Location: South Dakota
|
| Posted: Mon Oct 26, 2009 7:57 pm Post subject: |
|
|
| Looks great! Man what a straight body. Instead of steel wool, try the light grade of scotchbrite sold for bodywork. It's much easier to use. You don't have all the mess of fine metal strands. Then wipe it down with clean-up solvent. John |
|
| Back to top |
|
|
53a1
Member
Joined: Jun 25, 2008
Posts: 583
Location: Kern Co.
|
| Posted: Tue Oct 27, 2009 5:49 pm Post subject: |
|
|
| It's all Bondo on that straight body. For sanding block, I used a length of 2x4 that I flattened with sand paper on top of a metal plate. I just got the hat channels from Midwest. I'm going to flip it over and weld them on. Paint stripper works wonders on the undercoating so I'm going to remove all of that while it is flipped over. |
|
| Back to top |
|
|
oilleaker1
Member
Joined: May 14, 2009
Posts: 971
Location: South Dakota
|
| Posted: Tue Oct 27, 2009 6:01 pm Post subject: |
|
|
OD paint when dry makes runs look good!  The channels Al makes at Midwest are primo! They need to put MD Juan OUT OF BUSINESS!!!!!!!! I'm sick to death of their crap from the Off-Shore state. You are doing a good job, keep up the work! The channels Al makes at Midwest are primo! They need to put MD Juan OUT OF BUSINESS!!!!!!!! I'm sick to death of their crap from the Off-Shore state. You are doing a good job, keep up the work!  John John |
|
| Back to top |
|
|
|

