Joined: Sep 30, 2013 Posts: 70 Location: Glenburn, ME
Posted: Wed Jan 08, 2014 7:49 pm Post subject: M38 stuck shift tower rail - help please
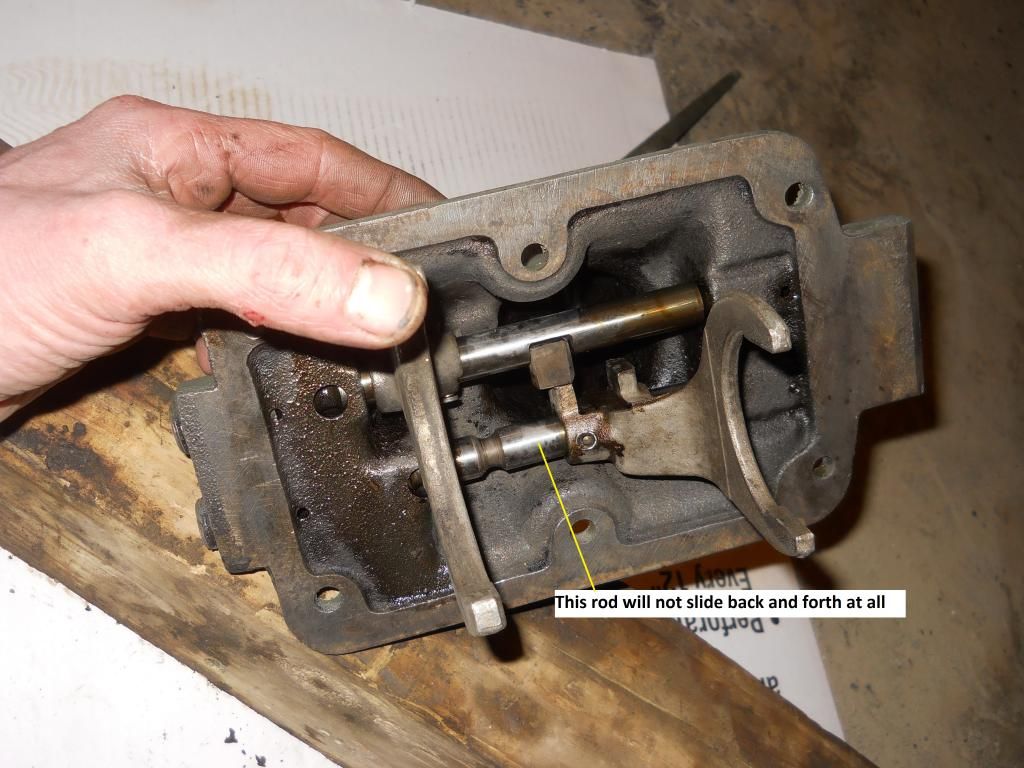
I just rebuilt the functional but worn out T-90. I want to put the shift tower back on but one of the rails won't budge now. It will rotate but not slide back and forth like it should. I'm afraid to try and force anything for fear of breaking something. I haven't found much on the web for help. Any advice? Thanks.
Joined: Nov 24, 2010 Posts: 1390 Location: Orem, UT
Posted: Wed Jan 08, 2014 11:11 pm Post subject:
Looks like it may be out too far and the poppet ball has fallen into the shafts path keeping it from moving back in. _________________ Brett
'51 M38
PHOTO DIARY OF MY BUILD
Rick Stiver's T90 rebuild guide has a section on the tower as well. He entions several issues that will lock up shafts. I'll email you a copy of his guide. _________________ Wes K
45 MB, 51 M38, 54 M37, 66 M101A1, 60 CJ5, 76 DJ5D, 47Bantam T3-C & 5? M100
Joined: Sep 30, 2013 Posts: 70 Location: Glenburn, ME
Posted: Thu Jan 09, 2014 5:35 am Post subject:
wesk wrote:
Rick Stiver's T90 rebuild guide has a section on the tower as well. He entions several issues that will lock up shafts. I'll email you a copy of his guide.
Hi Wes, thanks but no need. I've used that guide to rebuild the T-90 and it's been great. I did read the part about the shift tower and still can't quite make sense of it. I guess I have a poppet ball stuck behind that shaft? I need to hunt down the appropriate sized square plug wrench today so I can remove the plug at the end of the shaft tube. I'm hoping that will allow me access to the stuck ball. If not, I still may have more questions.
Looks like you did not follow the guide completely since those two plugs are removed at the beginning of the guide's tower section. I've highlighted & underlined the portions important to shaft movement.
Quote:
DISASSEMBLY
Remove shifter fork pins from the second and high-speed shifter-fork and the low and reverse speed shifter-fork. In some shifters this is a split pin and in others it will be a hollow pin that is staked in the end. The split pins can simply be driven out with a pin drift but the staked pins must have the staked end drilled off first. Place both shift rails into the neutral position.
The M-38 shift tower will have two 3/8-inch countersunk head pipe plugs at the rear of the shift rod rail holes. Remove these. For other models this is N/A.
Verify that the rods are both still in the neutral position. Drive the second and high-speed gears shifter rail to the front until the rail hole expansion plug can be removed. Carefully slide the shifter rod forward while rotating the shift lever notch in the rod toward the bottom of the tower. Do not allow the notch to pass the poppet ball while it is pointed toward the top or the poppet ball and spring will become trapped in the notch. If this happens you can force the poppet ball back into the hole by rotating the shaft with a pair of vise-grips. Caution: as the rod slides past the poppet ball, the natural tendency is for the ball to shoot out. Cover the hole with a rag. Remove the rail and the second and high-speed gears shift fork.
Drive the low and reverse speed gears shifter rail to the front until the rail hole expansion plug can be removed. This rail does not have the notch to worry about so it should be a little easier to deal with. Caution: as the rod slides past the poppet ball, the natural tendency is for the ball to shoot out. Cover the hole with a rag. Remove the rail and the low and reverse speed gears shifter fork.
This leaves the removal of the shift lever. This procedure is totally different between the M-38 and other T-90 transmissions.
M-38: Unscrew the shift tower cap from the shift tower and remove. Slide shift lever out of the shift tower.
Other T-90s: Turn the shift tower upside down and lock into a vise if possible. It worked pretty well for me sitting in my lap. Start at the top of the spring and using a large screw driver gently pry the spring over each spring retaining dog one at a time. My first idea was to use a pair of vise-grips and rotate the spring from the case. This can be done but it is very hard on the spring and chews up where the vise-grips bite. It only takes about 2 minutes to do it with the screwdriver and it's much easier on the spring. Once the spring is removed, slide the shift lever out the bottom of the tower.
INSPECTION Now clean [including the bores you opened by pulling the two pipe plugs] and inspect the shift tower case for cracks, stripped threads (For M-3 or damage of any kind. Any cracked or otherwise damaged units should be replaced or repaired.
Replace the gearshift lever if it is excessively worn or bent.
M-38: Replace the gearshift shift tower cap if it is bent or has stripped threads.
Other T-90s: Replace shift lever retaining ring if it is bent or broken.
Replace the second and high speed gears shifter-rail and second and high-speed shifter fork if they are excessively worn, or if they are bent or distorted. Any burs should be removed.
Replace the low and reverse speed gear shifter-rail and low and reverse speed shifter fork if they are excessively worn, or if they are bent or distorted. On one of the ones I inspected, there was a groove cut in the shift rail where the poppet ball rode. Any burs should be removed.
M-38: Replace the 3/8-inch countersunk head pipe plugs if the threads are stripped. Replace the gearshift lever support spring if it is cracked or distorted.
Replace the poppet balls and poppet ball springs if they are worn, broken, or distorted. I recommend replacing them anyway.
ASSEMBLY
I have found that the staked pin that prevents the shift lever from rotating in the tower and the pin that allows for the installation of the interlock pin will leak if left alone. Prior to assembly you should clean around these pins until all grease and oil are removed and then seal with a good gasket sealer and allow to cure. Make sure to force the gasket sealer in around the pins but make sure it doesn't go all the way through to the inside. I can attest to the fact that if you fail to do this these pins can leak a large amount of oil. The last time I had my shift tower off I made a few other mods to it. One mod was to drill a hole in the rear between the shift rails. I tapped threads into the hole to accept a bolt. Then I made a plate that fit over the end of the shift tower. The tail end of the shift tower had to be filed smooth. This was easy to do by keeping the pressure applied to the center of the file instead of the ends. I then sealed the end of the sift rails with this cap plate. I did have to remove about 1/4" off the end of the first/reverse shift rod to prevent it from hitting the plate. It hasn't leaked any oil since. In addition to this modification my old shift lever had been ground down a time or two to fit various shifter knobs. When I bought my new knob for the shifter it would not fit the current thread. I bought a grade 5 bolt with the right threads and cut the head off of it. Then I ground down a releaf on the bolt and shifter and MIG welded the bolt on. I oil quenched the finished product and ground it down smooth. I now have a beautiful shifter that the know screws right onto.
M-38: Install shift-lever back into the shift tower and secure with gearshift shift tower cap.
Other T-90s: Turn shift tower upside down and install shift lever into the tower make sure the positioning pin seats in the notch on the shift lever ball. Slide spring down over the shift lever and pop the spring over the retaining dogs one notch at a time with a large screw diver. This took me about 20 minutes the first time I did it, but now I can do it in about 2 minutes. Just don't loose patience with it.
Make sure the shift lever is to the inside of the rail before installation. Insert poppet ball spring and poppet balls into gearshift control housing on the low and reverse speed gears side. Insert the low and reverse speed gears shifter shaft into the gearshift control housing from the rear. If you have difficulty getting the shaft to go in more than about 3 inches inspect the interlock pin to make sure it is out of the way. Slide the low and reverse speed gears shifter fork onto the rail Note: it is easy to put this fork on backwards if you aren't careful. When it is properly installed the fork should fall evenly in the middle of the shift tower. Depress the poppet ball and poppet ball spring, using a blunt shaft (Do not use a sharp tipped instrument like a screwdriver or a nail.) and slide the rail in over the poppet ball to the second groove. This is the neutral position.
Make sure the shift lever is to the inside of this rail also before installation. Insert poppet ball spring and poppet balls into gearshift control housing on the second and high-speed gears side. Insert the second and high-speed gears shifter rail into the gearshift control housing from the rear. If you have difficulty getting the shaft to go in more than about 3 inches inspect the interlock pin to make sure it is out of the way. By now the interlock pin must fit into the detent notch in the low side rail. Note: This interlock pin is not like the one on the model 18 transfer-case. If you remove this pin it will allow the transmission to shift into two gears at the same time. This would effectively destroy a T-90. DO NOT REMOVE THE PIN. Slide the second and high-speed gears shifter fork onto the rail. Note: it is easy to put this fork on backwards if you aren't careful. When it is properly installed the fork should fall evenly in the middle of the shift tower. Depress the poppet ball and poppet ball spring, using a blunt shaft and slide the rail in over the poppet ball to the second groove. This is the neutral position.
Situate the shift lever so that it falls in between both the Low shift fork and the High shift notch. Secure both shifter forks onto the shifter shafts with shifter fork pins. For those with staked pins, flange the ends of the gearshift fork pins with a center punch.
M-38: Install 3/8-inch countersunk head pipe plugs in ends of gearshift control housing.
Place a small amount of sealant around the new gearshift rail hole expansion plugs into shifter shaft holes in the front end of gearshift control housing. If there is enough room in the ends of the rear shaft holes of your shifter, I recommend installing these plugs there too.
There has also been some interest in installing a reverse light switch in the shift tower. A write-up for this can be seen here.
Joined: Sep 30, 2013 Posts: 70 Location: Glenburn, ME
Posted: Thu Jan 09, 2014 7:43 pm Post subject:
I got it loose. Removed the plugs and the pins in the shift forks and was able to drive the shaft out with a drift. I had originally hoped not to disassemble all that but now that it's done I'm glad I did.
You cannot post new topics in this forum You cannot reply to topics in this forum You cannot edit your posts in this forum You cannot delete your posts in this forum You cannot vote in polls in this forum