a1 reassembly
-
zeke57

- Active Member

- Posts: 194
- Joined: Wed Dec 27, 2017 6:00 pm
- Location: Salamanca,NY
a1 reassembly
Before I install the tub back on the frame is there anything that should be done first? Right now I am addressing any fluid leaks in the trans./trans.case installing the fuel lines. I plan on doing the wiring once I have the body back on. I have also filled the steering box full of lubricant.
-
wesk

- Site Administrator

- Posts: 16459
- Joined: Sun Apr 03, 2005 6:00 pm
- Location: Wisconsin
- Contact:
Are you using all the old tub mounting hardware and rubbers? If you are did you carefully mark them on removal so they end up back on the correct mount?
You may want to study the TM's & ORD 9 very closely so you can better organize your attack on the "Fitting and alignment of the tub"
I have a sub-album for the A1 tub mounting you may find something there that helps.
http://www.willysmjeeps.com/v2/modules. ... _album.php
But before you hoist the tub take a quiet one hour or so siesta and set next to your chassis with a cold beer, drink or whatever relaxes you and study the chassis. You will be surprised how things that have been right in front of you during the long resto process but you never noticed because you were busy working on something will suddenly pop right out at you. As a rule if the tubs off then carefully inspect and repair everything that sets below it before you install it.
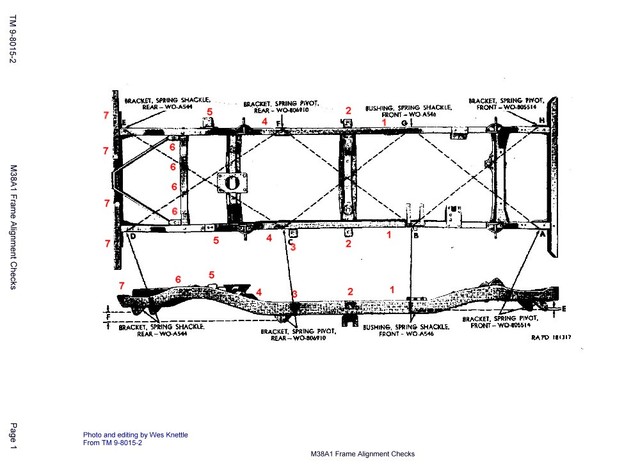
A couple of install procedural items you should review are the tub alignment procedure which starts at the rear crossmember and works it way forward. By the time you reach the firewall area you will find a constant adjusting of the tub position becomes necessary as you check brake/clutch pedal alignment and starter pedal alignment and steering shaft alignment as well as it will be wise not to start the final tightening of the tub mounts until you have also temporarily fitted the front sheet metal. Use the TM 9-8015-2.
You may want to study the TM's & ORD 9 very closely so you can better organize your attack on the "Fitting and alignment of the tub"
I have a sub-album for the A1 tub mounting you may find something there that helps.
http://www.willysmjeeps.com/v2/modules. ... _album.php
But before you hoist the tub take a quiet one hour or so siesta and set next to your chassis with a cold beer, drink or whatever relaxes you and study the chassis. You will be surprised how things that have been right in front of you during the long resto process but you never noticed because you were busy working on something will suddenly pop right out at you. As a rule if the tubs off then carefully inspect and repair everything that sets below it before you install it.
A couple of install procedural items you should review are the tub alignment procedure which starts at the rear crossmember and works it way forward. By the time you reach the firewall area you will find a constant adjusting of the tub position becomes necessary as you check brake/clutch pedal alignment and starter pedal alignment and steering shaft alignment as well as it will be wise not to start the final tightening of the tub mounts until you have also temporarily fitted the front sheet metal. Use the TM 9-8015-2.
Wes K
45 MB, 51 M38, 54 M37, 66 M101A1, 60 CJ5, 76 DJ5D, 47Bantam T3-C & 5? M100
Mjeeps photo album: http://www.willysmjeeps.com/v2/modules. ... _album.php
45 MB, 51 M38, 54 M37, 66 M101A1, 60 CJ5, 76 DJ5D, 47Bantam T3-C & 5? M100
Mjeeps photo album: http://www.willysmjeeps.com/v2/modules. ... _album.php
-
zeke57
- Active Member
- Posts: 194
- Joined: Wed Dec 27, 2017 6:00 pm
- Location: Salamanca,NY
-
wesk
- Site Administrator
- Posts: 16459
- Joined: Sun Apr 03, 2005 6:00 pm
- Location: Wisconsin
- Contact:
The thickness is very important to tub alignment.
The pads vary a lot in flat dimensions and thicknesses. They are not that expensive in a kit.
The pads vary a lot in flat dimensions and thicknesses. They are not that expensive in a kit.
Wes K
45 MB, 51 M38, 54 M37, 66 M101A1, 60 CJ5, 76 DJ5D, 47Bantam T3-C & 5? M100
Mjeeps photo album: http://www.willysmjeeps.com/v2/modules. ... _album.php
45 MB, 51 M38, 54 M37, 66 M101A1, 60 CJ5, 76 DJ5D, 47Bantam T3-C & 5? M100
Mjeeps photo album: http://www.willysmjeeps.com/v2/modules. ... _album.php
-
zeke57
- Active Member
- Posts: 194
- Joined: Wed Dec 27, 2017 6:00 pm
- Location: Salamanca,NY
-
wesk
- Site Administrator
- Posts: 16459
- Joined: Sun Apr 03, 2005 6:00 pm
- Location: Wisconsin
- Contact:
Assuming a straight frame and straight tub the difference 1/8 to 1/16's can make in 10 feet or so is very measurable. There are steps you can take to check the tub and frame for straightness (trueness) and all are simple geometry. How much difference can 1/8" possibly mean???
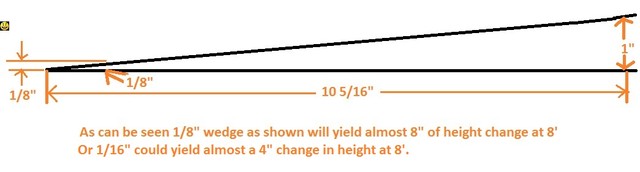
The pedal holes and that arm on the starter are very easy to miss if you get the angled up at the front too high.
If your tub & frame are straight then by using the correct size pad at each body mount your tub will line correctly or extremely close requiring only small increment adjustments at the end of your alignment.
Wes K
45 MB, 51 M38, 54 M37, 66 M101A1, 60 CJ5, 76 DJ5D, 47Bantam T3-C & 5? M100
Mjeeps photo album: http://www.willysmjeeps.com/v2/modules. ... _album.php
45 MB, 51 M38, 54 M37, 66 M101A1, 60 CJ5, 76 DJ5D, 47Bantam T3-C & 5? M100
Mjeeps photo album: http://www.willysmjeeps.com/v2/modules. ... _album.php
-
zeke57
- Active Member
- Posts: 194
- Joined: Wed Dec 27, 2017 6:00 pm
- Location: Salamanca,NY
-
zeke57
- Active Member
- Posts: 194
- Joined: Wed Dec 27, 2017 6:00 pm
- Location: Salamanca,NY
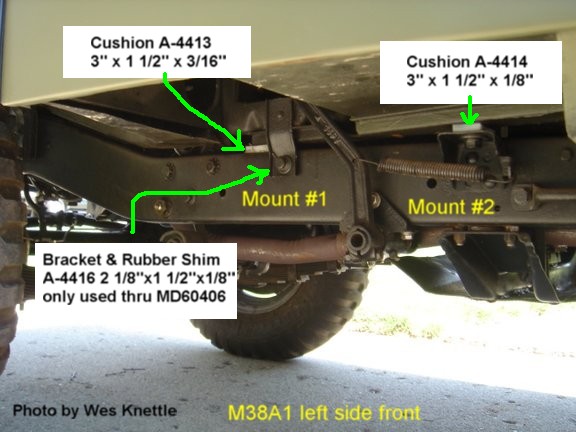
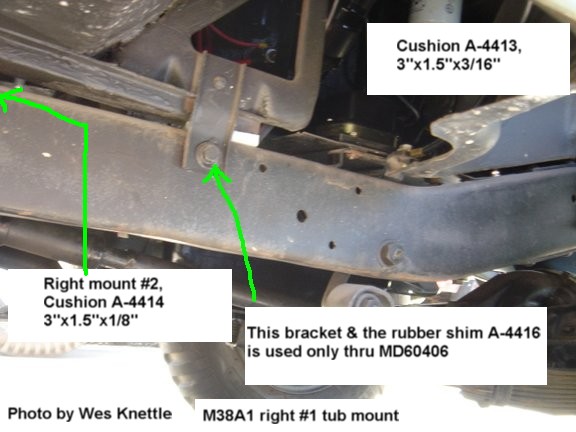
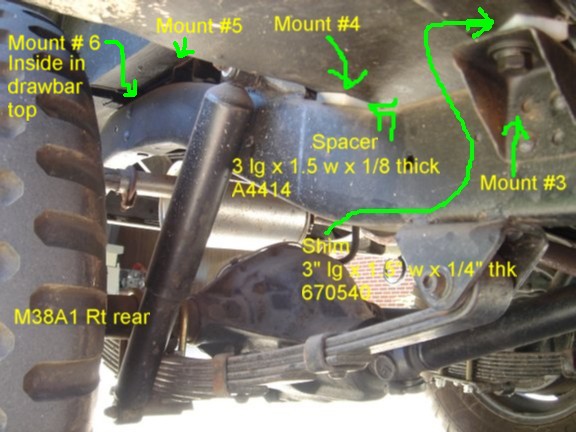
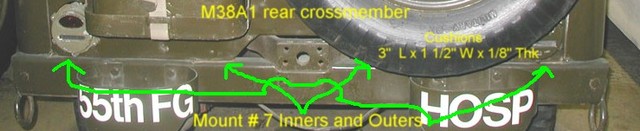
I am a little confused by body mounts #5 and #6. ORD 9 SNL G-758 is calling for (2 )1/8'' cushions and (2) 3/16'' cushions for body mount #5 so am I correct in assuming the 1 /8'' go on the right side and that two cushions go side by side on each mount? Body mount #6 is calling for (4) 1/8'' cushions but only (2) sq. neck bolts to secure them. I see on the body and on the frame the corresponding holes for body mount #6 which consists of two holes so where do the other 1/8'' cushions go as the book is showing (4) cushions required for body mount #6. Hope I explained this for everyone to understand.
-
wesk
- Site Administrator
- Posts: 16459
- Joined: Sun Apr 03, 2005 6:00 pm
- Location: Wisconsin
- Contact:
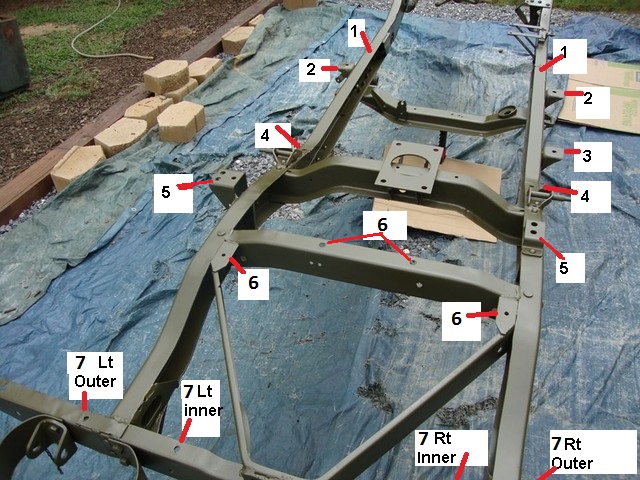
There are a few errors in bolt counts and in some cases the other two bolts are located elsewhere in the IPL.
On #5 I believe they are offering you a choice between two thicknesses: 1/8" and 3/16".
On # 6 There are a total of 4 mounting points. You will probably find the other 2 bolts elsewhere in the IPL.
Wes K
45 MB, 51 M38, 54 M37, 66 M101A1, 60 CJ5, 76 DJ5D, 47Bantam T3-C & 5? M100
Mjeeps photo album: http://www.willysmjeeps.com/v2/modules. ... _album.php
45 MB, 51 M38, 54 M37, 66 M101A1, 60 CJ5, 76 DJ5D, 47Bantam T3-C & 5? M100
Mjeeps photo album: http://www.willysmjeeps.com/v2/modules. ... _album.php
-
zeke57
- Active Member
- Posts: 194
- Joined: Wed Dec 27, 2017 6:00 pm
- Location: Salamanca,NY
-
wesk
- Site Administrator
- Posts: 16459
- Joined: Sun Apr 03, 2005 6:00 pm
- Location: Wisconsin
- Contact:
They may be possibilities. There is no other source right now to narrow this down any further. The only source that can clear the air on this are the Willys Blueprints.
What also concerns me is the M170 body parts are shown/segregated clearly everywhere except within section 1801. There's no differentiation between frames for M170/early M38A1/late M38A1 even though they are three different part number frames.
I suspect the tech writer responsible for section 1801 wrote it all inclusive for both the M38A1 and the M170 with no differentiation between models in the list. My money says the two different thickness pads for Mount #5 are one pair for the m170 and one pair for the m38A1. My money says the 4 each for Mount #6 are really meant to be two each for M38A1 and two each for the M170. These are my personal assumptions and are risky since they apply a term that tech writers are not very familiar with called "Common Sense"!
Bottom line for any restorer is: Use the body mount cushions that will properly align your tub with your frame. Since 50 year olod frames & tubs get bent twisted and distorted over the years one will usually have to straighten tubs/frames or vary pad thicknesses from the book listings.
Wes K
45 MB, 51 M38, 54 M37, 66 M101A1, 60 CJ5, 76 DJ5D, 47Bantam T3-C & 5? M100
Mjeeps photo album: http://www.willysmjeeps.com/v2/modules. ... _album.php
45 MB, 51 M38, 54 M37, 66 M101A1, 60 CJ5, 76 DJ5D, 47Bantam T3-C & 5? M100
Mjeeps photo album: http://www.willysmjeeps.com/v2/modules. ... _album.php