Hodakaguy M38 Misc Thread

Start your project thread here for advice and for others to follow along with your project. This is a long term thread.

Moderator: wesk

Post Reply
HodakaguyTom
Member
Posts: 79
Joined: Wed Apr 24, 2024 6:00 pm
Location: Eastern WA State

Post by HodakaguyTom »

Vapor Lock....let's address that.

When the M38 left the factory the fuel line was routed very close to the exhaust manifold. This allowed the fuel tubing to get hot enough to boil the fuel and cause vapor locking issues. We had vapor lock a couple times last summer. I had temporarily fixed this issue by sliding a fire sleeve over the fuel line to insulate the line from the exhaust manifold, but didn't like the looks of it installed as it took away from the stock look.

In 1953 the US Army released a technical bulletin to address the vapor lock issue, this Bulletin called for re-routing the fuel line away from the exhaust manifold. Here's a copy of the bulletin.

Image

Image


And here's a pic of the fuel line on our Jeep, routed as it would have been when it originally left the factory.

Image


Fresh stick of 5/16" tubing

Image


Marking the bend location on the tubing

Image

Image

Image


Making the bend. I love roller benders, they leave smooth bends without any kinks or smashed tubing.

Image

Image

Image


Back in the Jeep to mark the cut length on the tubing.

Image


Initial cut.

Image


Adding the width of the mandrel to the cut line. When the double flare is made this will bring the overall length back to the original mark.

Image

Image


Setting the height of the tubing in the tool. The tubing height should be even with the raised edge on the mandrel.

Image


Inside of the tubing has been reemed to take off any raised edges.

Image


Using a file to ensure the top of the tubing is completly flat. Taking time to prep properly here makes a huge difference in the quality of the final flare.

Image


Adding a bit of oil to the tubing and mandrel.

Image

Image


The proper sized mandrel is placed into the tubing, then the mandrel is pressed down against the clamp. This forms the first flare.

Image

Image

Image


The mandrel is removed then the clamp is utilized again with some light oil to form the double flare. DONT forget to install the fitting on the tubing before you make the flare...or you'll be doing it over again :-)

Image

Image

Image


With the fuel line fabricated I decided to fabricate a new vent line as well. The previous owner had bent the line incorrectly then hand tweaked it to fit...resulting in several kinks in the tubing.

Image

Image


Marking and bending the new vent line.

Image

Image

Image


New vent line installed in the Jeep. A lot cleaner.

Image

Image


And the new fuel line installed as well.

Image

Image

Image

Image

Image


One more small project out of the way.

Hodakaguy
HodakaguyTom
Member
Posts: 79
Joined: Wed Apr 24, 2024 6:00 pm
Location: Eastern WA State

Post by HodakaguyTom »

The transmission & transfer case are friends again.

With the transmission set on the bench it's time to get to work.

Image


I cut the heads off a couple bolts and installed them in the transmission for alignment pins. This will help guide the two units together smoothly.

Image

Image


Marking where the gasket sits so I can apply Aviation Permatex. Permatex was applied to both sides of the gasket and both mating surfaces. Allow the Permatex to air dry for a bit before joining the parts. I've used Aviation Permatex for years....great stuff!

Image

Image

Image

Image

Image


Joining the two together.

Image

Image


Removing the guide pins and installing the bolts.

Image


Torquing the bolts

Image


Joined together.

Image


Next up is to install the gear on the transmission output shaft.

Image


Gear slid onto the shaft.

Image


Washer installed.

Image

Image


Applying Orange Thread Sealer

Image


Lock nut for the Output Shaft.

Image


Torquing the output shaft nut to 105 ft/lbs

Image

Image


Installing the cover with more Aviation Permatex. Permatex applied to the bolt threads as well to seal the through holes.

Image

Image

Image

Image

Image

Image


With the two units mated up I cleaned off the excess Permatex and primed/painted the exposed edges.

Image

Image


Next I removed the emergency brake drum again and swapped out the companion flange bolts. The new set I installed last post was to short and didn't have enough bolt length to attach the drive line. This swap only took a few minutes.

Image

Image

Image


With that out of the way I set to cleaning up and painting some of the small bits. Here I'm removing the clutch cable from the bell housing.

Image

Image

Image


Parts cleaned up and ready for paint.

Image

Image


In primer

Image


Time to clean up the clutch control tube

Image


End seals have seen better days.

Image


Unit was missing the two metal disks.

Image


More primer and paint

Image

Image

Image


Getting closer!

Image

Image

Image


More to come....

Hodakaguy
HodakaguyTom
Member
Posts: 79
Joined: Wed Apr 24, 2024 6:00 pm
Location: Eastern WA State

Post by HodakaguyTom »

A tiny bit of progress today.

Freshly painted clutch control tube displayed with the new rebuild kit. I ended up painting and re-using the original ball studs as they were in great cond still. When I removed this assembly from the jeep both metal disc's were missing.

Image


Assembly order of the clutch control tube. Note new cotter pins have already been installed in the tube.

Image


Starting to pack the tube with grease.

Image

Image


Starting on the short side first. The metal disc is installed up against the cotter pin.

Image

Image


More grease added then the felt is installed up against the disc.

Image

Image


Next up is the long end. On this end the spring is installed first and goes up against the cotter pin. Again the tube is packed with grease.

Image

Image

Image

Image


Disc is installed on top of spring.

Image

Image


More grease then the felt is installed up against the disc.

Image

Image


With the control tube assembled and placed in a zip lock bag for future use I turned my attention to the bell housing.

Image


A light coat of grease on the mating surface of the bell housing.

Image

Image


Bolted up.

Image

Image


Installing the clutch release fork.

Image


A bot of grease on the ears and where the ball stud rides.

Image

Image

Image

Image

Image

Image


Installing the vent fitting on top of the transfer case. I used Aviation Permatex to seal the threads.

Image

Image

Image

Image

Image

Image

Image

Image


Installing the clutch control shaft ball stud onto the transfer case.

Image

Image

Image

Image

Image


More to come.....

Hodakaguy
RonD2
Member
Posts: 2067
Joined: Wed Oct 01, 2014 6:00 pm
Location: South Carolina, Dorchester County

Post by RonD2 »

Hey Tom,
More great photo details!

Have to ask: considering this recent announcement http://willysmjeeps.com/v2/modules.php? ... 0668#80668 how did you manage to upload all those photos?

I can't even look at my album.
Ron D.
1951 M38 Unknown Serial Number
1951 M100 Dunbar Kapple 01169903 dod 5-51

“The only good sports car that America ever made was the Jeep."
--- Enzo Ferrari

HodakaguyTom
Member
Posts: 79
Joined: Wed Apr 24, 2024 6:00 pm
Location: Eastern WA State

Post by HodakaguyTom »

RonD2 wrote:Hey Tom,
More great photo details!

Have to ask: considering this recent announcement http://willysmjeeps.com/v2/modules.php? ... 0668#80668 how did you manage to upload all those photos?

I can't even look at my album.
I host my photos on a remote site (Smugmug) then link the photos to my post. That way the photos don't take up any space from the host site. I also retain full control of my photos.

I'd be happy to make up a video showing the process if that's something you would like to try.

Hodakaguy
RonD2
Member
Posts: 2067
Joined: Wed Oct 01, 2014 6:00 pm
Location: South Carolina, Dorchester County

Post by RonD2 »

Thanks anyway Tom, but not necessary.
Can't afford $25 a month for a place to park photos.
Ron D.
1951 M38 Unknown Serial Number
1951 M100 Dunbar Kapple 01169903 dod 5-51

“The only good sports car that America ever made was the Jeep."
--- Enzo Ferrari

RonD2
Member
Posts: 2067
Joined: Wed Oct 01, 2014 6:00 pm
Location: South Carolina, Dorchester County

Post by RonD2 »

HodakaguyTom wrote:Image
Hi Tom,
I’m guessing you decided to pack your tube full of grease to keep crud out?

I always found it strange that the Army and Willys seem to pretty much ignore the clutch control lever (tube) in the service manuals and lubrication order --- a moving part that gets a lot of use and is positioned to easily collect crud and water from the road.
Especially since there’s no way to clean and lubricate it without taking it apart.

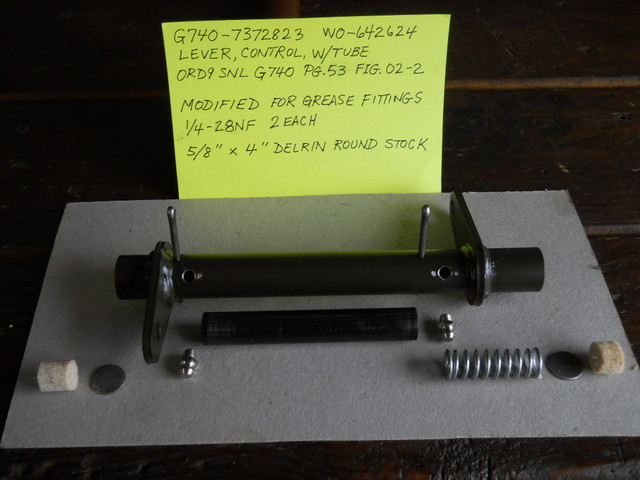
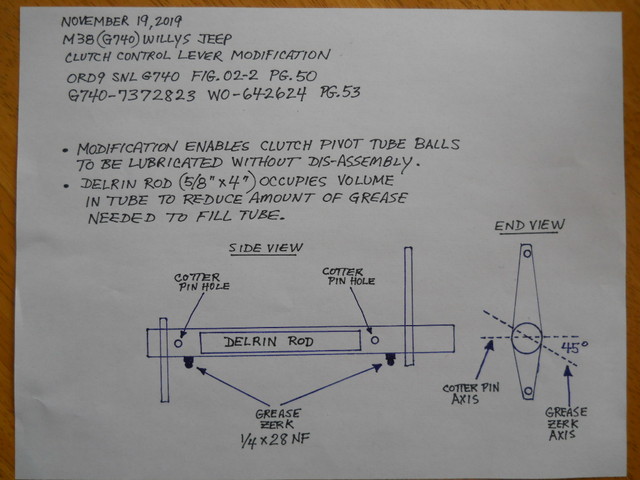
I thought I’d share that I modified my tube by inserting a piece of Delrin (5/8-inch round stock 4-inches long) inside the tube to take up space instead of packing it with grease.
The 5/8ths round stock is a medium interference fit --- tight enough not to move but not so tight it can’t be easily removed if need be.
Delrin is impervious to grease, durable enough to last forever, and temperature stable so it doesn’t shrink, expand, or rot.

Then I took it a step further and drilled and tapped the tube for 2 grease zerk fittings (carefully placed to be accessible).
I'm considering finishing this unauthorized mod by replacing the cotter pins with roll pins to totally enclose the space (except for the ends of course).
Still easy enough to punch them out for maintenance.

With the other zerks under the jeep in that area they look right at home.
Maybe overkill ---> a solution in search of a problem? :lol:

ImageImage
Last edited by RonD2 on Sat Feb 08, 2025 9:02 am, edited 1 time in total.
Ron D.
1951 M38 Unknown Serial Number
1951 M100 Dunbar Kapple 01169903 dod 5-51

“The only good sports car that America ever made was the Jeep."
--- Enzo Ferrari

RonD2
Member
Posts: 2067
Joined: Wed Oct 01, 2014 6:00 pm
Location: South Carolina, Dorchester County

Post by RonD2 »

Can't take credit for the basic idea, got it here: http://willysmjeeps.com/v2/modules.php? ... be&start=0

Yet another nugget buried in this great forum.
Ron D.
1951 M38 Unknown Serial Number
1951 M100 Dunbar Kapple 01169903 dod 5-51

“The only good sports car that America ever made was the Jeep."
--- Enzo Ferrari

HodakaguyTom
Member
Posts: 79
Joined: Wed Apr 24, 2024 6:00 pm
Location: Eastern WA State

Post by HodakaguyTom »

[quote="RonD2"
Hi Tom,
I’m guessing you decided to pack your tube full of grease to keep crud out?

I always found it strange that the Army and Willys seem to pretty much ignore the clutch control lever (tube) in the service manuals and lubrication order --- a moving part that gets a lot of use and is positioned to easily collect crud and water from the road.
Especially since there’s no way to clean and lubricate it without taking it apart.

I thought I’d share that I modified my tube by inserting a piece of Delrin (5/8-inch round stock 4-inches long) inside the tube to take up space instead of packing it with grease.
The 5/8ths round stock is a medium interference fit --- tight enough not to move but not so tight it can’t be easily removed if need be.
Delrin is impervious to grease, durable enough to last forever, and temperature stable so it doesn’t shrink, expand, or rot.

Then I took it a step further and drilled and tapped the tube for 2 grease zerk fittings (carefully placed to be accessible).
I'm considering finishing this unauthorized mod by replacing the cotter pins with roll pins to totally enclose the space (except for the ends of course).
Still easy enough to punch them out for maintenance.

With the other zerks under the jeep in that area they look right at home.
Maybe overkill ---> a solution in search of a problem? :lol:

[/quote]


Hi Ron. Yeah I filled the tube just to keep any rust ect from forming inside the tube. Nice job on the Zerks. I did think of adding that mod as well but was wondering how effective they would be since they are on the inside of the disk/felt, I'm sure the pressure will push grease past them just fine. I figured It's pretty easy to drop the tube every few years and clean/repack with grease. Like you said It's weird they didn't set this part up for easier maint.

Thanks for the tip

Hodakaguy
RonD2
Member
Posts: 2067
Joined: Wed Oct 01, 2014 6:00 pm
Location: South Carolina, Dorchester County

Post by RonD2 »

HodakaguyTom wrote:....wondering how effective they would be since they are on the inside of the disk/felt, I'm sure the pressure will push grease past them just fine.
Yes it does.
A little grease also gets out the cotter pin holes --- hence swapping them out for roll pins.
Ron D.
1951 M38 Unknown Serial Number
1951 M100 Dunbar Kapple 01169903 dod 5-51

“The only good sports car that America ever made was the Jeep."
--- Enzo Ferrari

HodakaguyTom
Member
Posts: 79
Joined: Wed Apr 24, 2024 6:00 pm
Location: Eastern WA State

Post by HodakaguyTom »

RonD2 wrote:
HodakaguyTom wrote:....wondering how effective they would be since they are on the inside of the disk/felt, I'm sure the pressure will push grease past them just fine.
Yes it does.
A little grease also gets out the cotter pin holes --- hence swapping them out for roll pins.
Nice! Great mod! Thanks again for sharing.

Hodakaguy
HodakaguyTom
Member
Posts: 79
Joined: Wed Apr 24, 2024 6:00 pm
Location: Eastern WA State

Post by HodakaguyTom »

More Progress.....Back in the Jeep!

Here the cross member and numerous small bits have received a fresh coat of primer & paint.

Image

Image

Image

Image


Original rubber isolator compared to the new one.

Image

Image


Yep...A new one will be good

Image


Isolator in the cross member

Image

Image

Image

Image

Image

Image


Installing the new rubber boot on the clutch cable. A bit of Sil-Glide made installation easy.

Image

Image

Image

Image


New dowel bolts installed in the bell housing. These are your alignment bolts.

Image


A thin coat of Moly Paste on the clutch splines

Image

Image


Assembly on the transmission jack and ready to go back into the Jeep. I padded the jack with moving blankets and used a ratchet strap to hold the assembly onto the jack. The transmission jack (This on is a Harbor Freight unit) makes this job soooo easy. All 4 wheels are full caster allowing freedom of movement, the jack handle pivots 360 deg allowing easy adjustment of height and the head is adjustable for angle on both front to back and side to side directions.

Image

Image


With my wife pushing forward on the jack from underneath I wiggled the transmission back and forth and it slid right into place. I popped a hole in the tape on top of the transmission so I could rotate the input shaft and make sure it was engaged in the clutch splines to get the assembly sliding forward.

Image

Image


And its in.

Image

Image

Image


It looks like the vent line is suppose to tie into the bell housing where the plug is installed just forward of the clutch boot. I'll have to modify this.

Image


Installing the shift levers on the transfer case. Lubricating the pivot points and pin before assembly.

Image


Anti rattle spring installed.

Image

Image


And hitting the zerk with some grease

Image

Image


I'm using Aviation Permatex on the shift tower gasket instead of grease. This will fill the little imperfections in the mating surface and hopefully prevent leaks.

Image

Image

Image


Some fresh GL4 to coat everything with oil. I'll finish topping it off through the fill plug.

Image

Image


Aviation Permatex on the threads to seal the through holes.

Image


I used some high moly grease to lubricate the ball on the T90 shifter upon assembly.

Image


Installing the gasket on the shift tower. A bit of grease on the gasket prior to assembly. Tip: The Cuno oil filter gaskets are also the perfect size to fit the shift tower on the M38.

Image

Image

Image


Image

Image


I didn't stop to snap pics during the process but when installing the shift tower onto the transmission place the shifter in 3rd gear and with the bolts installed and still a bit loose pull the tower rearward as far as it will go then tighten down the bolts.

Image


Clutch control tube back in place.

Image


More to come....

Hodakaguy
RonD2
Member
Posts: 2067
Joined: Wed Oct 01, 2014 6:00 pm
Location: South Carolina, Dorchester County

Post by RonD2 »

Hey Tom,
Think you still might have a duplicate sequence of your last photo post?

The little "x" button next to the quote and edit (post) buttons at the far right is the "delete this post" button to do it yourself.

Maybe I missed it ----- engine stay cable?

Nice work!
Last edited by RonD2 on Sun Feb 09, 2025 7:47 pm, edited 1 time in total.
Ron D.
1951 M38 Unknown Serial Number
1951 M100 Dunbar Kapple 01169903 dod 5-51

“The only good sports car that America ever made was the Jeep."
--- Enzo Ferrari

HodakaguyTom
Member
Posts: 79
Joined: Wed Apr 24, 2024 6:00 pm
Location: Eastern WA State

Post by HodakaguyTom »

RonD2 wrote:Hey Tom,
Think you still might have a duplicate sequence of your last photo post?

The little "x" button next to the quote and edit (post) buttons at the far right is the "delete this post" button to do it yourself.

Maybe I missed it ----- engine stay cable?

Nice work!
I was looking for that option to delete but it's not there, I think it's only available for a limited period of time. The site was having issues this morning and it looks like it uploaded numerous copies when it finally went through.

The engine stay is on there, I did not get a good picture of it though. I still need to modify the vent line coming off of the transmission so that it tees into the bell housing, I am waiting on getting the fitting before I can do that work. Getting closer!

Thanks.

Tom.
RonD2
Member
Posts: 2067
Joined: Wed Oct 01, 2014 6:00 pm
Location: South Carolina, Dorchester County

Post by RonD2 »

HodakaguyTom wrote:I think it's only available for a limited period of time.
I just looked at several of my posts from weeks ago and it's there.
A little "x" in a box at the far right hand side of the screen.
If you hover on it it says "delete this post".
You have to be logged in to see it.
Ron D.
1951 M38 Unknown Serial Number
1951 M100 Dunbar Kapple 01169903 dod 5-51

“The only good sports car that America ever made was the Jeep."
--- Enzo Ferrari

Post Reply