1950 M38 find
-
Bretto
- Jeep Legend

- Posts: 1390
- Joined: Tue Nov 23, 2010 6:00 pm
- Location: Orem, UT
-
4x4M38

- Jeep Legend
- Posts: 3487
- Joined: Thu May 29, 2014 6:00 pm
- Location: Texas Hill Country
Thank you Sir!
Yes, all cold worked. I was sweating bullets as I got the bend
near 90 degrees, but went slow and took my time. The real scary
moments were when I had to bring the ends back to square
from twisting while making the big bends.
They aren't perfect but only you, Rick and Wes would notice!
You can do them without heat. And the second one is easier
as you can start in the middle and work your way to the ends
Again, thanks for the inspiration and the data.
Brian
-
4x4M38
- Jeep Legend
- Posts: 3487
- Joined: Thu May 29, 2014 6:00 pm
- Location: Texas Hill Country
sheet metal work
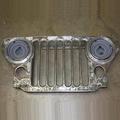
Started on the hood. Money and a fear of minimum metal left to work with has made the decision not to media blast. I am paying the price in sweat equity instead. This also gives me an appreciation for the guys in the past that did all of this stuff by hand.
The hood was a mess. Several coats of paint and Bondo. Fording and slave cable cutout badly patched with bubblegum welds and a gallon of Bondo. I borrowed a MIG, Youngest son says he can weld 18 gauge sheet. I'll save that repair until he comes out next.
In the meantime, began removing the junk on top. Heated up with a propane torch, then paint scraper. Mostly paint scraper. Then sand paper. Got it down to mostly metal. Pulled the hood and laid it flat upside down on the garage floor and began working on the dents. Sanded again then hit it with some etching primer to protect the metal.
Went to the driver's side then decided I needed to take at least one photo.
I started with the torch, but gave up and went to the scraper.
http://willysmjeeps.com/v2/modules/gall ... d_001.jpeg
I have no idea what those two holes were for. One match on the other side.
Unfortunately there is no green paint under Bubba's first couple of coats of primer and Bondo, so I gave up on any chance at hood numbers.
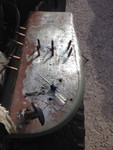
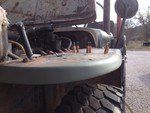
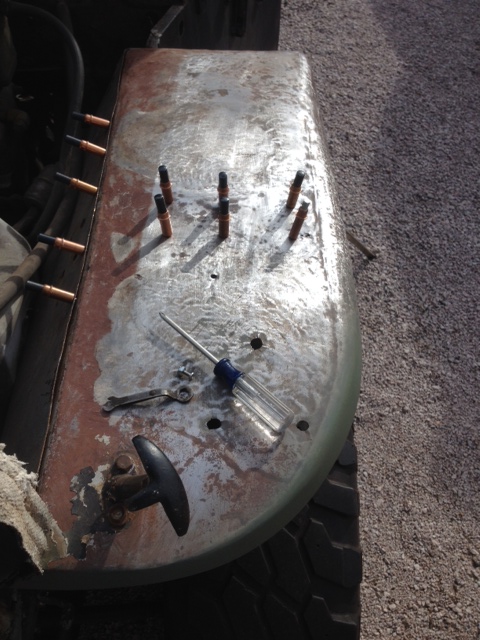
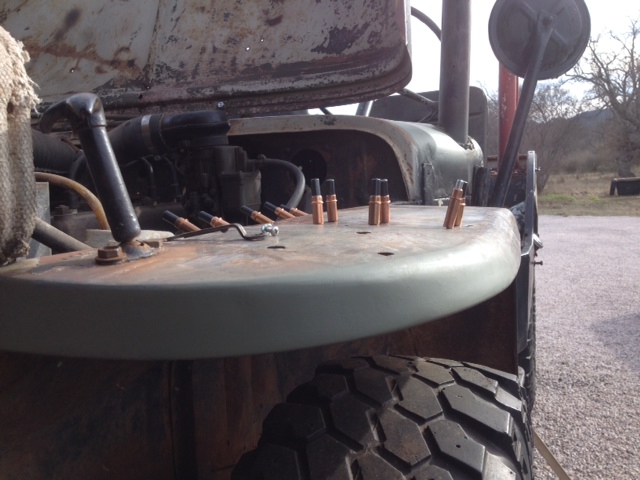
Here's one for the Strata Blue guys. The left fender was worse than the hood. It had been mashed, stood on, and pounded out so much the fender had pulled out of the inner fenderwell, and the horizontal sheetmetal was so stretched there was no way to bring it back to true. I first thought the support had bent, but a square on it underneath showed it to be good. The fender only had spot welds out at the very end holding it. Everything else was popped. Once I figured that out I realized the dented section where it attached to the support was at the correct place, everything else was stretched something awful in the vertical. So. I drilled 1/8" holes through the fender and bracket moving in towards the fender well, two at a time, and putting Clecos in. Then drill the next pair of holes, and so on.
http://willysmjeeps.com/v2/modules/gall ... nder2.jpeg
http://willysmjeeps.com/v2/modules/gall ... nder1.jpeg
Once I got near the fenderwell, I kneeled on top of the fender and that pushed the fender back down where it belonged in relation to the fenderwell. Drilled and Clecoed fore and aft to where that edge was again semi-square. Then I went back and removed the Clecos one at a time and replaced with screws and locknuts to hold the mess. Once #2 son shows up I'll pull the screws one at a time and have him spot weld.
http://willysmjeeps.com/v2/modules/gall ... nder3.jpeg
These are neat little gizmos and come in a variety of hole diameters. They were designed for riveting airplanes together. You drill the holes, put the panels together, Cleco them up, then rivet. I bought these years ago for a train project which I have yet to use them on, so this was my first go. It won't be the last.
As you can see from the last photo this old girl will never be a trailer queen with things like that fender. I didn't buy her to be one, but I'll fix her up and make her as presentable as possible with my means, and drive.
One day if I win the lottery maybe I'll buy a new hood and fenders. As Wes said in another post, all I have to do is paint them and bolt them on. That's the way Willys did it, and I'm sure the motor pool guys as well.
My arms hurt.......................
The hood was a mess. Several coats of paint and Bondo. Fording and slave cable cutout badly patched with bubblegum welds and a gallon of Bondo. I borrowed a MIG, Youngest son says he can weld 18 gauge sheet. I'll save that repair until he comes out next.
In the meantime, began removing the junk on top. Heated up with a propane torch, then paint scraper. Mostly paint scraper. Then sand paper. Got it down to mostly metal. Pulled the hood and laid it flat upside down on the garage floor and began working on the dents. Sanded again then hit it with some etching primer to protect the metal.
Went to the driver's side then decided I needed to take at least one photo.
I started with the torch, but gave up and went to the scraper.
http://willysmjeeps.com/v2/modules/gall ... d_001.jpeg
I have no idea what those two holes were for. One match on the other side.
Unfortunately there is no green paint under Bubba's first couple of coats of primer and Bondo, so I gave up on any chance at hood numbers.
Here's one for the Strata Blue guys. The left fender was worse than the hood. It had been mashed, stood on, and pounded out so much the fender had pulled out of the inner fenderwell, and the horizontal sheetmetal was so stretched there was no way to bring it back to true. I first thought the support had bent, but a square on it underneath showed it to be good. The fender only had spot welds out at the very end holding it. Everything else was popped. Once I figured that out I realized the dented section where it attached to the support was at the correct place, everything else was stretched something awful in the vertical. So. I drilled 1/8" holes through the fender and bracket moving in towards the fender well, two at a time, and putting Clecos in. Then drill the next pair of holes, and so on.
http://willysmjeeps.com/v2/modules/gall ... nder2.jpeg
http://willysmjeeps.com/v2/modules/gall ... nder1.jpeg
Once I got near the fenderwell, I kneeled on top of the fender and that pushed the fender back down where it belonged in relation to the fenderwell. Drilled and Clecoed fore and aft to where that edge was again semi-square. Then I went back and removed the Clecos one at a time and replaced with screws and locknuts to hold the mess. Once #2 son shows up I'll pull the screws one at a time and have him spot weld.
http://willysmjeeps.com/v2/modules/gall ... nder3.jpeg
These are neat little gizmos and come in a variety of hole diameters. They were designed for riveting airplanes together. You drill the holes, put the panels together, Cleco them up, then rivet. I bought these years ago for a train project which I have yet to use them on, so this was my first go. It won't be the last.
As you can see from the last photo this old girl will never be a trailer queen with things like that fender. I didn't buy her to be one, but I'll fix her up and make her as presentable as possible with my means, and drive.
One day if I win the lottery maybe I'll buy a new hood and fenders. As Wes said in another post, all I have to do is paint them and bolt them on. That's the way Willys did it, and I'm sure the motor pool guys as well.
My arms hurt.......................
-
ACRay
- Contributor

- Posts: 80
- Joined: Wed Jul 23, 2014 6:00 pm
- Location: Fort Bliss Texas
I'm digging through a pile of junk that the mechanics have dubbed trash ... that's where I found my perfect condition tail light. I need a black out light but if I find 2 I could send the other to you if you need one. I still need the mounting "hoop" for the fender black out drive lamp but I'm sure I can get my hands on at least one of em for my fender from our wasteful mechanics. Pretty cool that the 113s use the same BO (looks the same anyway) and tail lights that the M38 did
-
4x4M38
- Jeep Legend
- Posts: 3487
- Joined: Thu May 29, 2014 6:00 pm
- Location: Texas Hill Country
-
ACRay
- Contributor
- Posts: 80
- Joined: Wed Jul 23, 2014 6:00 pm
- Location: Fort Bliss Texas
-
4x4M38
- Jeep Legend
- Posts: 3487
- Joined: Thu May 29, 2014 6:00 pm
- Location: Texas Hill Country
-
4x4M38
- Jeep Legend
- Posts: 3487
- Joined: Thu May 29, 2014 6:00 pm
- Location: Texas Hill Country
I have worked my way around the hood, skipping the right side that needs to be cut out and replaced, straightening, sanding, and priming. Made it to the cowl, then the dash. Two days with a paint scraper and sandpaper and I am here:
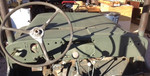
http://willysmjeeps.com/v2/modules/gall ... /dash.jpeg
I have a lot of work ahead, but I'm tackling what is right in front, or more importantly, like saving old buildings, starting on the top and working my way down.
Wes, there is a hole maybe 3/8 or a little bigger, on the lower left side of the dash, in line with the priming pump hole where the start button currently is. Unfortunately it is obscured by the steering wheel.
There are also two other holes on the right side. One just to the bottom left of the right bracket mount for the windshield attachment. One more to the right and near the top right corner of the dash.
Any idea what any of these holes would have been for? Also, how were the door straps and/or seat belts retrofitted if at all?
Slowly and surely it is all starting to become the same color, even if primer.
Thanks,
Brian
-
wesk

- Site Administrator

- Posts: 16464
- Joined: Sun Apr 03, 2005 6:00 pm
- Location: Wisconsin
- Contact:
It is a shame you didn't purchase Ryan's M38 resto guide book. Early and late dashes are well illustrated on page 143.
At the far lower left edge of the dash (slightly lower than the primer pump) is the hole for the garwood winch control used on some of the pre-production prototypes. The Garwood winch was not used during production but the hole was left there.
On the right there are only three holes above the glove box. Two for the windshield hold down bracket and one for the glove box door striker.
Wes K
45 MB, 51 M38, 54 M37, 66 M101A1, 60 CJ5, 76 DJ5D, 47Bantam T3-C & 5? M100
Mjeeps photo album: http://www.willysmjeeps.com/v2/modules. ... _album.php
45 MB, 51 M38, 54 M37, 66 M101A1, 60 CJ5, 76 DJ5D, 47Bantam T3-C & 5? M100
Mjeeps photo album: http://www.willysmjeeps.com/v2/modules. ... _album.php
-
4x4M38
- Jeep Legend
- Posts: 3487
- Joined: Thu May 29, 2014 6:00 pm
- Location: Texas Hill Country
It's out there, Wes, and can be had. Maybe my birthday or Christmas
wish list.
Well the winch hole makes sense. I'll plug it with a tap in.
The other two, well I guess Bubba struck again. Maybe needed
a spot to hang a drink holder.....
The bigger hole? Not sure. It's right at the lower left corner
of the windshield mount screw hole.
Thanks,
Brian
wish list.
Well the winch hole makes sense. I'll plug it with a tap in.
The other two, well I guess Bubba struck again. Maybe needed
a spot to hang a drink holder.....
The bigger hole? Not sure. It's right at the lower left corner
of the windshield mount screw hole.
Thanks,
Brian
-
4x4M38
- Jeep Legend
- Posts: 3487
- Joined: Thu May 29, 2014 6:00 pm
- Location: Texas Hill Country
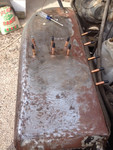
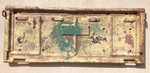
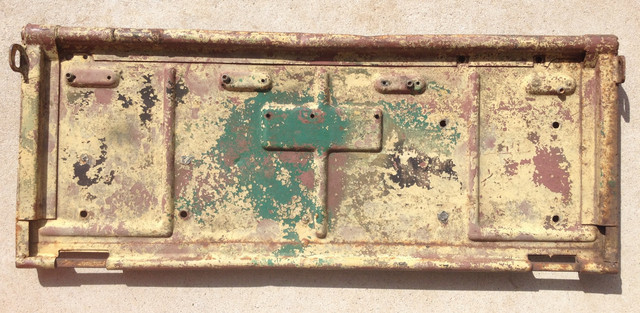
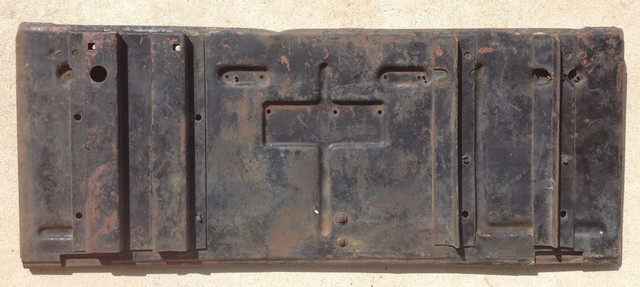
Finally got my 25 dollar Ebay tailgate home. Brown charged me 50 to ship it, so 75 total?
http://willysmjeeps.com/v2/modules/gall ... .sized.jpg
It was advertised as a CJ tailgate. Then I saw the back.
http://willysmjeeps.com/v2/modules/gall ... .sized.jpg
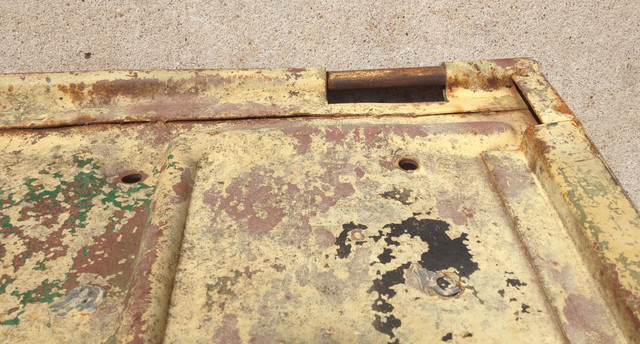
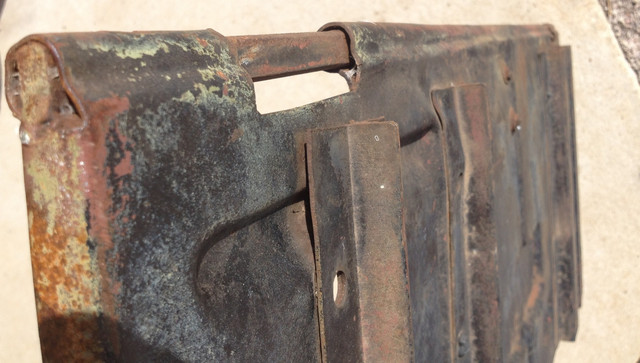
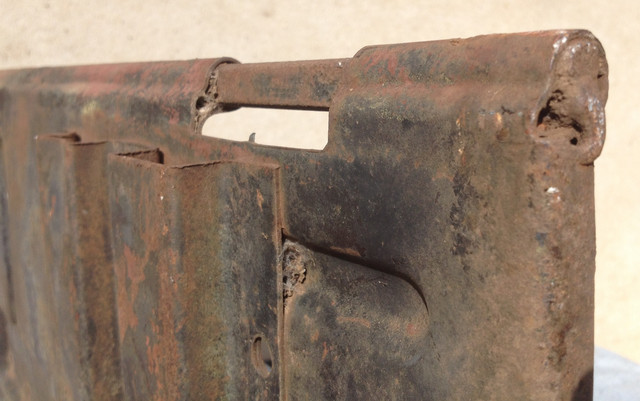
It has rust in the usual places, in the bottom where the wrapped up piece holds the hinge pins on. But, doesn't appear to be as bad as it could be. What I can see into the pin areas looks pretty good.

http://willysmjeeps.com/v2/modules/gall ... .sized.jpg

http://willysmjeeps.com/v2/modules/gall ... .sized.jpg

http://willysmjeeps.com/v2/modules/gall ... .sized.jpg

http://willysmjeeps.com/v2/modules/gall ... .sized.jpg
It has plenty of warts, and will need some work, but for a driver and maybe eventual motor pool, I believe it beats a repop.
Interesting paint. On the interior side, it looks like red lead over steel, and black paint over the primer.
The back is red lead over steel, then what looks like faded zinc chromate, then a bad green. Some of it appears almost a light olive, and a brighter green, then of course the black, then more yellow.
I can't find anything that looks like 2430 anywhere.
Onward.
http://willysmjeeps.com/v2/modules/gall ... .sized.jpg
It was advertised as a CJ tailgate. Then I saw the back.
http://willysmjeeps.com/v2/modules/gall ... .sized.jpg
It has rust in the usual places, in the bottom where the wrapped up piece holds the hinge pins on. But, doesn't appear to be as bad as it could be. What I can see into the pin areas looks pretty good.
http://willysmjeeps.com/v2/modules/gall ... .sized.jpg
http://willysmjeeps.com/v2/modules/gall ... .sized.jpg
http://willysmjeeps.com/v2/modules/gall ... .sized.jpg
http://willysmjeeps.com/v2/modules/gall ... .sized.jpg
It has plenty of warts, and will need some work, but for a driver and maybe eventual motor pool, I believe it beats a repop.
Interesting paint. On the interior side, it looks like red lead over steel, and black paint over the primer.
The back is red lead over steel, then what looks like faded zinc chromate, then a bad green. Some of it appears almost a light olive, and a brighter green, then of course the black, then more yellow.
I can't find anything that looks like 2430 anywhere.
Onward.
-
4x4M38
- Jeep Legend
- Posts: 3487
- Joined: Thu May 29, 2014 6:00 pm
- Location: Texas Hill Country
As the fox says,"Some days chicken, some days feathers."
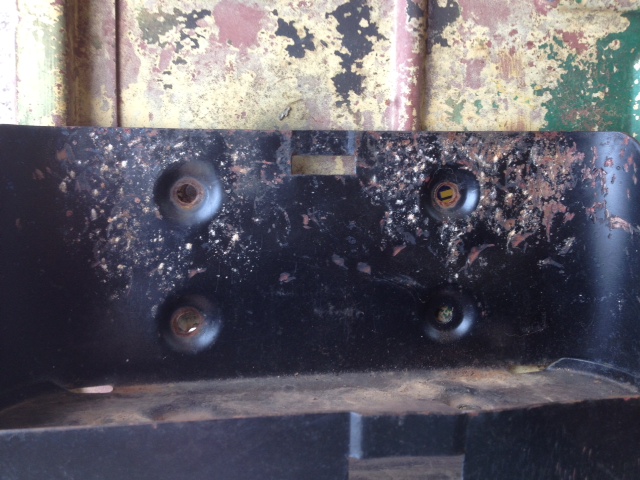
As bought my hammer had a gas can bracket bolted to the left rear quarter and valance panel. Don't ask..........
So I was cleaning up the tailgate, removing snaps, drilling out plugs and broken screws and bolts where there should be holes, grinding off what was left of the gas can strap bracket. You know, the usual things.
Grabbed that gas can bracket that came with the jeep and laid it on the tailgate......

http://willysmjeeps.com/v2/modules/gall ... acket.jpeg
One hole. Only one hole works. Of course everyone can line up one hole.
Sanded paint off a manufacturer stamp in the base.
Sturdy Products, Fresno, Ca.
Guess I'm in the market for a correct gas can mount.
Joy.
As bought my hammer had a gas can bracket bolted to the left rear quarter and valance panel. Don't ask..........
So I was cleaning up the tailgate, removing snaps, drilling out plugs and broken screws and bolts where there should be holes, grinding off what was left of the gas can strap bracket. You know, the usual things.
Grabbed that gas can bracket that came with the jeep and laid it on the tailgate......
http://willysmjeeps.com/v2/modules/gall ... acket.jpeg
One hole. Only one hole works. Of course everyone can line up one hole.
Sanded paint off a manufacturer stamp in the base.
Sturdy Products, Fresno, Ca.
Guess I'm in the market for a correct gas can mount.
Joy.
-
4x4M38
- Jeep Legend
- Posts: 3487
- Joined: Thu May 29, 2014 6:00 pm
- Location: Texas Hill Country
Stopped at a junk shop today that always seemed to be closed.
He had 5 G cans for 25 a piece. I'd bite if I didn't have one already.
On the shelf below was this weird, misshapen thing like a hollow
shoe on one end and a slot running down the thing. A 5/16 piece of
rod with rubber on it and a couple of metal pieces obviously held
something in place. Asked the guy if he would take 15 for it but he insisted
on 25. Then he asked me if I knew what it was.
I told him it was a rifle rack for a jeep.
Now I need to get my windshield back here from Georgia so I have
something to bolt it to
I need a clutch ASAP but I just couldn't pass this up.
B
-
4x4M38
- Jeep Legend
- Posts: 3487
- Joined: Thu May 29, 2014 6:00 pm
- Location: Texas Hill Country
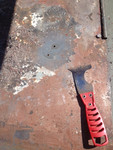
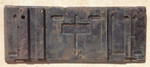
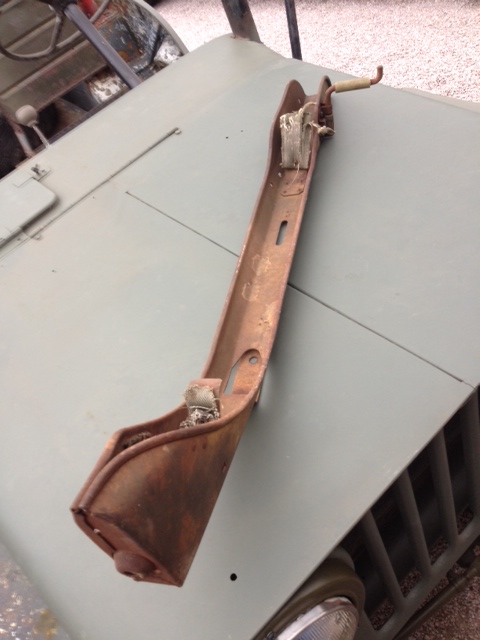
My 25 dollar rifle rack.

http://willysmjeeps.com/v2/modules/gall ... _rack.jpeg
A little cleanup, some new webbing, paint, brackets and I should be good to go!
I'll be needing dimensions for the brackets and that U shaped piece that goes inside towards the barrel. Bretto, I believe you made your brackets?
Now I just need my windshield that is sitting in Atlanta!