What is missing in the 5th photo down is the rubber insulator so the bright metal washer doesn't short the pin to the housing. This is more visible in the April 6th post, third photo down which shows the original rubber packard female socket re-installed so it properly insulates the pin. Then he used the standard GI method of adapting late Packard to Early Douglas with a short adapter lead.
If you want to make it look like his 5th photo in the Jan post. just be sure to sculpture a rubber/phenolic flanged washer that enters the hole and insulates the pin from the edge of the hole and that has a large upper flange that insulates the metal washer from the housing.
Hawkshadow's '52 M38CDN
-
wesk

- Site Administrator

- Posts: 16453
- Joined: Sun Apr 03, 2005 6:00 pm
- Location: Wisconsin
- Contact:
Wes K
45 MB, 51 M38, 54 M37, 66 M101A1, 60 CJ5, 76 DJ5D, 47Bantam T3-C & 5? M100
Mjeeps photo album: http://www.willysmjeeps.com/v2/modules. ... _album.php
45 MB, 51 M38, 54 M37, 66 M101A1, 60 CJ5, 76 DJ5D, 47Bantam T3-C & 5? M100
Mjeeps photo album: http://www.willysmjeeps.com/v2/modules. ... _album.php
-
Hawkshadow

- Jeep Enthusiast

- Posts: 310
- Joined: Tue Oct 09, 2012 6:00 pm
- Location: Toronto, Ontario, Canada
Good point Wes. The Packard female is essentially a rubber cup with a hole in the bottom for the pin. This provides complete insulation and keeps the pin, nut and washer mounting hardware from shorting out on the body.
I will say that reassembly can be difficult trying to keep the pin from spinning as you tighten the nut. Don't try to reef on it. Make sure the threads are clean and tighten just enough to keep the pin from wobbling.
Thanks also for pointing out the misassembly of the gauges. I suppose they were switched on mine at some point and I reassembled based on how it came apart.
Jordan
M38 CDN
52-30718
M38 CDN
52-30718
-
4x4M38

- Jeep Legend

- Posts: 3487
- Joined: Thu May 29, 2014 6:00 pm
- Location: Texas Hill Country
-
Hawkshadow
- Jeep Enthusiast
- Posts: 310
- Joined: Tue Oct 09, 2012 6:00 pm
- Location: Toronto, Ontario, Canada
I spent most of the afternoon working through making battery cables and hooking them up. Apologies for no pictures with this post, I will endeavor to take some tomorrow.
The stage was set to be an exciting moment - it would make noise for the first time since I started the project! Well, I hooked up the starter, gave the lever a press and nothing… I checked voltage and got 25+ volts at the starter. I checked for full depression of the lever and it looked good.
Finally, I tried reading resistance from the power-in stud to the support bracket. I figure that there should be an open circuit reading when idle, and closed reading when the pedal is depressed. Well, I was (am) getting a closed circuit all the time. The plunger is travelling freely and is not stuck.
I checked the forums here for the problem and plan to try just operating the plunger to see what I get. Any additional suggestions to try before I have to remove the whole thing?
Jordan
M38 CDN
52-30718
M38 CDN
52-30718
-
wesk
- Site Administrator
- Posts: 16453
- Joined: Sun Apr 03, 2005 6:00 pm
- Location: Wisconsin
- Contact:
Not sure what test points you are using. I assume since you have a M38 CDN you have the later closed nose starter.
Wes K
45 MB, 51 M38, 54 M37, 66 M101A1, 60 CJ5, 76 DJ5D, 47Bantam T3-C & 5? M100
Mjeeps photo album: http://www.willysmjeeps.com/v2/modules. ... _album.php
45 MB, 51 M38, 54 M37, 66 M101A1, 60 CJ5, 76 DJ5D, 47Bantam T3-C & 5? M100
Mjeeps photo album: http://www.willysmjeeps.com/v2/modules. ... _album.php
-
4x4M38
- Jeep Legend
- Posts: 3487
- Joined: Thu May 29, 2014 6:00 pm
- Location: Texas Hill Country
-
wesk
- Site Administrator
- Posts: 16453
- Joined: Sun Apr 03, 2005 6:00 pm
- Location: Wisconsin
- Contact:
Shouldn't hijack. Usually confuses original post. Photo provided was to discuss the starter. The engine is an M38A1 engine!
Wes K
45 MB, 51 M38, 54 M37, 66 M101A1, 60 CJ5, 76 DJ5D, 47Bantam T3-C & 5? M100
Mjeeps photo album: http://www.willysmjeeps.com/v2/modules. ... _album.php
45 MB, 51 M38, 54 M37, 66 M101A1, 60 CJ5, 76 DJ5D, 47Bantam T3-C & 5? M100
Mjeeps photo album: http://www.willysmjeeps.com/v2/modules. ... _album.php
-
4x4M38
- Jeep Legend
- Posts: 3487
- Joined: Thu May 29, 2014 6:00 pm
- Location: Texas Hill Country
-
Hawkshadow
- Jeep Enthusiast
- Posts: 310
- Joined: Tue Oct 09, 2012 6:00 pm
- Location: Toronto, Ontario, Canada
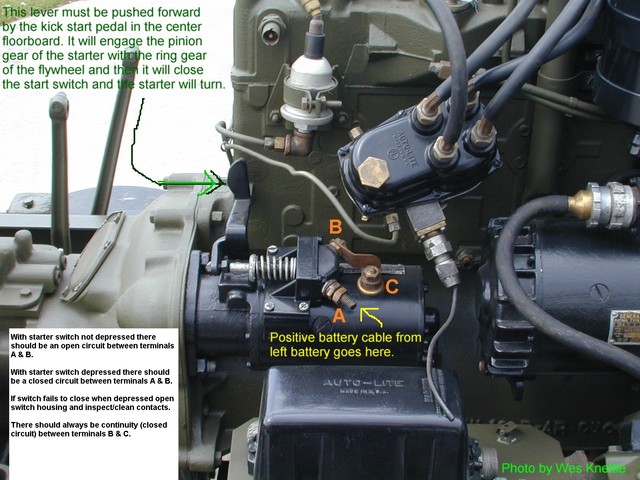
Thanks Wes! I was checking for continuity between point A in the picture and the starter support bracket on the underside figuring that the check would follow the path to ground. I tried it on another m38 present at the time and only had continuity between those points when the pedal was depressed. Tonight I will check between points A and B and let you know what I find. You are correct, it is a late model starter. Pics to follow.
Jordan
M38 CDN
52-30718
M38 CDN
52-30718
-
wesk
- Site Administrator
- Posts: 16453
- Joined: Sun Apr 03, 2005 6:00 pm
- Location: Wisconsin
- Contact:
Continuity between A and ground all the time would result in a smoke generating short circuit the instant you tried to connect a battery to terminal A.
Wes K
45 MB, 51 M38, 54 M37, 66 M101A1, 60 CJ5, 76 DJ5D, 47Bantam T3-C & 5? M100
Mjeeps photo album: http://www.willysmjeeps.com/v2/modules. ... _album.php
45 MB, 51 M38, 54 M37, 66 M101A1, 60 CJ5, 76 DJ5D, 47Bantam T3-C & 5? M100
Mjeeps photo album: http://www.willysmjeeps.com/v2/modules. ... _album.php
-
Hawkshadow
- Jeep Enthusiast
- Posts: 310
- Joined: Tue Oct 09, 2012 6:00 pm
- Location: Toronto, Ontario, Canada
First off, the promised picture update.
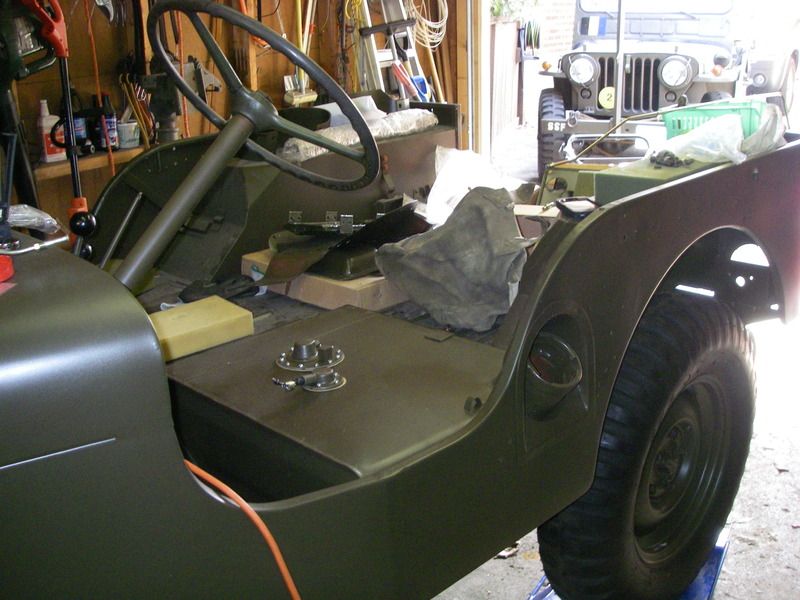
Installing the fuel tank.
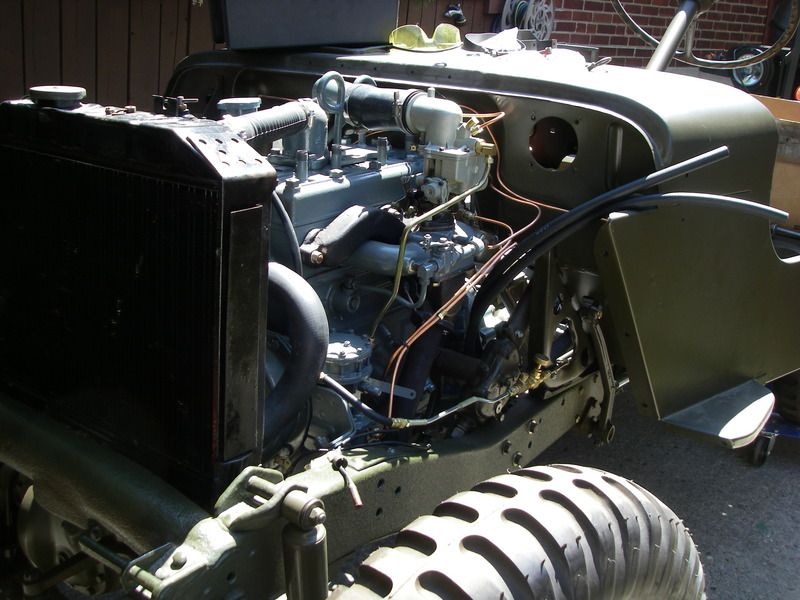
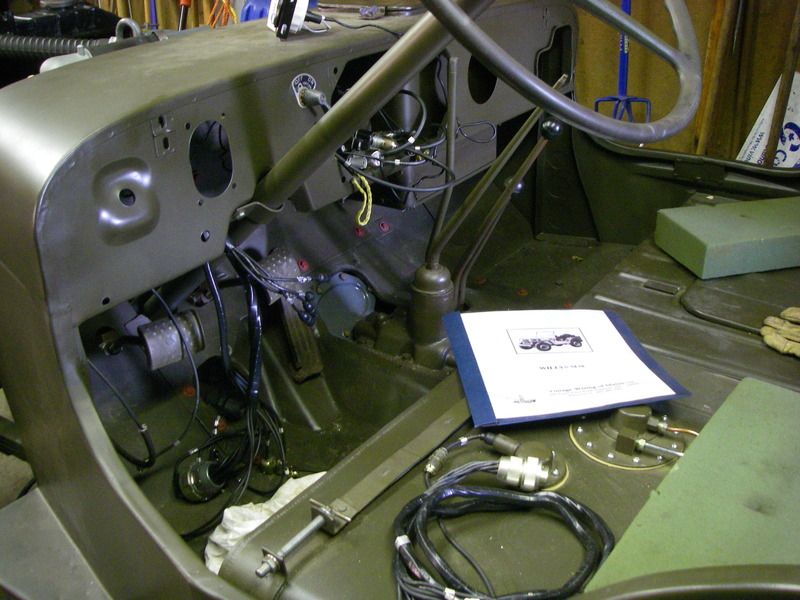
Fuel Lines, Vent Lines, and hoses to new dual master installed. The fuel lines were a pre-made set purchased earlier. For the most part the routing went well. I had to adjust the pump to carb line to route it away from the exhaust. The shut-off was bought separately, and the T which came with the line set was sloppy and oversized for comfort so I replaced that as well.
Vent Lines, Air cleaner, Battery cables installed.
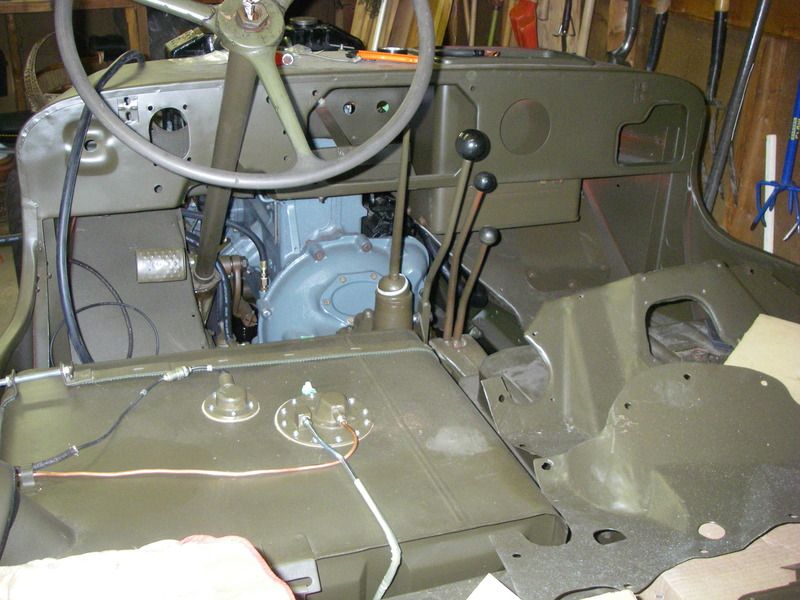
Interior. Fuel lines, vent, and sending electrical run. You can also see the hose hooked up for the mechanical oil pressure tester.
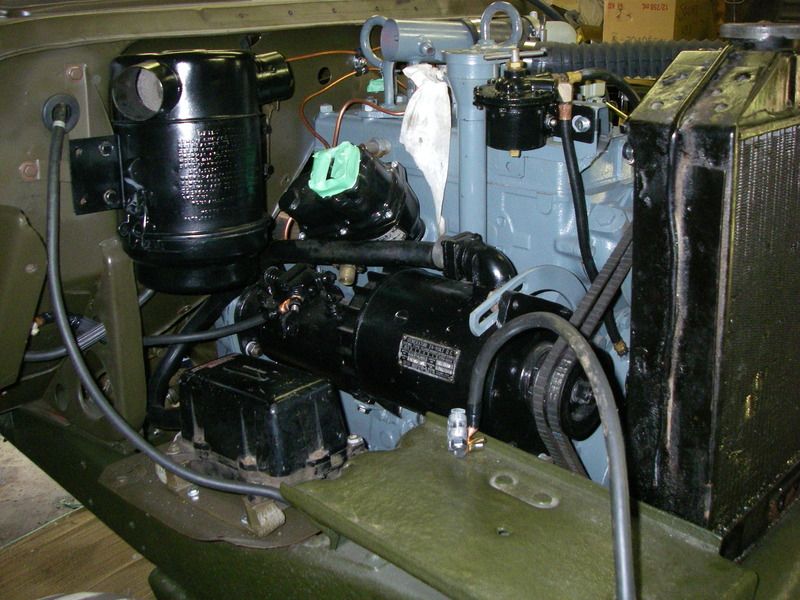
Now on to the starter..
I started by attempting to replicate the results from yesterday where I found continuity between point A and the support bracket bolt. I was unable to replicate this result.
I tried continuity between points A and B. There was no continuity when the switch was open, and there was continuity when the switch was closed.
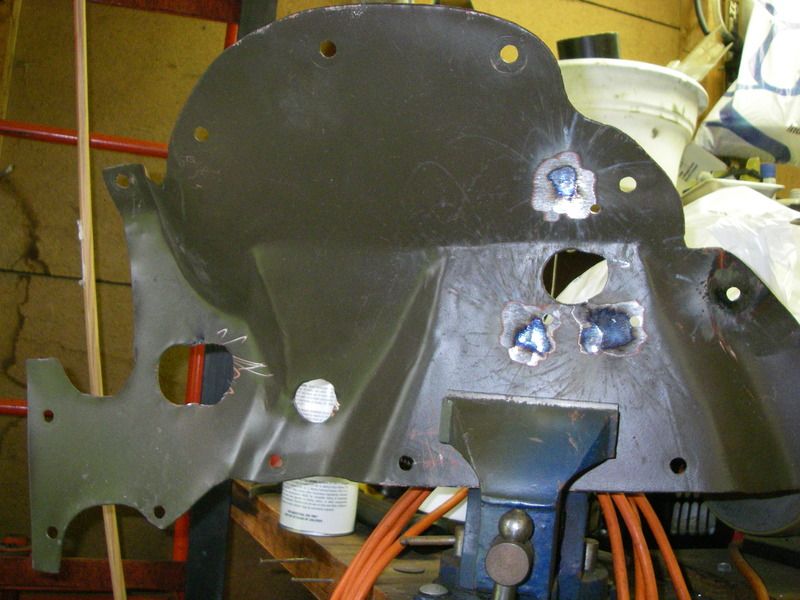
So, judging from this test the results seem promising. The difficulties in completing these initial tests probably came from trying to hold the test needles to painted surfaces that I needed to clean a little better, but mostly because the starter foot pedal isn't installed yet and I was trying to activate the switch with a 2x2. So, I tried installing the pedal, but the new floorboard is going to require some modification to get a proper fit - main hole needs to be moved right ~ 1" and corresponding mounting holes drilled.
I think it would be best to install the correct pedal and try the tests again before delving any deeper into the starter.
Installing the fuel tank.
Fuel Lines, Vent Lines, and hoses to new dual master installed. The fuel lines were a pre-made set purchased earlier. For the most part the routing went well. I had to adjust the pump to carb line to route it away from the exhaust. The shut-off was bought separately, and the T which came with the line set was sloppy and oversized for comfort so I replaced that as well.
Vent Lines, Air cleaner, Battery cables installed.
Interior. Fuel lines, vent, and sending electrical run. You can also see the hose hooked up for the mechanical oil pressure tester.
Now on to the starter..
I started by attempting to replicate the results from yesterday where I found continuity between point A and the support bracket bolt. I was unable to replicate this result.
I tried continuity between points A and B. There was no continuity when the switch was open, and there was continuity when the switch was closed.
So, judging from this test the results seem promising. The difficulties in completing these initial tests probably came from trying to hold the test needles to painted surfaces that I needed to clean a little better, but mostly because the starter foot pedal isn't installed yet and I was trying to activate the switch with a 2x2. So, I tried installing the pedal, but the new floorboard is going to require some modification to get a proper fit - main hole needs to be moved right ~ 1" and corresponding mounting holes drilled.
I think it would be best to install the correct pedal and try the tests again before delving any deeper into the starter.
Jordan
M38 CDN
52-30718
M38 CDN
52-30718
-
Hawkshadow
- Jeep Enthusiast
- Posts: 310
- Joined: Tue Oct 09, 2012 6:00 pm
- Location: Toronto, Ontario, Canada
I set out to install the starter pedal and found out that (as has been mentioned before) the repro MD Juan kits require some alterations. The opening for the brake pedal shaft had to be moved, starter column had to be moved, opening for accelerator pedal had to be moved, starter pedal had to be moved and starter bolt holes re-done completely.
Oh well, it was all worth it when I got everything in to place and..... (click link for video)
http://vid5.photobucket.com/albums/y190 ... 0potau.mp4
Great success! It makes noise for the first time! Turning a little slow, but I figure that's because it's all fresh inside. First I started by supplying power right to point B and the motor turned. I then hooked it up and tried with the pedal in place.
Jordan
M38 CDN
52-30718
M38 CDN
52-30718
-
Hawkshadow
- Jeep Enthusiast
- Posts: 310
- Joined: Tue Oct 09, 2012 6:00 pm
- Location: Toronto, Ontario, Canada
It has been a busy month! How time flies....
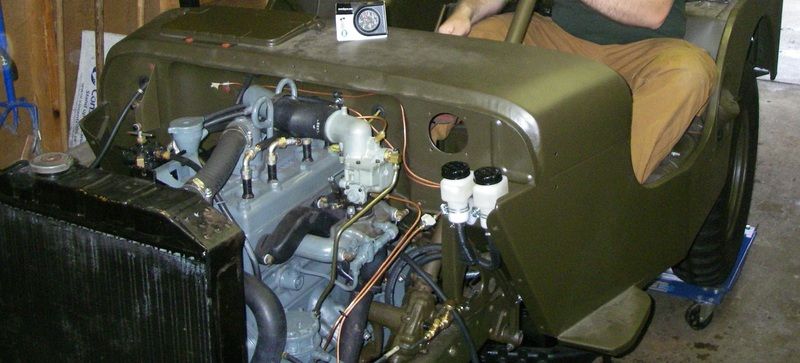
Well, after some timing work it fired up and ran. Not quite on its own as throttle had to be held in. Also had water coming past the bellows in the water pump. After a water pump rebuild and quite a bit of timing work:
http://vid5.photobucket.com/albums/y190 ... mrd738.mp4
It fires up with much less work, and runs and idles on its own. However, it is quite evident that the bearings in the generator were on their last legs. So, generator removed and in for rebuild.
In the mean time it's on to other projects. Brake reservoirs installed and brakes bled.
On to the harness!
Attaching the turn signal harness to the main harness took some time referencing the military master numbering chart (http://willysmjeeps.com/downloads/Elect ... System.pdf). This chart was also quite helpful when it came to numbers which didn't necessarily always match each other such as main harness to rear tail light connections.
Speaking of turn signal install; where is the standard mounting spot for the solid-state flasher? I have seen them mounted on the fender before, but my harness seems to be set up for an install to the firewall (which I have heard about but not seen...)
Stay tuned! Progress is coming fast and furious - much faster than I can stop myself to take pictures!
Jordan
M38 CDN
52-30718
M38 CDN
52-30718
-
4x4M38
- Jeep Legend
- Posts: 3487
- Joined: Thu May 29, 2014 6:00 pm
- Location: Texas Hill Country
Man,
You've had no lack of fun with that tub. God job sticking with it.
All of that work shows.
Check out Wes' photo page 2. Turn signals are there, although the photos you need are for the early setup.
http://www.willysmjeeps.com/v2/modules. ... _album.php
Again, nice work!
Brian
You've had no lack of fun with that tub. God job sticking with it.
All of that work shows.
Check out Wes' photo page 2. Turn signals are there, although the photos you need are for the early setup.
http://www.willysmjeeps.com/v2/modules. ... _album.php
Again, nice work!
Brian
-
Hawkshadow
- Jeep Enthusiast
- Posts: 310
- Joined: Tue Oct 09, 2012 6:00 pm
- Location: Toronto, Ontario, Canada
Thanks Brian. The tub has been a tough job in some ways. Quite a few holes have had to be opened up or moved slightly (or not so slighly in a few cases…)
The turn signal setup is the late transistorized setup with the solid state flasher. Unfortunately Wes' album doesn't have a mounting location for hat as it does for the earlier one.
The turn signal setup is the late transistorized setup with the solid state flasher. Unfortunately Wes' album doesn't have a mounting location for hat as it does for the earlier one.
Jordan
M38 CDN
52-30718
M38 CDN
52-30718