Getting ready to pull the motor, transmission, and transfer case as a unit.
Already removed carburetor, manifolds, fuel pump, and starter from the motor.
I'm thinking the best safest way to do this will be to bolt the head (using the old gasket and bolts/studs) back on the block along with the lifting hook plate. Maybe not torque it up to the full 65 foot-pounds.......something less --- like 50 foot-pounds be ok to do the job?
I thought about pulling it without the head and just rigging a sling around the block to the hoist. But I figured the load might not balance correctly like using the lift plate is supposed to do.
Your advice appreciated!
Blown Head Gasket - M38
-
RonD2
- Jeep Legend

- Posts: 2071
- Joined: Wed Oct 01, 2014 6:00 pm
- Location: South Carolina, Dorchester County
-
wesk

- Site Administrator

- Posts: 16460
- Joined: Sun Apr 03, 2005 6:00 pm
- Location: Wisconsin
- Contact:
The geometry of the hoist plate is based on all those things you listed still being installed!
No reason the hoist plate can't be attached directly to the block without the head.
Are you planning on rebuilding the tranny & transfer?
No reason the hoist plate can't be attached directly to the block without the head.
Are you planning on rebuilding the tranny & transfer?
Wes K
45 MB, 51 M38, 54 M37, 66 M101A1, 60 CJ5, 76 DJ5D, 47Bantam T3-C & 5? M100
Mjeeps photo album: http://www.willysmjeeps.com/v2/modules. ... _album.php
45 MB, 51 M38, 54 M37, 66 M101A1, 60 CJ5, 76 DJ5D, 47Bantam T3-C & 5? M100
Mjeeps photo album: http://www.willysmjeeps.com/v2/modules. ... _album.php
-
RonD2
- Jeep Legend
- Posts: 2071
- Joined: Wed Oct 01, 2014 6:00 pm
- Location: South Carolina, Dorchester County
-
RonD2
- Jeep Legend
- Posts: 2071
- Joined: Wed Oct 01, 2014 6:00 pm
- Location: South Carolina, Dorchester County
Ok, just double-checking here.
The front engine lift plate bolt uses the same hole in the block that's cracked. Still ok to bolt the plate directly to the block? I'd hate to make things worse, if that's possible.
The front engine lift plate bolt uses the same hole in the block that's cracked. Still ok to bolt the plate directly to the block? I'd hate to make things worse, if that's possible.
Ron D.
1951 M38 Unknown Serial Number
1951 M100 Dunbar Kapple 01169903 dod 5-51
“The only good sports car that America ever made was the Jeep."
--- Enzo Ferrari
1951 M38 Unknown Serial Number
1951 M100 Dunbar Kapple 01169903 dod 5-51
“The only good sports car that America ever made was the Jeep."
--- Enzo Ferrari
-
wesk
- Site Administrator
- Posts: 16460
- Joined: Sun Apr 03, 2005 6:00 pm
- Location: Wisconsin
- Contact:
If you weren't so greedy and were just pulling the block I would say not an issue. Adding the weight of the transfer & tranny may not go well. Adding the head is not going to help or strengthen the cracked stud hole.
Wes K
45 MB, 51 M38, 54 M37, 66 M101A1, 60 CJ5, 76 DJ5D, 47Bantam T3-C & 5? M100
Mjeeps photo album: http://www.willysmjeeps.com/v2/modules. ... _album.php
45 MB, 51 M38, 54 M37, 66 M101A1, 60 CJ5, 76 DJ5D, 47Bantam T3-C & 5? M100
Mjeeps photo album: http://www.willysmjeeps.com/v2/modules. ... _album.php
-
RonD2
- Jeep Legend
- Posts: 2071
- Joined: Wed Oct 01, 2014 6:00 pm
- Location: South Carolina, Dorchester County
-
wesk
- Site Administrator
- Posts: 16460
- Joined: Sun Apr 03, 2005 6:00 pm
- Location: Wisconsin
- Contact:
The lift plate should handle the block alone with no problem as is. A simple sling will give you a real battle trying to lift the now very light block with the very heavy tranny & transfer hanging on the back.
I suggest you put a jack under the bell housing, undo the bell bolts and lift the bare block out. Then take the cherry picker over the center of the tranny/transfer and while it's sitting on the jack take some weight off with the picker and unbolt the driveshafts and crossmember and roll her out from under the jeep.
I suggest you put a jack under the bell housing, undo the bell bolts and lift the bare block out. Then take the cherry picker over the center of the tranny/transfer and while it's sitting on the jack take some weight off with the picker and unbolt the driveshafts and crossmember and roll her out from under the jeep.
Wes K
45 MB, 51 M38, 54 M37, 66 M101A1, 60 CJ5, 76 DJ5D, 47Bantam T3-C & 5? M100
Mjeeps photo album: http://www.willysmjeeps.com/v2/modules. ... _album.php
45 MB, 51 M38, 54 M37, 66 M101A1, 60 CJ5, 76 DJ5D, 47Bantam T3-C & 5? M100
Mjeeps photo album: http://www.willysmjeeps.com/v2/modules. ... _album.php
-
RonD2
- Jeep Legend
- Posts: 2071
- Joined: Wed Oct 01, 2014 6:00 pm
- Location: South Carolina, Dorchester County
-
RonD2
- Jeep Legend
- Posts: 2071
- Joined: Wed Oct 01, 2014 6:00 pm
- Location: South Carolina, Dorchester County
Finally got the power pack pulled, and the motor bolted up to a stand. Getting ready to pull the valves, and right after that the rest of the guts (oil pump, pistons, cam, and crankshaft). I have a valve spring compressor and a ridge reamer. I've been carefully studying the TM9-1804A engine manual along the way, but remember I'm a rookie and this is my first time being this far into a motor --- so be gentle. 
Quick question on the best way to remove the crankshaft pulley nut? Electric impact wrench? (Have to borrow one of those from a friend) Or, would it be ok to wedge a couple of the flywheel bolts against the back of the stand mount and just use a hand ratchet and socket to break it loose? Six of one, half-dozen of the other? This is no time for me to be stoopid --- I already managed to have an ear break off my early bell housing...
I also forgot to mark the flywheel's position on the crankshaft for re-assembly in the same position. I'm going to have the machine shop resurface it and make sure it's balanced, so I'm guessing this won't be an issue.
Thanks for the advice!
Ron D.
1951 M38 Unknown Serial Number
1951 M100 Dunbar Kapple 01169903 dod 5-51
“The only good sports car that America ever made was the Jeep."
--- Enzo Ferrari
1951 M38 Unknown Serial Number
1951 M100 Dunbar Kapple 01169903 dod 5-51
“The only good sports car that America ever made was the Jeep."
--- Enzo Ferrari
-
wesk
- Site Administrator
- Posts: 16460
- Joined: Sun Apr 03, 2005 6:00 pm
- Location: Wisconsin
- Contact:
The impact gun is the safe answer. After a dozen or more wheel removals in the garage most folks already own one (air or electric). If you still choose to trap the crank with a bolt at the back then don't use any of the flywheel bolts you intend to use for the final installation.
Because of the dowell bolts the flywheel will only mount four ways. Frontwards and backwards and with #1 TDC the timing marks can end up on the left or right side of the engine. I would shoot for machined surface facing rear and the timing marks with #1 TDC on the right!
Because of the dowell bolts the flywheel will only mount four ways. Frontwards and backwards and with #1 TDC the timing marks can end up on the left or right side of the engine. I would shoot for machined surface facing rear and the timing marks with #1 TDC on the right!
Last edited by wesk on Sun Dec 30, 2018 11:34 pm, edited 1 time in total.
Wes K
45 MB, 51 M38, 54 M37, 66 M101A1, 60 CJ5, 76 DJ5D, 47Bantam T3-C & 5? M100
Mjeeps photo album: http://www.willysmjeeps.com/v2/modules. ... _album.php
45 MB, 51 M38, 54 M37, 66 M101A1, 60 CJ5, 76 DJ5D, 47Bantam T3-C & 5? M100
Mjeeps photo album: http://www.willysmjeeps.com/v2/modules. ... _album.php
-
RonD2
- Jeep Legend
- Posts: 2071
- Joined: Wed Oct 01, 2014 6:00 pm
- Location: South Carolina, Dorchester County
Thanks Wes. Gentle enough. 
I went and bought a 1/2-inch drive electric impact wrench today, and got lucky, on sale. I had to borrow my friend's wrench once before....asking twice means I need to get one of my own. Thanks for the reminder.
The manuals are pretty clear about orienting the flywheel correctly, thanks. I may replace the flywheel bolts anyway just to be safe. Maybe questions about that later.....
Right now I'm more than a little concerned about all the serviceability standards and assembly measurements that require tools I don't have that run into 3 and 4 decimal places to get right. I know the machine shop will assist with some, but it's all on me in the end. Trusting off-shore un-calibrated tools to measure that small gives me the Willys.
Ron D.
1951 M38 Unknown Serial Number
1951 M100 Dunbar Kapple 01169903 dod 5-51
“The only good sports car that America ever made was the Jeep."
--- Enzo Ferrari
1951 M38 Unknown Serial Number
1951 M100 Dunbar Kapple 01169903 dod 5-51
“The only good sports car that America ever made was the Jeep."
--- Enzo Ferrari
-
rgmutchler
- Jeep Enthusiast

- Posts: 350
- Joined: Sat Sep 27, 2008 6:00 pm
- Location: Caldwell, Texas
-
RonD2
- Jeep Legend
- Posts: 2071
- Joined: Wed Oct 01, 2014 6:00 pm
- Location: South Carolina, Dorchester County
Thanks RG, that's pretty much what I'm thinking too. I'm challenged enough by the skill it takes to build a solid, reliable motor. And without having to back-track on account of inferior or used parts that a more experienced guy would know better than to use. The odds of me doing a correct assembly with good parts is going to be challenging enough!
Ron D.
1951 M38 Unknown Serial Number
1951 M100 Dunbar Kapple 01169903 dod 5-51
“The only good sports car that America ever made was the Jeep."
--- Enzo Ferrari
1951 M38 Unknown Serial Number
1951 M100 Dunbar Kapple 01169903 dod 5-51
“The only good sports car that America ever made was the Jeep."
--- Enzo Ferrari
-
wesk
- Site Administrator
- Posts: 16460
- Joined: Sun Apr 03, 2005 6:00 pm
- Location: Wisconsin
- Contact:
RG,
Your email is bouncing the mjeep's web site's automated emails to you. Check your mail system filters and spam controls. If necessary just add the web sites admin email address to your contact list. admin@willysmjeeps.com
Your email is bouncing the mjeep's web site's automated emails to you. Check your mail system filters and spam controls. If necessary just add the web sites admin email address to your contact list. admin@willysmjeeps.com
Wes K
45 MB, 51 M38, 54 M37, 66 M101A1, 60 CJ5, 76 DJ5D, 47Bantam T3-C & 5? M100
Mjeeps photo album: http://www.willysmjeeps.com/v2/modules. ... _album.php
45 MB, 51 M38, 54 M37, 66 M101A1, 60 CJ5, 76 DJ5D, 47Bantam T3-C & 5? M100
Mjeeps photo album: http://www.willysmjeeps.com/v2/modules. ... _album.php
-
RonD2
- Jeep Legend
- Posts: 2071
- Joined: Wed Oct 01, 2014 6:00 pm
- Location: South Carolina, Dorchester County
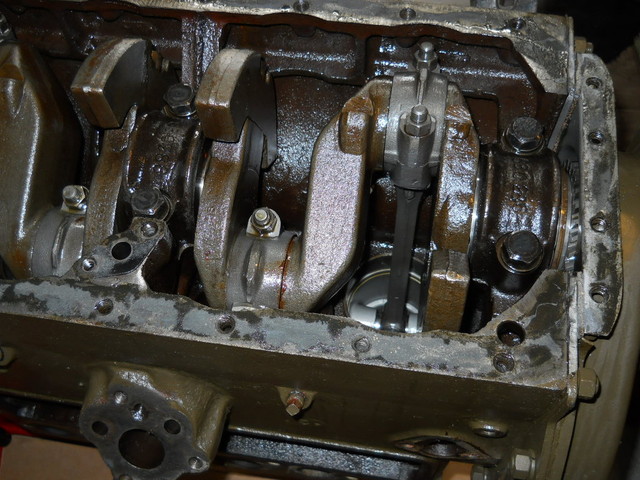
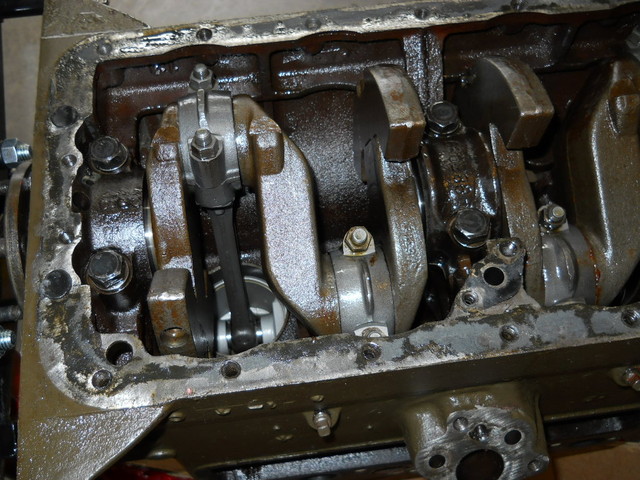
Balmy 55 degrees in South Carolina today.  I'm about half-way through the disassembly now......valves out anyway. Motor has been sleeved to standard (pistons marked "STD"). Before I get started with removing the crank and camshafts tomorrow I thought I'd pause, post a few photos with my observations and ask a couple of questions.
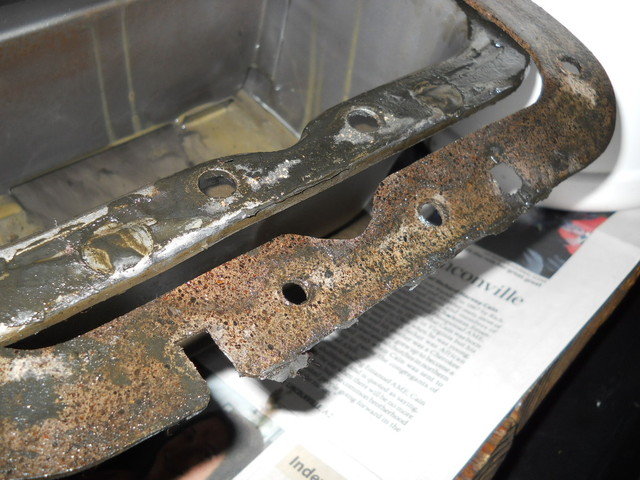
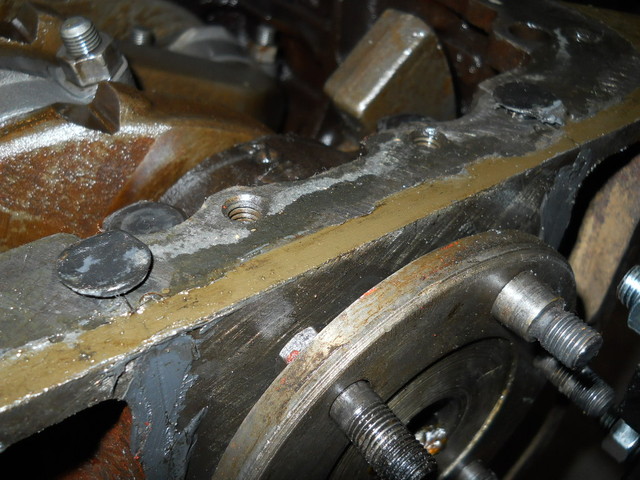
I noticed the rear of the oil pan gasket at the rear main seal has been cut out by hand over where the ends of the seal protrude. Doesn't seem normal to me, and nothing in the manuals or forums about it. What are these "buttons" on the end of the seal? I'm guessing I don't have a rope seal but rather the neoprene rubber seal.
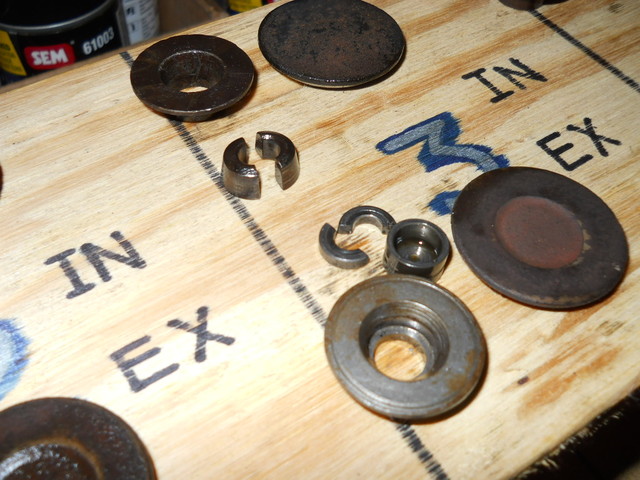
The valves came out ok, a few were sticky, I'm guessing mostly due to the delay in me taking it apart, and the water contaminated oil. I was thinking the locks would be the same on both intake and exhaust, but they aren't. The removable "cup" on the bottom of the exhaust valve has me confused.....not in the TM that I found. What is it called?
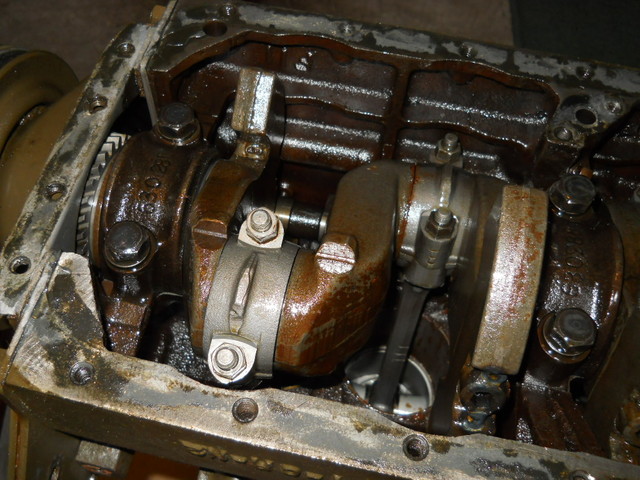
I noticed no lock washers on the bolts to the oil pick-up tube inside the pan. Also, there are no jam nuts ("PAL nuts") on the connecting rod bolts. Still studying the manual (for the 5th time) for other possible issues before I proceed.

How is the skid plate attached to the oil pan? Glue? I see no indication of fasteners or welding and can't find anything about it in the TM's. The inside pan is in great shape, but thought I'd check underneath the pan if it's not a major exercise to remove and re-attach the skid plate.
Once I get the crankshaft out, should it be handled, transported, and stored vertically? I've see posts that say vertical, horizontal braced, and don't matter.. I just don't want to damage it back and forth to the machine shop and until I get it all bolted together again.
As always, your advice is appreciated.
I noticed the rear of the oil pan gasket at the rear main seal has been cut out by hand over where the ends of the seal protrude. Doesn't seem normal to me, and nothing in the manuals or forums about it. What are these "buttons" on the end of the seal? I'm guessing I don't have a rope seal but rather the neoprene rubber seal.
The valves came out ok, a few were sticky, I'm guessing mostly due to the delay in me taking it apart, and the water contaminated oil. I was thinking the locks would be the same on both intake and exhaust, but they aren't. The removable "cup" on the bottom of the exhaust valve has me confused.....not in the TM that I found. What is it called?
I noticed no lock washers on the bolts to the oil pick-up tube inside the pan. Also, there are no jam nuts ("PAL nuts") on the connecting rod bolts. Still studying the manual (for the 5th time) for other possible issues before I proceed.
How is the skid plate attached to the oil pan? Glue? I see no indication of fasteners or welding and can't find anything about it in the TM's. The inside pan is in great shape, but thought I'd check underneath the pan if it's not a major exercise to remove and re-attach the skid plate.
Once I get the crankshaft out, should it be handled, transported, and stored vertically? I've see posts that say vertical, horizontal braced, and don't matter.. I just don't want to damage it back and forth to the machine shop and until I get it all bolted together again.
As always, your advice is appreciated.
Ron D.
1951 M38 Unknown Serial Number
1951 M100 Dunbar Kapple 01169903 dod 5-51
“The only good sports car that America ever made was the Jeep."
--- Enzo Ferrari
1951 M38 Unknown Serial Number
1951 M100 Dunbar Kapple 01169903 dod 5-51
“The only good sports car that America ever made was the Jeep."
--- Enzo Ferrari